- ホーム
- /
- 投稿記事

コメントありがとうございます。

組織のために Webex Calling を設定する
 この記事の内容
 フィードバックがある場合
Control Hub で Webex Calling のために組織をカスタマイズする初回セットアップ ウィザードを使用して最初の場所をアクティブ化した後、場所を設定および管理できます。
初回セットアップ ウィザードで通話設定をセットアップする
Webex Calling サービスを稼働させるための最初のステップは、初回セットアップ ウィザード (FTSW) を完了することです。最初のロケーションの FTSW が完了した後では、追加のロケーションに対して完了する必要がありません。
| 1 |
受け取ったウェルカム メールのはじめにリンクをクリックします。 管理者のメールアドレスが、自動的に、Control Hub にサインインするためのメール アドレスとして使用されます。サインインすると、管理者パスワードを作成するように求められます。サインインすると、セットアップ ウィザードが自動的に開始します。 |
| 2 |
利用規約を見直して、承諾します。 |
| 3 |
プランを見直して、[はじめに] をクリックします。 アカウント マネージャは FTSW の最初の手順をアクティブにする責任があります。[使い始める] を選択した時に、「通話をセットアップできません」という通知を受け取った場合は、アカウント マネージャーに連絡してください。 |
| 4 |
データ センターがマッピングする国を選択し、顧客の連絡先と顧客アドレス情報を入力します。 |
| 5 |
[次へ: デフォルトのロケーション |
| 6 |
次のオプションから選択します:
|
| 7 |
このロケーションに適用する次の選択を行います。
|
| 8 |
[次へ] をクリックします。 |
| 9 |
利用可能な Cisco Webex SIP アドレスを入力し、[次へ] をクリックし、[完了] を選択します。 |
ロケーションを追加する
始める前に
新しいロケーションを作成するには、以下の情報を指定します。
-
ロケーションの住所
-
希望する電話番号(オプション)
| 1 |
https://admin.webex.comの Control Hub にログインし、 。 新しい場所は、初回セットアップ ウィザードを使用して選択した国に対応する地域データ センターでホストされます。 |
| 2 |
ロケーションを設定します。
|
| 3 |
[保存 ] をクリックしてから、[ はい/いいえ ] を選択して、現在または後でロケーションに番号を追加します。 |
| 4 |
[はい] をクリック した場合、次のいずれかのオプションを選択します。
PSTN オプションの選択は各ロケーション レベルで行います (各ロケーションには PSTN オプションが 1 つしかありません)。展開に対して必要な数のオプションを組み合わせることができますが、各ロケーションには 1 つのオプションとなります。PSTN オプションを選択してプロビジョニングしたら、ロケーションの PSTN プロパティで [管理] をクリックすると、オプションを変更できます。ただし、Cisco PSTN などの一部のオプションは、別のオプションが割り当てられた後は使用できない場合があります。ガイダンスについてはサポートケースを開いてください 。 |
| 5 |
番号を今すぐに有効にするか、または後で有効にするかを選択します。 |
| 6 |
統合されていない CCP またはプレミス ベースの PSTN を選択した場合は、電話番号をコンマ区切り値として入力し、[検証] をクリックします。 特定のロケーションのための番号が追加されます。有効なエントリは [検証済みの番号] フィールドに移動し、無効なエントリは [番号の追加] フィールドに残り、エラー メッセージが表示されます。 番号の書式は、ロケーションの所在する国に応じ、ダイヤリングに関する地元の要件に従って定められます。たとえば、国コードが必要な場合には、コードを付けて入力することも、コードなしで入力してからコードが自動的に先頭に追加されるようにすることもできます。 |
| 7 |
[保存] をクリックします。 |
次に行うこと
ロケーションを作成した後、そのロケーションの緊急 911 サービスを有効にすることができます。詳細については「Webex Calling の RedSky 緊急 911 サービス」を参照してください。
場所を削除する
開始する前に
使用されていない場所や、関連付けられているユーザーとワークスペースを削除した後に、誤って構成された場所を削除できます。場所を削除すると、割り当てられているサービスと番号がすべて削除されます。
ロケーションに関連付けられているユーザーとワークスペースのリストを取得します。 をクリックし、ドロップダウン メニューから削除する場所を選択します。ロケーションを削除する前に、これらのユーザーとワークスペースを削除する必要があります。
この場所に関連付けられた番号はすべて PSTN プロバイダーに返却され、それらの番号の所有権は失われることに注意してください。
| 1 |
https://admin.webex.comのコントロールハブにログインし、 。 |
| 2 |
削除したい場所の横にある アクション 列をクリックします。 |
| 3 |
[場所 の削除] を選択し、その場所を削除します。 通常、場所を完全に削除するには数分かかりますが、最大 1 時間かかる場合があります。場所名の横をクリックし、 削除ステータスを選択すると、ステータスを確認できます。 |
既存のロケーションを更新する
作成した後PSTNのセットアップ、名前、タイムゾーン、言語を変更できます。新しい言語は新しいユーザーとデバイスにのみ適用されることに注意してください。既存のユーザーおよびデバイスは古い言語を使用し続けます。
既存のロケーションについては、緊急時の 911 サービスを有効にすることができます。詳細については「Webex Calling の RedSky 緊急 911 サービス」を参照してください。
| 1 | |
| 2 |
。 ロケーションの隣に [警告] 記号が表示される場合、そのロケーションの電話番号をまだ設定していないという意味です。その番号を設定するまで、通話の送受信が行えなんす。 |
| 3 |
(オプション) [PSTN 接続] の下で、すでに設定されているものに応じて、[クラウド接続 PSTN] または [プレミスベースの PSTN](ローカル ゲートウェイ) のいずれかを選択します。[管理] をクリックして設定を変更してから、[続行] を選択することにより、関連するリスクを承認します。以下のオプションのいずれかを選択して、[保存] クリックします。
移行するには、以下の 「 Cisco 通話プランへの移行 」を参照してください。 |
| 4 |
場所については、ドロップダウンリストから メイン番号 を選択します。 メイン番号を自動応答または場所内の他の宛先に割り当てることができるため、外部からの発信者は適切な宛先にルーティングされます。 トランクや、ユーザー、ワークスペース、仮想回線、機能などの内線のみのエンティティが存在する場合、場所にメイン番号を割り当てることが必須です。メイン番号がないとトランクを使用できず、内線のみのエンティティは内部または外部の通話を発信または受信できません。その場所にいるユーザーは、PSTN 通話を行うときに、この番号を外部発信者 ID として使用することもできます。 場所のメイン番号としてフリーダイヤル番号を選択した場合は、フリーダイヤル番号には緊急サービスのアドレスがないため、その場所の緊急コールバック番号を更新することをお勧めします。詳細については、「ロケーションの緊急コールバック番号を設定する」を参照してください。 |
| 5 |
(オプション) [緊急コール] で[緊急時のロケーション識別子] を選択して、このロケーションに割り当てることができます。 この設定はオプションで、必要な国にのみ適用されます。 一部の国 (例: フランス) の規制要件は、緊急電話を行い、緊急連絡時にセルの識別を確立するためのセルに関する規制要件であり、緊急権限によって利用可能になります。米国やカナダなどの他の国では、他の方法を使用して位置特定を実装しています。詳細については、「緊急時通話の強化 」を参照してください。 緊急通報プロバイダーはアクセス ネットワークに関する情報を必要とする場合があります。これは、新しいプライベート SIP 拡張ヘッダー P-Access-Network-Info を定義することによって実現されます。ヘッダーにはアクセスネットワークに関連する情報が含まれます。 場所に緊急ロケーション識別子を設定すると、場所の値は SIP メッセージの一部としてプロバイダーに送信されます。緊急通話プロバイダーに連絡して、この設定が必要で、緊急通話プロバイダーから提供された値を使用する必要がある場合はそれを確認してください。」 |
| 6 |
このロケーションでユーザーがボイスメールをチェックするために呼び出せる [ボイスメール番号] を選択します。 |
| 7 |
(オプション) ロケーション ページの上部にある鉛筆アイコンをクリックし、必要に応じて [ロケーションの名前]、[アナウンス言語]、[メール言語]、[タイムゾーン]、[住所] を変更し、[保存] をクリックします。 [アナウンス言語] の変更は、このロケーションに追加された新規ユーザーや機能に対して直ちに有効になります。既存のユーザーや機能のアナウンス言語も変更する必要がある場合は、プロンプトが表示されたら、[既存のユーザーとワークスペースの変更] または [既存機能の変更] を選択します。[適用] をクリックします。[タスク] ページで進捗状況を確認できます。これが完了するまでは、これ以上変更を加えることはできません。 ロケーションの [タイム ゾーン] を変更しても、このロケーションに関連する機能のタイム ゾーンは更新されません。自動応答、ハント グループ、通話キューなどの機能のタイム ゾーンを編集するには、タイム ゾーンを更新する特定の機能の [全般設定 領域に移動し、そこで編集して保存します。 |
Cisco 通話プランへの移行
前提条件
移行を開始する前に、その場所にあるすべての電話番号 (TN) を確認してください。所有しなくなった番号や移行したくない番号は削除または移動します。移行前にこれらの番号が削除されていない場合は、移行をキャンセルして再開するか、サポート チームに連絡して問題を解決する必要があります。
既存の場所の PSTN 接続を Cisco PSTN に変更できます。たとえば、構内ベースの PSTN (ローカル ゲートウェイ) または非統合 CCP 接続の場所を Cisco PSTN に変更できます。Cisco PSTN は、Cisco のクラウド PSTN ソリューションを提供します。
すべてのポータブル番号は、移行が完了する予定時間中の短い中断を除き、引き続き機能します。
また、PSTN 接続の移行が行われている場所に対しては、番号管理の変更を行うことはできません。ただし、既存の番号は引き続き機能し、引き続き場所に番号を割り当てたり、割り当て解除したりすることができます。その場所の番号を追加、削除、移動することはできません。このプロセス中に、ルーティング プロファイルが自動的に更新され、Cisco PSTN が有効になります。
現在、既存の場所の PSTN 接続を Cisco PSTN に変更する機能は、日本地域ではサポートされていません。
PSTN 接続を変更する際に、通話ライセンスを含むサブスクリプションが適用され、課金サービスに通知が届きます。
制限:
-
統合された IntelePeer ロケーションから Cisco PSTN ロケーションへの移行はサポートされていません
-
専用インスタンスの場所はCisco PSTNに移行できません
-
PSTN 接続の変更には複数のポート注文が必要になる場合があります。そうであれば、これらの注文はリンクされて同時に完了します。1 つのポート注文の日付変更またはキャンセルは、接続変更にリンクされているすべてのポート注文に適用する必要があります。
-
ある場所で初めて Cisco PSTN 接続を設定するときに、緊急サービス アドレス (ESA) 免責事項に署名するには、顧客管理者アカウントが必要です。システムでは、パートナー管理者またはクロス起動顧客管理者が免責事項に署名することはできません。サポートされている国の ESA 免責事項に署名すると、パートナー管理者は通常どおり移行を操作できるようになります。
PSTN接続の変更を開始する方法
開始する前に
E911 契約に署名する必要があるため、PSTN 接続の変更を開始できるのは顧客管理者のみです。
| 1 | |
| 2 |
。 |
| 3 |
PSTN 接続を Cisco PSTN に変更する場所を選択します。 |
| 4 |
通話 タブに移動し、オンプレミス PSTN または非統合クラウド接続 PSTN の横にある 管理 オプションをクリックします。 |
| 5 |
接続タイプ [ の横にある 編集。 |
| 6 |
Cisco 通話プラン カードを選択し、この場所のユーザーに Cisco 通話プランを割り当てるサブスクリプションを選択します。[次へ] をクリックします。 |
| 7 |
確認のための接続変更ページが表示されます。 次へ をクリックし、番号のポートの準備状況を確認します。 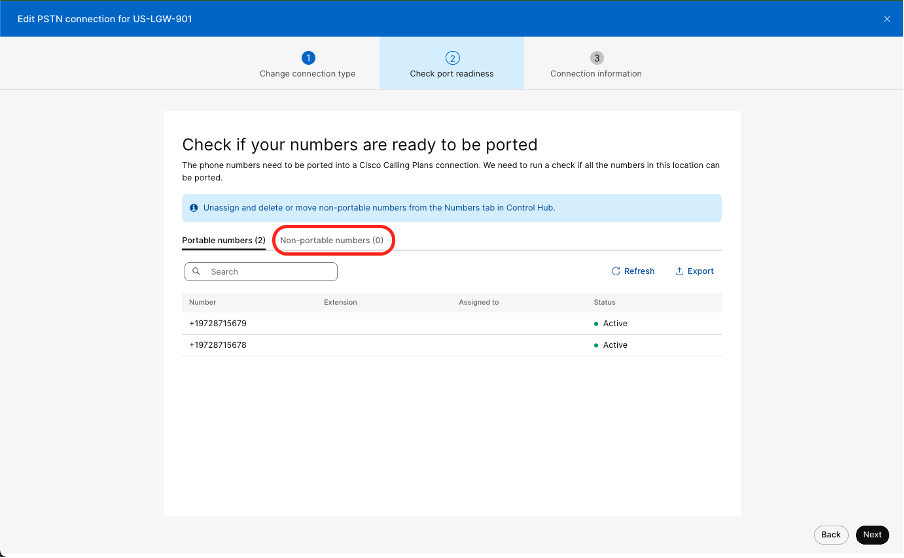 [次へ] ボタンは、リスト内のすべての番号が移植可能である場合にのみ有効になります。以下の指針をお読みください:
|
| 8 |
次へ をクリックし、契約情報を入力します。  これは、Cisco 通話プラン (米国) を使用しているすべての場所の主な契約連絡先です。この連絡先への変更は、Cisco 通話プラン (米国) を使用している他のすべての場所に適用されます。 |
| 9 |
[次へ] をクリックします。その場所の契約情報を保存するかどうかを確認する通知が表示されます。 はい、変更します。を選択します。 |
| 10 |
緊急サービスアドレスを入力し、 保存をクリックします。 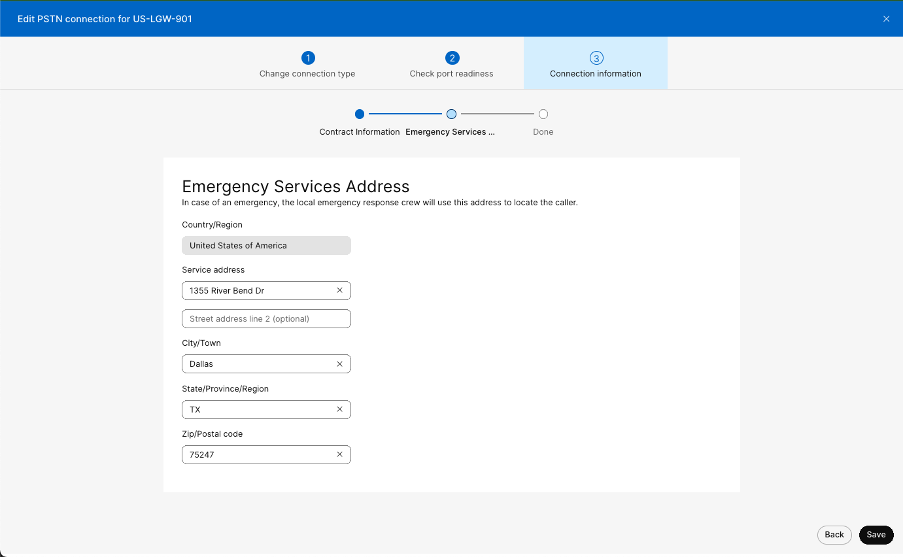 緊急時には、地元の緊急対応チームがこの住所を使用して発信者の位置を特定します。 |
| 11 |
作成されたポートの数を示す概要ページが表示されます。注文が 1 つしかない場合は、 追加情報を入力するという追加の手順が表示されます。複数の注文の場合は、上部にある注文セレクターを使用して注文間を移動できます。 次へ をクリックし、詳細を入力してポート ウィザードを完了します。 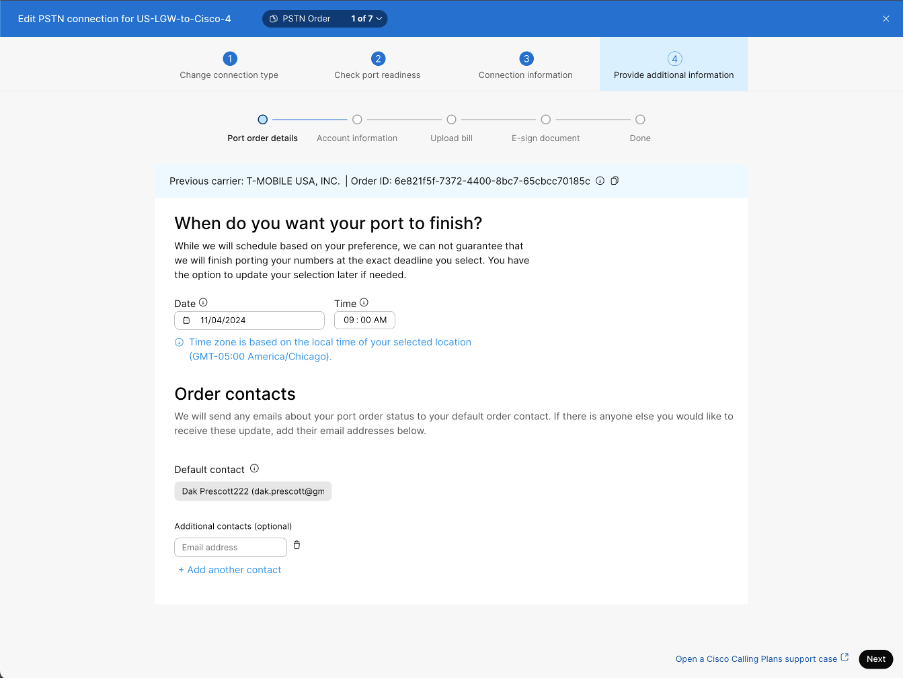 単一の PSTN 移行リクエストに対してすべての情報が提供されると、注文は一度に送信されます。デフォルトでは、確定注文コミットメント日付はすべての注文で一貫しています。最後にリンクされた注文が完全に移行された後、PSTN 接続の変更が自動的に適用されます。
移行の詳細は タブ。注文 ID を選択すると、サイド パネル ビューで注文の詳細が表示されます。PSTN 接続の変更から作成された注文のタイプは、「PSTN の変更」として表示されます。 |
Webex Calling ダイヤルプランを構成する
アウトバウンド ダイヤル コードダイヤル プラン使用してWebex Callingシステムの設定をコントロールできます。内線の長さ、ルーティング プレフィックス、およびダイヤル設定 (内部と外部) が、ユーザーのダイヤル習慣に適合するようにカスタマイズします。
これらの設定は社内ダイヤルに適用されるものであり、最初のセットアップ ウィザードでも設定できます。ダイヤル プランを変更すると、コントロール ハブのサンプル番号が更新され、これらの変更が反映されます。
場所ごとに発信通話権限を設定できます。発信通話のアクセス許可を構成するには、 これらの手順 を参照してください。
| 1 |
Control Hubにサインインし、 をクリックし、 内線ダイヤルまでスクロールします。 |
| 2 |
必要に応じて、次のオプションのダイヤル設定を行います。
|
| 3 |
特定の場所の内部ダイヤルを指定します。 をクリックし、リストから場所を選択して 通話をクリックします。 ダイヤルまでスクロールし、必要に応じて内部ダイヤルを変更します。
|
| 4 |
特定の場所への外部ダイヤルを指定します。 をクリックし、リストから場所を選択して 通話をクリックします。 ダイヤルまでスクロールし、必要に応じて外線ダイヤルを変更します。
ユーザーへの影響:
|
Control Hub でプレミス ベースの PSTN (ローカル ゲートウェイ) を設定する
付加価値再販業者の場合、これらの手順を使用して Control Hub でローカル ゲートウェイの設定を開始できます。このゲートウェイがクラウドに登録されると、Webex Calling の 1 つ以上のロケーションで使用して、エンタープライズ PSTN サービス プロバイダーへのルーティングを提供できます。
ローカル ゲートウェイがある場所は、ローカル ゲートウェイが他の場所で使用されているときには削除できません。
トランクを作成する
始める前に
-
ロケーションが追加されたら、ロケーションに対してプレミスベース PSTN を設定する前に、トランクを作成する必要があります。
-
それぞれについて、ロケーションと固有の設定および番号を作成します。ロケーションはプレミスベース PSTN を追加する前に存在する必要があります。
-
Webex Calling でのプレミスベース PSTN (ローカル ゲートウェイ) 要件について理解しておいてください。
-
プレミスベース PSTN を持つロケーションに対して、複数のトランクを選択できませんが、複数のロケーションに対して同じトランクを選択することはできます。
| 1 | |
| 2 |
トランク追加 をクリックし、場所を選択します。 |
| 3 |
トランクの名前を指定し、[保存] をクリックします。 名前は 24 文字以内にしてください。 |
次にやる必要
画面 [ドメインの登録]、[トランク グループ OTG/DTG]、[回線/ポート]、および [発信プロキシ アドレス] にトランク情報が表示されます。
プレミスベース PSTN を設定する準備ができているときに参照できるように、この情報を Control Hub からコピーして、ローカルのテキスト ファイルまたは文書に貼り付けておくことを推奨します。
この資格情報を紛失した場合には、Control Hub のトランク情報画面で生成する必要があります。[ユーザー名の取得とパスワードのリセット] をクリックして、トランクを使用するための認証資格情報の新しいセットを生成します。
プレミス ベースの PSTN のトランクを選択する
| 1 |
https://admin.webex.comの Control Hub にログインし、 。 |
| 2 |
変更する場所を選択し、[管理] をクリックします。 |
| 3 |
プレミスベース PSTN を選択して、[次へ] をクリックします。 |
| 4 |
ドロップダウン メニューからトランクを選択します。 トランク ページにアクセスして、トランク グループの選択を管理します。 |
| 5 |
確認通知をクリックし、[保存] をクリックします。 |
次にやる必要
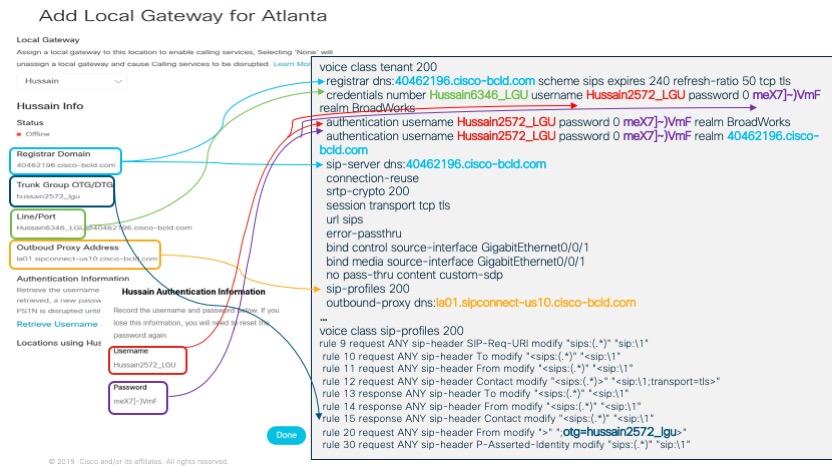
Control Hub が生成した構成情報を記録し、パラメーターをローカル ゲートウェイ (たとえばオンプレミスの Cisco CUBE) にマップする必要があります。この記事 では、このプロセスについて詳しく説明します。参考のため、どのように Control Hub の構成情報 (左側) が CUBE のパラメーター (右側) にマップされるかを示す例である次の図を参照してください。
ゲートウェイ自体の設定が正常に完了したら、 Control Hub と作成したゲートウェイは、割り当てた場所カードに、名前の左側に緑色のドット付きで表示されます。このステータスは、ゲートウェイがセキュアに通話クラウドに対して登録され、そのロケーションでのアクティブな PSTN としての役割を果たしていることを示しています。
電話番号の管理
Control Hub では、組織の電話番号を簡単に表示、アクティベート、削除、追加できます。詳細については、「Control Hub で電話番号を管理する」を参照してください。
Control Hub でトライアルからの Webex サービス購入をリクエストする
Webex サービスを試していて、トライアルから有料サブスクリプションに変更したい場合は、メールでパートナーにリクエストできます。
| 1 |
https://admin.webex.comで Control Hub にログインし、建物アイコン |
| 2 |
[サブスクリプション] タブを選択し、[今すぐ購入] をクリックします。 有料サブスクリプションへの変換に興味を持っていることを知らせるメールがパートナーに送信されます。 |
 を選択します。
 通話オプションを設定する
Control Hub を使用して、Webex アプリでユーザーに表示する利用可能な通話オプションの優先度を設定できます。シングルクリック通話を有効にすることもできます。詳細については、次を参照してください。Webex アプリ ユーザーの通話オプションを設定します。
発信動作を設定する
ユーザーが通話を発信するときにどの通話アプリケーションが開くかを制御できます。Unified CM または Webex Calling の権限を持つユーザーと、Cisco の有料通話サービスを持たないユーザーがいる組織向けの混合モード展開を含む、通話クライアント設定を構成できます。詳細については、次を参照してください。呼び出し動作を設定します。


