- Pagină de pornire
- /
- Articol

Mulțumim pentru feedback.

Adăugați dispozitivul gestionat de partenerul dvs.
 În acest articol
 Feedback?
Administratorii companiei pot adăuga și gestiona dispozitive terțe din Control Hub. Puteți lansa încrucișat și selecta parteneri de soluții pentru configurarea dispozitivelor Webex Calling.
Începeți să utilizați dispozitivul gestionat de partener
Trebuie să furnizați dispozitivele manual și să dețineți acreditările de autentificare SIP. Ești responsabil pentru orice fraudă creată din cauza nesecurizării acestor acreditări.
Următoarele specificații se aplică atunci când adăugați dispozitive SIP terțe:
-
Atribuiți dispozitive gestionate de parteneri unui utilizator. De asemenea, puteți atribui fiecare dispozitiv mai multor utilizatori.
-
Toate dispozitivele terțe trebuie să fie conforme cu cerințele de securitate Webex Calling. Consultați Cerințe de securitate pentru Webex Calling.
-
Există cerințe minime de firmware în vigoare. Consultați documentația terței părți pentru detalii.
Pentru a gestiona dispozitivul partenerului, solicitați acces special la integrarea Device Management de la echipele dvs. de conturi.
Adăugați un dispozitiv gestionat de partener la utilizator
| 1 |
Conectați-vă la Control Hubși accesați . De asemenea, puteți adăuga un dispozitiv utilizatorului din secțiunea Utilizatori navigând la > selectați un utilizator > . |
| 2 |
Alegeți Utilizare personală pentru a atribui un dispozitiv unui utilizator, apoi faceți clic pe Următorul. |
| 3 |
Introduceți fie numele de utilizator, fie numele real al proprietarului telefonului, alegeți utilizatorul din rezultate, apoi faceți clic pe Următorul. |
| 4 |
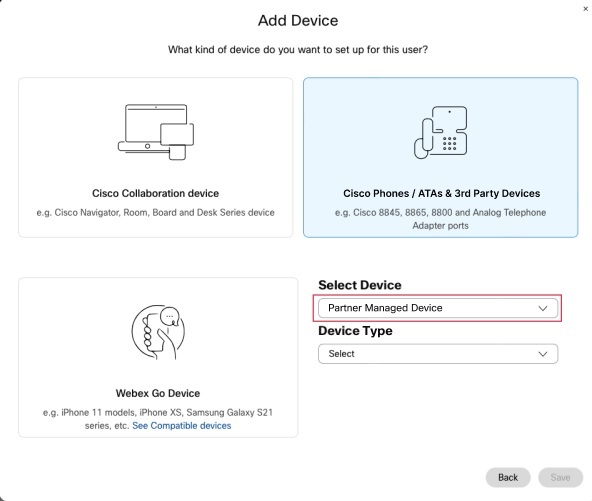
Alegeți Telefon Cisco, ATA sau dispozitiv terț. |
| 5 |
Alegeți Dispozitive gestionate de partener din meniul derulant Selectați dispozitivul. |
| 6 |
Alegeți tipul de dispozitiv din meniul derulant Tip dispozitiv. |
| 7 |
Introduceți următoarele detalii legate de dispozitiv:
În prezent, puteți adăuga dispozitive SIP aprobate și nu puteți adăuga un dispozitiv neaprobat. |
| 8 |
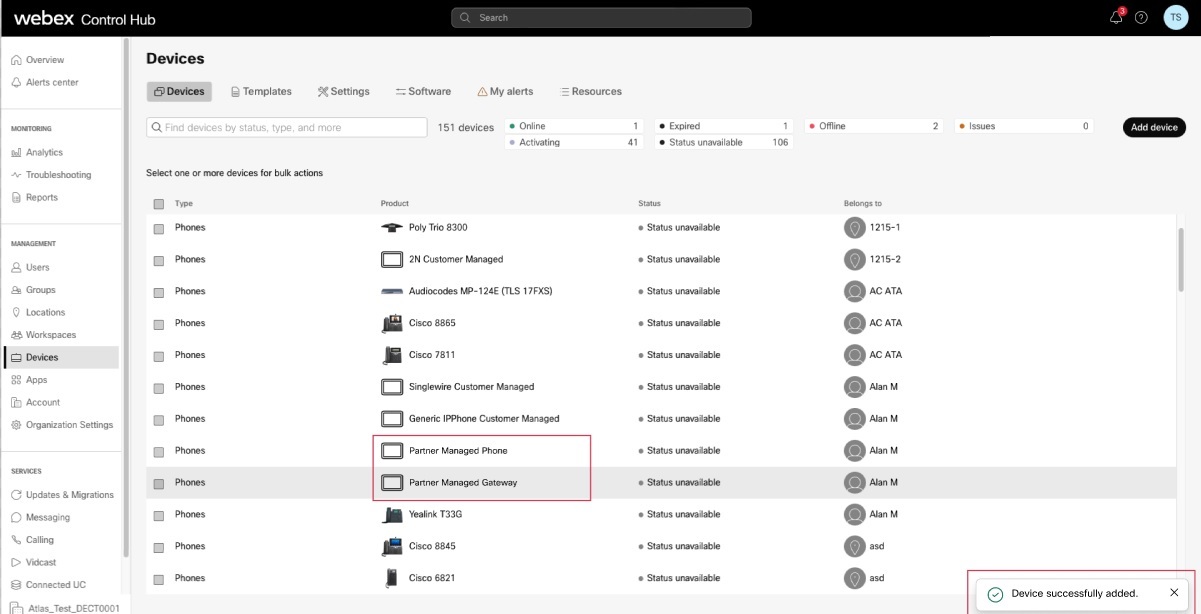
Citiți exonerarea de răspundere și faceți clic pe caseta de confirmare. Apoi, faceți clic pe Salvați. Acum puteți vizualiza dispozitivul în lista de dispozitive.
Puteți adăuga și gestiona dispozitivele partenerilor în bloc folosind API-uri. Pentru detalii, consultați Prezentare generală a dispozitivelor și Prezentare generală a apelurilor Webex. |
Adăugați un dispozitiv gestionat de partener în noul spațiu de lucru
Înainte de a începe
- Poți adăuga până la 5 dispozitive gestionate de parteneri la un spațiu de lucru cu o licență profesională pentru spațiu de lucru.
Puteți adăuga mai multe dispozitive la un spațiu de lucru profesional doar de pe pagina noului spațiu de lucru. Trebuie să activați Încercați spații de lucru noi din colțul din dreapta sus al paginii spațiului de lucru pentru a utiliza noua pagină a spațiului de lucru.
- Puteți adăuga un singur dispozitiv la un spațiu de lucru cu licență pentru spațiu de lucru comun.
| 1 |
Conectați-vă la Control Hubși accesați . De asemenea, puteți adăuga un dispozitiv la noul spațiu de lucru din secțiunea Spații de lucru navigând la . |
| 2 |
Alegeți . |
| 3 |
Introduceți un nume pentru spațiul de lucru (cum ar fi numele camerei fizice), selectați tipul camerei și adăugați capacitatea, apoi faceți clic pe Următorul. Numele unui spațiu de lucru nu poate avea mai mult de 30 de caractere și nu poate conține %, #, <, >, /, \, și „personaje”. |
| 4 |
Alegeți Telefon Cisco, ATA sau dispozitiv terț. |
| 5 |
Alegeți Dispozitive gestionate de partener din meniul derulant Selectați dispozitivul. |
| 6 |
Alegeți un tip de dispozitiv din meniul derulant Tip dispozitiv. |
| 7 |
Introduceți următoarele detalii legate de dispozitiv:
În prezent, puteți adăuga dispozitive SIP aprobate și nu puteți adăuga un dispozitiv neaprobat. |
| 8 |
Citiți exonerarea de răspundere și faceți clic pe caseta de confirmare. Apoi, faceți clic pe Următorul. |
| 9 |
Faceți clic pe serviciul Apelare și alegeți abonamentul și tipul de licență pe care doriți să le atribuiți spațiului de lucru.
Pentru a afla mai multe despre funcțiile disponibile cu licențele, consultați Funcții disponibile în funcție de tipul de licență pentru Webex Calling. |
| 10 |
Atribuiți o locație și un număr de telefon (determinate de locația pe care o alegeți), apoi faceți clic pe Salvare. De asemenea, aveți opțiunea de a atribui o extensie. Dacă doriți să adăugați dispozitive suplimentare la un spațiu de lucru profesional, puteți face acest lucru în oricare dintre următoarele moduri:
|
 sub coloana
 Resetarea parolei SIP pentru dispozitivul gestionat de partener
| 1 |
Conectați-vă la Control Hubși accesați . |
| 2 |
Selectați o opțiune gestionată de parteneri device/gateway. |
| 3 |
Sub Detalii, faceți clic pe Actualizare parolă.
|
| 4 |
Faceți clic pe Actualizare pentru a confirma parola. Parola nou generată se afișează în câmp. |
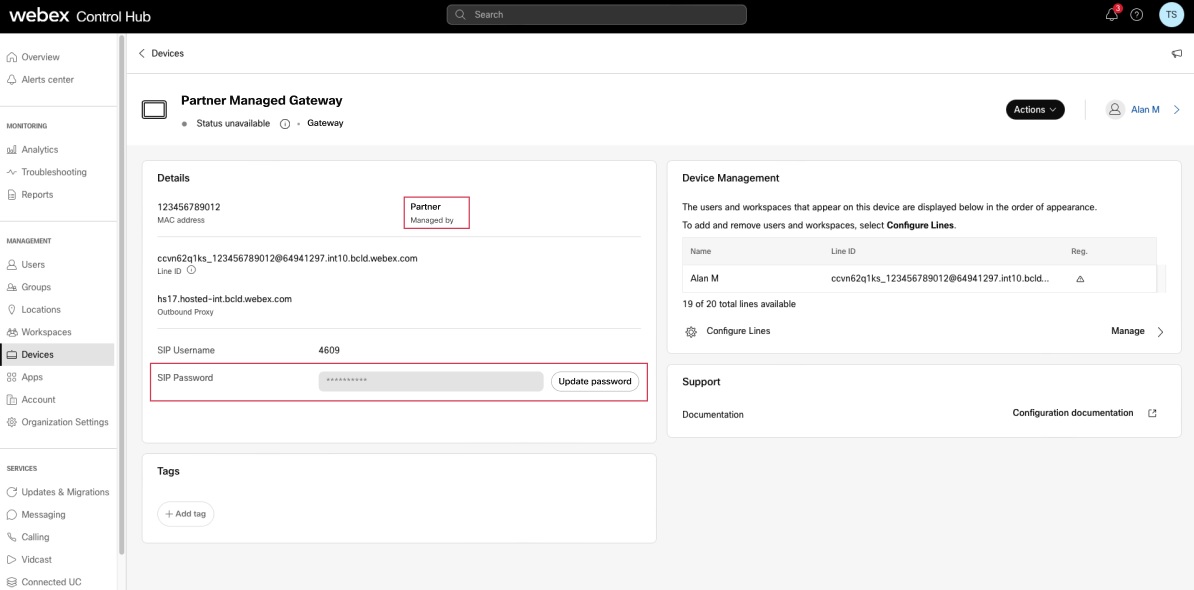
Administratorul acestui dispozitiv este responsabil pentru păstrarea acestor date de identificare. Aceasta este ultima dată când puteți vizualiza parola în întregime. Copiați și păstrați aceste informații pentru evidențele dumneavoastră și pentru utilizare ulterioară.


