- Pagină de pornire
- /
- Articol

Mulțumim pentru feedback.

Configurați și gestionați dispozitivele Webex Calling
 În acest articol
 Feedback?
Puteți atribui și gestiona dispozitive pentru utilizatori și spații de lucru în Control Hub. Alegeți să adăugați după adresa MAC sau generând un cod de activare pe care să îl introduceți pe dispozitivul în sine.
Când adăugați un dispozitiv, se afișează un cod de activare format din 16 cifre. Codul de activare expiră după 30 de zile pentru telefoanele MPP și după 7 zile pentru dispozitivele Room.
Adăugați un telefon la un utilizator
Cu Control Hub, puteți atribui un telefon unui utilizator pentru uz personal. Telefoanele listate aici acceptă Webex Calling. Deși toate aceste telefoane pot fi adăugate folosind o adresă MAC, doar următorul subset poate fi înregistrat folosind un cod de activare:
-
Telefoane multiplatforme Cisco IP Phone seria 6800 (telefoane audio - 6821, 6841, 6851, 6861, 6871)
-
Cisco IP Phone 7800 Series Multiplatform Phones (Telefoane audio-7811, 7821, 7841, 7861)
-
Telefoane multiplatforme Cisco IP Phone seria 8800 (telefoane audio - 8811, 8841, 8851, 8861)
-
Cisco IP Phone 8800 Seria Multiplatform Telefoane (Telefoane video-8845, 8865)
-
Cisco IP Conferința de telefon 7832 și 8832
-
Cisco Video Phone 8875
-
Telefon Cisco Desk seria 9800
Puteți atribui doar dispozitive de bază DECT (nu receptoare DECT) în Control Hub. După ce alocați o unitate de bază unui utilizator, asociați manual un receptor DECT cu acea unitate de bază. Pentru mai multe informații, consultați Conectarea telefonului la stația de bază.
| 1 |
Conectați-vă la Control Hub. |
| 2 |
Accesați . De asemenea, puteți adăuga un dispozitiv utilizatorului din secțiunea Utilizatori navigând la > selectați un utilizator > .
|
| 3 |
Alegeți Utilizare personală pentru a atribui un dispozitiv unui utilizator, apoi faceți clic pe Următorul. |
| 4 |
Introduceți fie numele de utilizator, fie numele real al proprietarului telefonului, alegeți utilizatorul din rezultate, apoi faceți clic pe Următorul. |
| 5 |
Alegeți tipul de dispozitiv pe care doriți să îl configurați pentru utilizator:
|
Adăugarea unui telefon la un spațiu de lucru nou
Când oamenii sunt la serviciu, se adună în locuri precum săli de mese, holuri și săli de conferințe. Puteți configura dispozitive Webex partajate în aceste spații de lucru, puteți adăuga servicii și apoi puteți urmări cum se desfășoară colaborarea.
Un dispozitiv din spațiile de lucru nu este atribuit unui anumit utilizator, ci unei locații fizice, permițând astfel utilizarea partajată.
Dispozitivele listate acceptă Webex Calling. Puteți înregistra majoritatea acestor dispozitive folosind o adresă MAC și puteți înregistra doar următorul subset folosind un cod de activare:
-
Cisco IP Phone 6800 Series Multiplatform Phones (Telefoane audio-6821, 6841, 6851)
-
Cisco IP Phone 7800 Series Multiplatform Phones (Telefoane audio-7811, 7821, 7841, 7861)
-
Telefoane multiplatforme Cisco IP Phone seria 8800 (telefoane audio - 8811, 8841, 8851, 8861)
-
Cisco IP Phone 8800 Seria Multiplatform Telefoane (Telefoane video-8845, 8865)
-
Cisco IP Conferința de telefon 7832 și 8832
-
Telefon Cisco Desk seria 9800
Înainte de a începe
- Puteți adăuga până la cinci telefoane de birou Cisco, telefoane Cisco MPP, dispozitive wireless, ATA, sistem de operare pentru telefon sau dispozitive terțe într-un spațiu de lucru cu o licență profesională Workspace.
- Puteți adăuga mai multe dispozitive la un spațiu de lucru profesional doar de pe pagina noului spațiu de lucru. Activați opțiunea Încercați spații de lucru noi din colțul din dreapta sus al paginii spațiului de lucru pentru a utiliza noua pagină a spațiului de lucru.
- Puteți adăuga un singur dispozitiv la un spațiu de lucru cu o licență de spațiu de lucru pentru zone comune.
| 1 |
Conectați-vă la Control Hub. |
| 2 |
Accesați . De asemenea, puteți adăuga un dispozitiv la un spațiu de lucru nou accesând .
|
| 3 |
Alegeți Utilizare partajată, apoi faceți clic pe Următorul. |
| 4 |
Alegeți Spațiu de lucru nou, apoi faceți clic pe Următorul. |
| 5 |
Introduceți un nume pentru spațiul de lucru (cum ar fi numele camerei fizice), selectați tipul camerei, adăugați capacitatea camerei și alegeți locația spațiului de lucru. Faceți clic pe Înainte. Numele unui spațiu de lucru nu poate avea mai mult de 128 de caractere și nu poate conține %, #, <, >, /, \, și „personaje”. |
| 6 |
Alegeți tipul de dispozitiv pe care doriți să îl configurați pentru spațiul de lucru:
|
| 7 |
Faceți clic pe serviciul Apelare și alegeți abonamentul și tipul de licență pe care doriți să le atribuiți spațiului de lucru.
Pentru a afla mai multe despre funcțiile disponibile cu licențele, consultați Funcții disponibile în funcție de tipul de licență pentru Webex Calling. |
| 8 |
Atribuiți o locație și un număr de telefon (determinate de locația pe care o alegeți), apoi faceți clic pe Salvare. De asemenea, aveți opțiunea de a atribui o extensie. Locația este actualizată în timpul resincronizării nocturne. Dacă doriți să adăugați dispozitive suplimentare la un spațiu de lucru profesional, puteți face acest lucru în oricare dintre următoarele moduri:
Pentru a modifica sau gestiona dispozitivele atribuite spațiului de lucru, consultați secțiunea Gestionarea unui dispozitiv pentru un spațiu de lucru. |
 sub coloana
 Reatribuirea unui telefon existent unui alt utilizator sau dispozitiv
Pentru a reutiliza un telefon care este atribuit unui utilizator/spațiu de lucru Webex Calling unui alt utilizator/spațiu de lucru Webex Calling unui alt utilizator/spațiu de lucru Webex Calling, urmați acești pași:
| 1 |
Conectați-vă la Control Hub. |
| 2 |
Mergi la User/Workspace unde este atribuit în prezent dispozitivul. Aveți posibilitatea să reatribuiți dispozitivul în aceste scenarii:
|
| 3 |
Pe telefon, accesați meniul de setări și parcurgeți acești pași pentru a reatribui telefonul. |
| 4 |
Urmați instrucțiunile din Adăugarea și atribuirea telefonului utilizatorului sau Adăugarea unui telefon la un spațiu de lucru nou pentru a atribui sau a adăuga un telefon unui utilizator/spațiu de lucru. |
| 5 |
La adăugarea dispozitivului în Control Hub, efectuați aceste acțiuni pe telefon: |
Adăugați o tablă, un birou sau un dispozitiv de sală la un utilizator
Atribuirea unui dispozitiv Table, Desk sau Room ca dispozitiv personal unei persoane permite acesteia să își primească apelurile și întâlnirile Webex direct pe dispozitivul său. Pentru mai multe detalii, consultați Atribuiți un dispozitiv personal de tip Table, Desk sau Room unui utilizator.
Adăugați o tablă, un birou sau un dispozitiv de sală într-un spațiu de lucru nou
Când oamenii sunt la locul de muncă, ei se reunesc într-o mulțime de spații de lucru, cum ar fi săli de prânz, lobby-uri, și săli de conferințe. Puteți să configurați dispozitive Cisco Webex partajate în aceste spații de lucru, să adăugați servicii, apoi să urmăriți colaborarea.
Principiul cheie al unui dispozitiv Workspaces este că nu este atribuit unui anumit utilizator, ci mai degrabă unei locații fizice, permițând utilizarea partajată.
Dispozitivele listate aici acceptă Webex Calling.
| 1 |
Conectați-vă la Control Hub. |
| 2 |
Accesați . De asemenea, puteți adăuga un dispozitiv la un spațiu de lucru nou din secțiunea Spații de lucru navigând la .
|
| 3 |
Alegeți Utilizare partajată și faceți clic pe Următorul. |
| 4 |
Alegeți Spațiu de lucru nou și faceți clic pe Următorul. |
| 5 |
Introduceți un nume pentru spațiul de lucru (cum ar fi numele camerei fizice), selectați tipul camerei, adăugați capacitatea camerei și alegeți locația spațiului de lucru. Apoi faceți clic pe Următorul. |
| 6 |
Alegeți dispozitivul Cisco Room and Desk. |
| 7 |
Alegeți unul dintre următoarele servicii și faceți clic pe Următorul.
|
| 8 |
Dacă ați ales un serviciu Cisco Webex Calling, alegeți abonamentul și tipul de licență pe care doriți să le atribuiți spațiului de lucru.
Pentru a afla mai multe despre funcțiile disponibile cu licențele, consultați Funcții disponibile în funcție de tipul de licență pentru Webex Calling. |
| 9 |
Atribuiți o locație, un număr de telefon (determinat de locația pe care o alegeți), o extensie, apoi faceți clic pe Salvare. |
| 10 |
Activați dispozitivul utilizând codul furnizat. Puteți să copiați, să trimiteți prin e-mail sau să imprimați codul de activare. |
Adăugarea și atribuirea dispozitivelor în bloc
Pentru a atribui mai multe dispozitive utilizatorilor și spațiilor de lucru, puteți completa un fișier CSV cu informațiile necesare și activa dispozitivele respective în doar câțiva pași simpli.
- Puteți adăuga până la 5 telefoane Cisco Desk, telefoane Cisco MPP, ATA-uri sau dispozitive terțe la un spațiu de lucru cu licență Professional.
- Puteți adăuga un singur dispozitiv la un spațiu de lucru cu o licență pentru spațiul de lucru comun.
Dispozitivele listate aici acceptă Webex Calling. Puteți înregistra toate dispozitivele folosind o adresă MAC; totuși, înregistrați următorul subset de dispozitive folosind un cod de activare:
-
Cisco IP Phone 6800 Series Multiplatform Phones (Telefoane audio-6821, 6841, 6851)
-
Cisco IP Phone 7800 Series Multiplatform Phones (Telefoane audio-7811, 7821, 7841, 7861)
-
Telefoane multiplatforme Cisco IP Phone seria 8800 (telefoane audio - 8811, 8841, 8851, 8861)
-
Cisco IP Phone 8800 Seria Multiplatform Telefoane (Telefoane video-8845, 8865)
-
Cisco IP Conferința de telefon 7832 și 8832
-
Cisco Video Phone 8875
-
Telefon Cisco Desk seria 9800
| 1 |
Conectați-vă la Control Hub. | |||||||||||||||||||||||||||||||||||||
| 2 |
Accesați . | |||||||||||||||||||||||||||||||||||||
| 3 |
Alegeți una dintre următoarele opțiuni și faceți clic pe Descărcare.
Puteți utiliza tabelul următor pentru a pregăti fișierul CSV.
Următoarele câmpuri sunt obligatorii atunci când se atribuie un dispozitiv utilizatorilor și spațiilor de lucru Webex Calling:
Aceste câmpuri Număr de telefon și Interval erau denumite anterior Număr director și Linie directă; Aceste nume de coloane continuă să fie acceptate pentru o perioadă scurtă de timp. Vă recomandăm să limitați numărul de dispozitive la 1000 per fișier CSV. Dacă doriți să adăugați mai mult de 1000 de dispozitive, utilizați un al doilea fișier CSV. | |||||||||||||||||||||||||||||||||||||
| 4 |
Completați foaia de calcul. | |||||||||||||||||||||||||||||||||||||
| 5 |
Încărcați fișierul CSV glisând și fixând fișierul sau făcând clic pe Alegeți un fișier. | |||||||||||||||||||||||||||||||||||||
| 6 |
Dacă adresa MAC este goală, aveți opțiunile de a alege unde va fi trimis codul de activare.
Dumneavoastră sau utilizatorul trebuie să introduceți codul de activare pe dispozitiv pentru a-l activa. | |||||||||||||||||||||||||||||||||||||
| 7 |
Faceți clic pe Trimitere. Afișează starea actualizată atunci când dispozitivele devin active.
Dispozitivele multiplatformă trebuie să ruleze o versiune de firmware 11.3.1 SR2 sau o versiune ulterioară pentru ca utilizatorii să poată introduce codul de activare pe dispozitivul lor. Pentru informații despre actualizarea firmware-ului telefonului, consultați acest articol. |
Exportați o listă de dispozitive
Dacă doriți să vizualizați lista dispozitivelor atribuite utilizatorilor și spațiilor de lucru, puteți exporta fișierul CSV.
Conectați-vă la Control Hub și accesați Devices.
Selectați mai multe dispozitive din lista de dispozitive și selectați opțiunea Export. Puteți alege câmpurile de inclus în fișierul CSV și puteți exporta conținutul într-un folder local.
Câmpurile afișate în fișierul CSV depind de conexiunea dispozitivului la platformă. Prin urmare, unele câmpuri nu sunt disponibile în fișierul de ieșire.
Gestionarea unui dispozitiv pentru un utilizator
Puteți să adăugați, să eliminați, să reporniți, să verificați activarea sau să creați un nou cod de activare pentru dispozitivele care sunt atribuite utilizatorilor din cadrul organizației. Acest lucru poate fi util pentru a vizualiza și gestiona dispozitivele în ecranul utilizatorilor, atunci când este necesar.
| 1 |
Conectați-vă la Control Hub. |
| 2 |
Accesați . |
| 3 |
Selectați un utilizator și faceți clic pe Dispozitive. |
| 4 |
Pentru a adăuga un dispozitiv la acest utilizator, faceți clic pe Adăugare dispozitiv. Dacă utilizatorului i-a fost deja atribuit un dispozitiv și doriți să adăugați un alt dispozitiv, faceți clic pe . Pentru mai multe informații despre adăugarea dispozitivului la un utilizator, consultați secțiunea Adăugarea de telefoane la un utilizator. |
| 5 |
Pentru a modifica un dispozitiv existent, selectați numele dispozitivului. Aceasta vă duce la pagina Dispozitive. Aici puteți vizualiza și edita setările dispozitivului, ștergeți dispozitivul, reporniți dispozitivul sau creați un nou cod de activare pentru dispozitiv, dacă este cazul. Pentru mai multe informații despre configurarea setărilor telefonului, consultați Configurarea și actualizarea setărilor telefonului. |
| 6 |
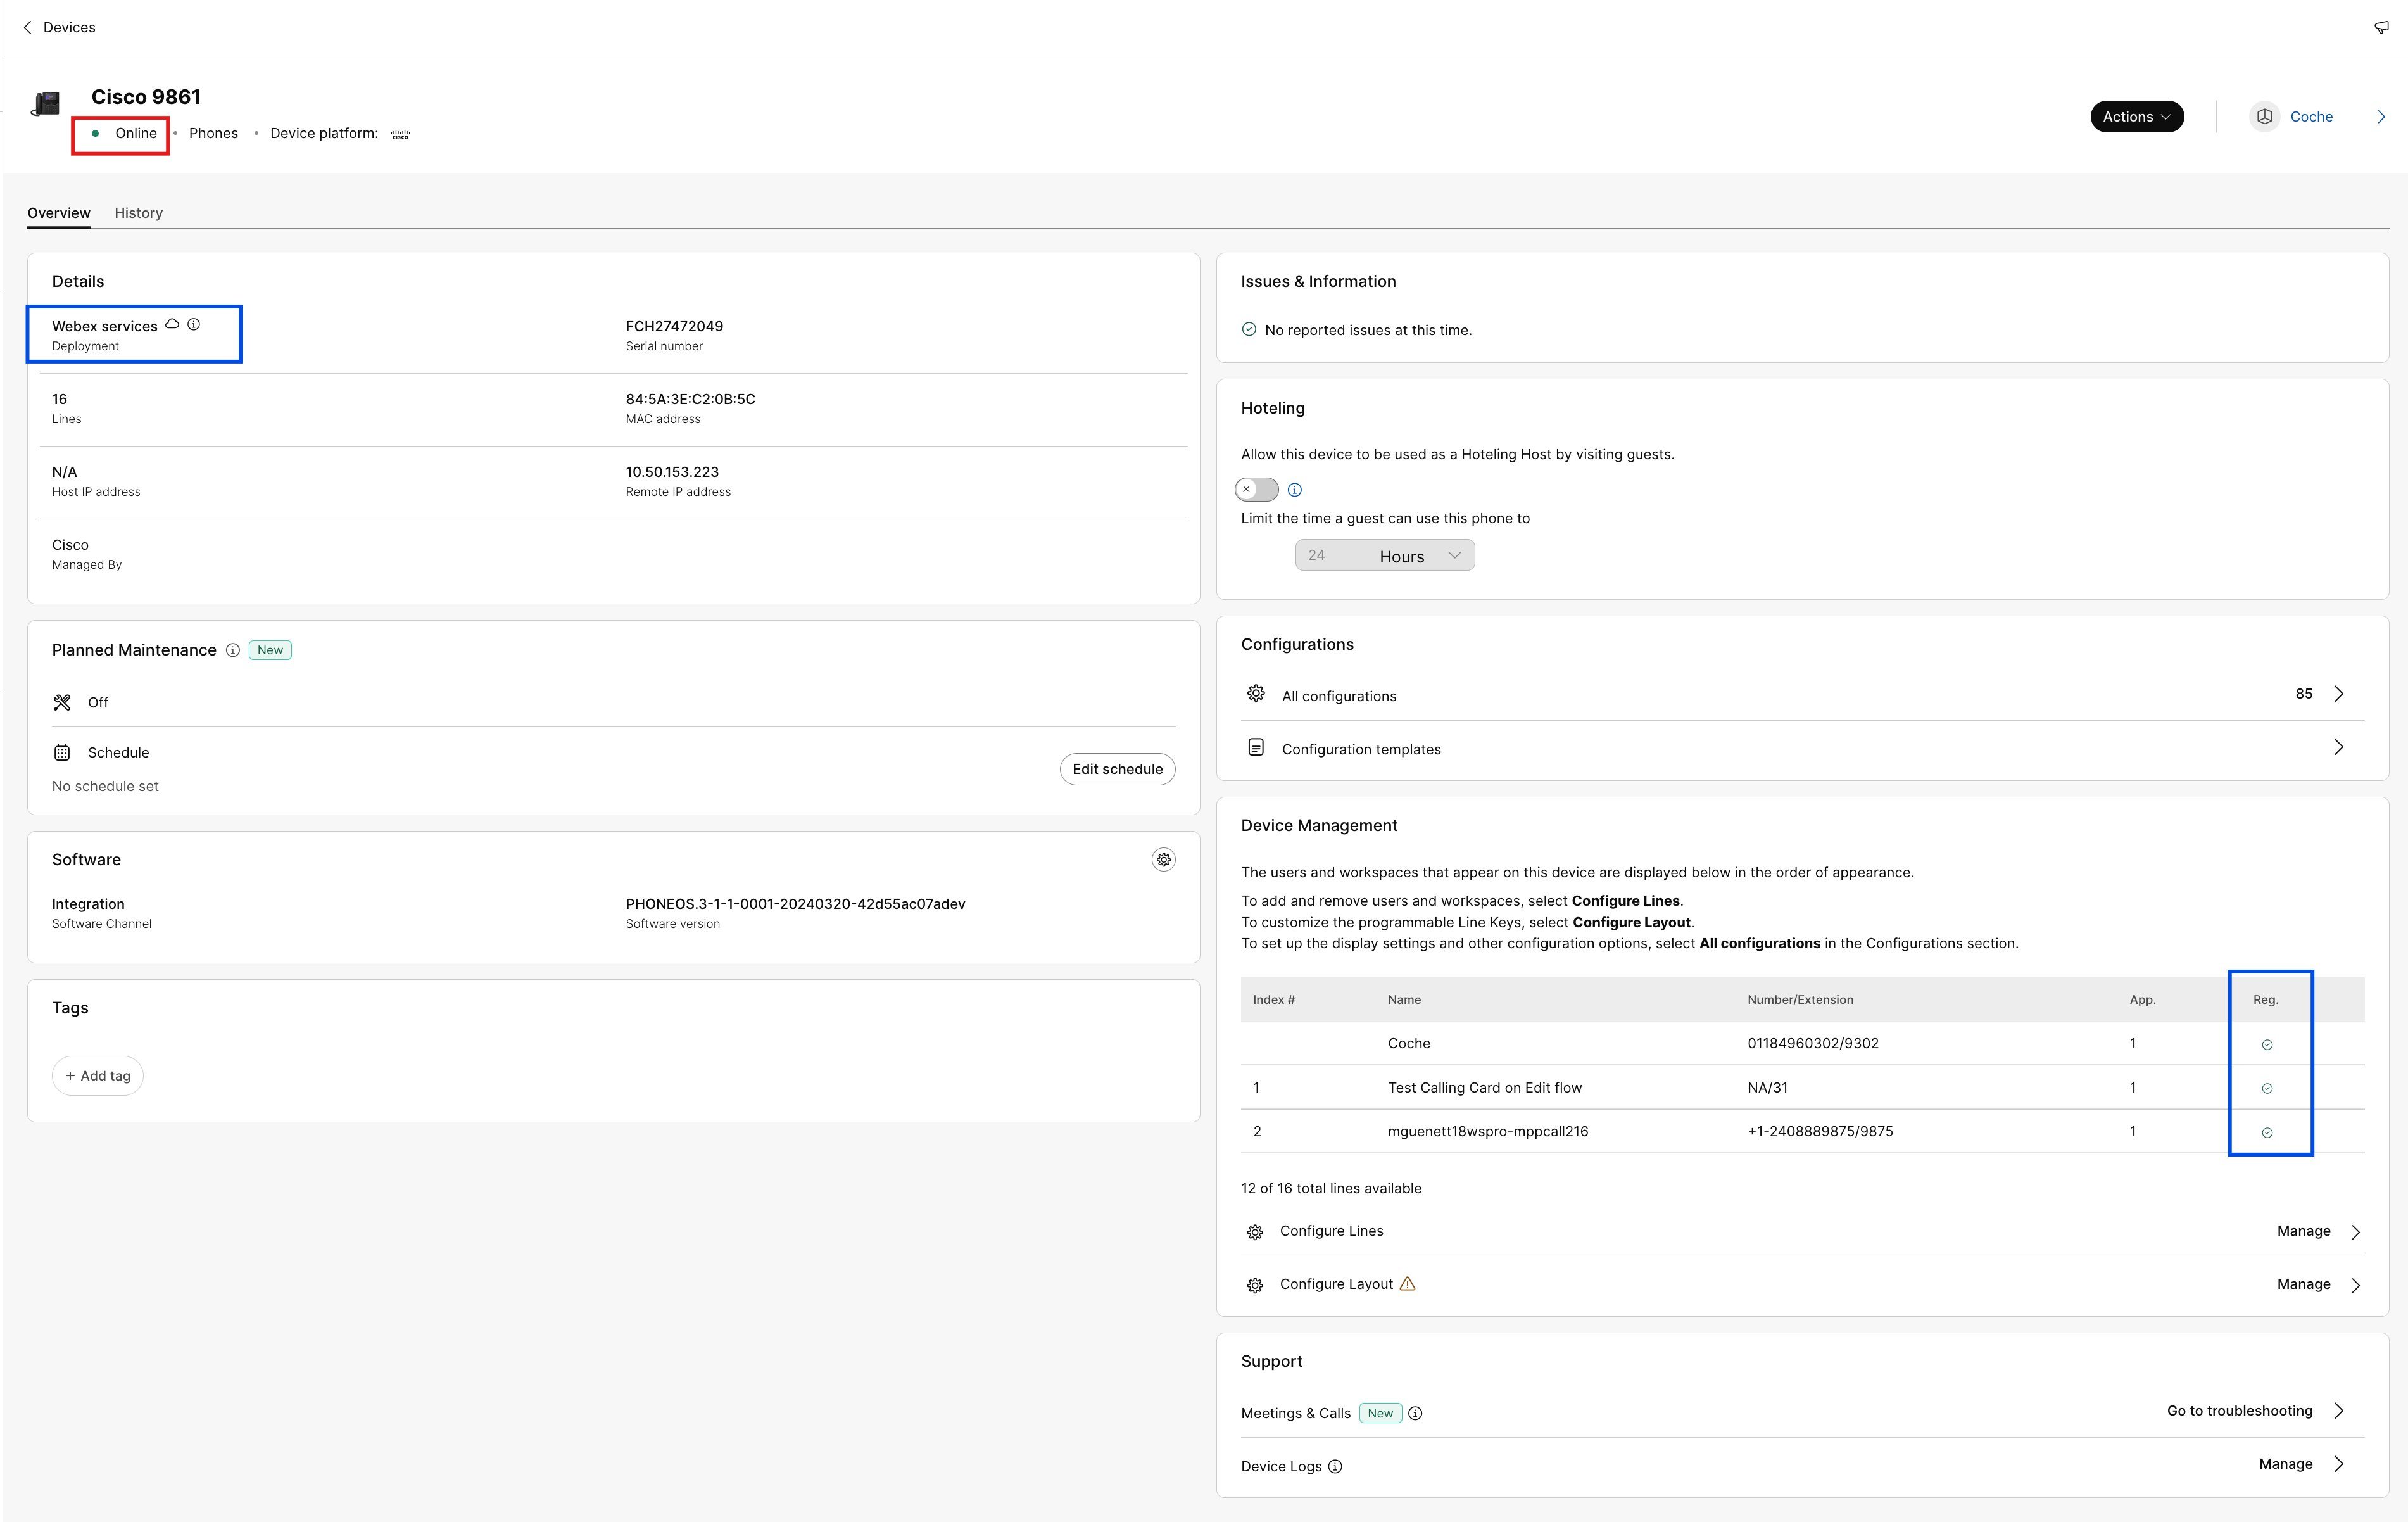
Dacă dispozitivul adăugat la utilizator este Webex Aware, atunci opțiunea Webex Aware este afișată sub dispozitive, așa cum se arată în diagramă. Webex Aware indică faptul că dispozitivul s-a integrat pe platforma Webex și are acces la Funcțiile Webex acceptate de telefon.
|
| 7 |
Faceți clic pe Acțiuni pentru a gestiona dispozitivul. Acțiunile vă permit să aplicați modificările de configurație, să reporniți dispozitivul, să raportați o problemă și să colectați jurnale ale dispozitivului sau să ștergeți dispozitivul. Fila Acțiuni conține aceste opțiuni pentru un dispozitiv compatibil cu Webex Aware:
|
Gestionarea unui dispozitiv pentru un spațiu de lucru
Puteți adăuga și gestiona dispozitive direct dintr-un profil de spațiu de lucru. Dispozitivele de spațiu de lucru pot include dispozitive ATA, cum ar fi mașinile de fax. De asemenea, puteți configura un dispozitiv de spațiu de lucru ca gazdă hotelieră. Pentru mai multe informații despre organizarea hotelurilor, consultați Organizarea hotelurilor în Control Hub.
| 1 |
Conectați-vă la Control Hub. |
| 2 |
Accesați . |
| 3 |
Selectați spațiul de lucru pe care doriți să îl modificați. |
| 4 |
Pentru a adăuga un dispozitiv, faceți clic pe Adăugare dispozitiv în dala Dispozitive. Pentru mai multe informații despre adăugarea dispozitivelor la spațiul de lucru, consultați secțiunea Adăugarea unui telefon la un spațiu de lucru nou. |
| 5 |
Pentru a modifica un dispozitiv existent, selectați numele dispozitivului. Aceasta vă duce la pagina Dispozitive. Aici puteți vizualiza și edita setările dispozitivului, ștergeți dispozitivul, reporniți dispozitivul și activați dispozitivul pentru a fi utilizat ca gazdă hoteling. Pentru mai multe informații despre configurarea setărilor telefonului, consultați Configurarea și actualizarea setărilor telefonului. |
| 6 |
Dacă dispozitivul adăugat la spațiul de lucru este Webex Aware, atunci opțiunea Webex Aware este afișată sub dispozitive, așa cum se arată în diagramă. Webex Aware indică faptul că dispozitivul s-a integrat pe platforma Webex și are acces la caracteristicile Webex care sunt acceptate de telefon.
|
| 7 |
Faceți clic pe Acțiuni pentru a gestiona dispozitivul. Acțiunile ajută la aplicarea modificărilor de configurare sau la actualizarea firmware-ului pentru dispozitivele MPP. Fila Acțiuni conține aceste opțiuni pentru un dispozitiv compatibil cu Webex Aware:
|
Configurați liniile - Adăugați și reordonați liniile
Funcția Configurare linii pentru atribuirea de linii principale, partajate și virtuale telefoanelor permite aparițiile multiple ale unei linii partajate pe același dispozitiv. Experiența de configurare a porturilor pentru ATA nu a fost modificată.
Iată actualizările pentru funcția Configurare linii pentru dispozitivele MPP și PhoneOS:
-
Linii primare
-
Desemnați proprietarul dispozitivului și asigurați-vă că acesta ocupă prima poziție pe linia dispozitivului.
-
Măriți Aparițiile pe rândul respectiv pentru a adăuga apariții suplimentare.
-
-
Linii partajate / Linii virtuale
-
Atribuiți linii partajate de la orice utilizator sau spațiu de lucru activat pentru apeluri din cadrul organizației cu ajutorul Apelurilor Partajate (SCA) disponibile.
-
Măriți numărul de apariții pe rândul de linie partajată pentru a adăuga apariții suplimentare.
Limitele SCA disponibile pentru utilizator sau spațiul de lucru pot limita aparițiile atribuibile.
-
Atribuiți un index de linie fiecărei linii partajate. Puteți rearanja liniile partajate prin drag-and-drop.
Nu poți separa aparențele individuale ale unei linii.
-
Folosește pentru a aranja poziția indexurilor de linii partajate pe un dispozitiv.
-
-
Aparențe
-
Configurați mai multe apariții ale aceleiași linii primare, partajate sau virtuale ca seturi individuale de linii ponderate.
-
Liniile ponderate au sufixe -1, -2 și așa mai departe (numai pentru telefoanele Cisco).
-
Apelurile sună la prima apariție de linie ponderată disponibilă.
-
-
Informații noi de rezumat (în partea de jos a paginii)
-
Linii unice de înregistrare SIP – Arată numărul de conturi unice de înregistrare SIP pe care le poate accepta telefonul. Numărul maxim de conturi acceptate în prezent este de 16.
-
Număr total de apariții ale liniilor – Afișează numărul total de apariții ale liniilor atribuibile acceptate de dispozitiv. Dacă modelul de telefon este compatibil cu KEM-uri, numărul maxim de apariții include capacitatea extinsă.
-
-
Atribuire în bloc a liniilor și API-uri publice
- Metodele Bulk CSV și Public API pentru atribuirea liniilor includ funcționalitatea „Apariții”.
Pentru mai multe informații despre linia partajată între locații, consultați Configurarea liniilor partajate și a liniilor virtuale între locații.
Când o apelare rapidă este adăugată la un telefon utilizând o apăsare lungă pe tasta liniei dorite, apelarea rapidă nu este vizibilă în Control Hub. O tastă de apelare rapidă poate fi suprascrisă prin configurarea unei linii partajate pe tasta respectivă.
| 1 |
Conectați-vă la Control Hub. |
| 2 |
Accesați Utilizatori sau Spații de lucru (în funcție de locul în care este atribuit dispozitivul de modificat). |
| 3 |
Selectați un utilizator sau un spațiu de lucru. |
| 4 |
Accesați Dispozitive și faceți clic pe un dispozitiv pentru care doriți să adăugați sau să modificați liniile partajate. Aceasta vă duce la pagina Dispozitive. |
| 5 |
Sub Gestionare dispozitive, faceți clic pe Configurare linii. |
| 6 |
Pentru a adăuga o apariție de linie partajată, faceți clic pe pictograma Puteți atribui aceeași linie partajată sau linie virtuală mai multor taste de linie individuale de pe un telefon. În coloana Apariții a liniei respective, faceți clic pe pictograma
Puteți adăuga liniile în ordinea în care doriți să apară. Pentru a reordona aspectul liniei, ștergeți și adăugați la listă în ordinea în care doriți să apară. Dacă un utilizator are numere de la alte users/groups configurate pe dispozitivele lor, puteți adăuga o etichetă de linie pentru linia partajată. Această etichetă de linie ajută la identificarea aspectului unei linii partajate față de cealaltă. Pentru a elimina o linie, faceți clic pe pictogramă |
| 7 |
Faceți clic pe Salvați. Pentru organizațiile mari, administratorul trebuie să selecteze o locație înainte de a configura linii de apel suplimentare. Faceți clic pe pictograma Pentru o organizație obișnuită, filtrul de locație nu este disponibil, iar administratorul poate selecta o linie. |
 , căutați după nume sau număr de telefon și alegeți o linie.
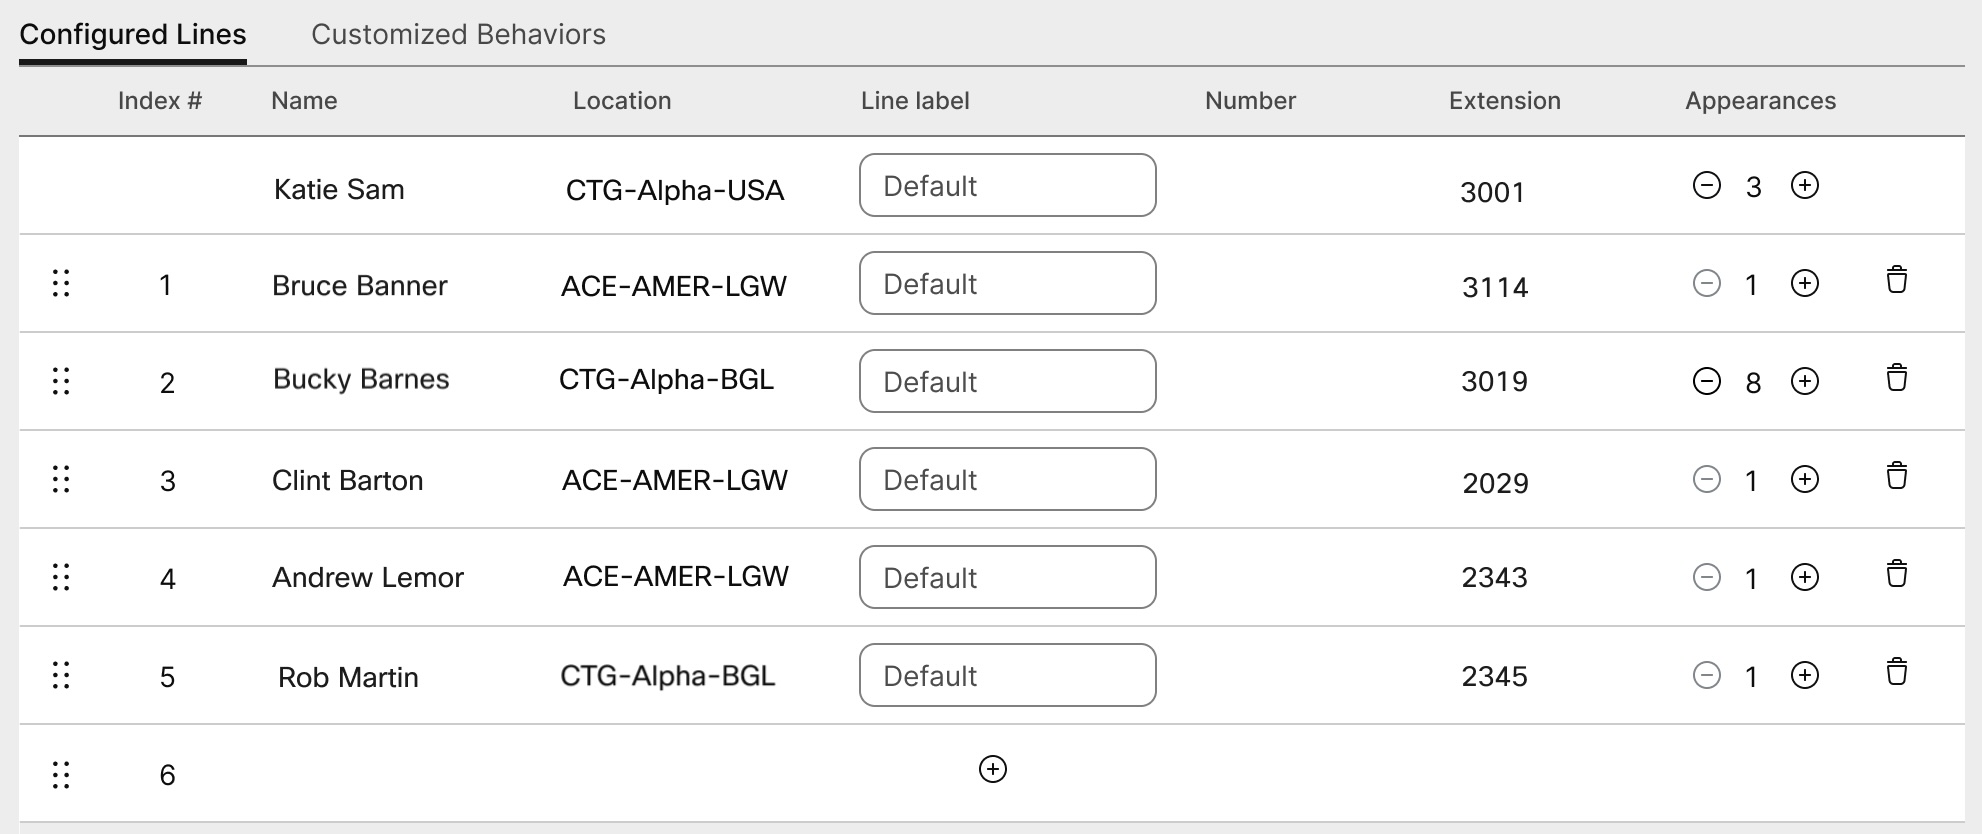
 . Nu poți elimina utilizatorul principal online 1.
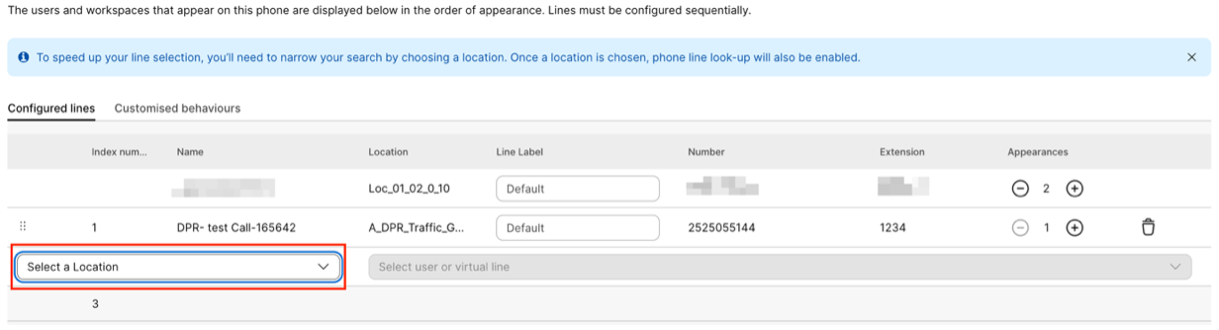
Configurarea unui dispozitiv ATA pentru un utilizator
Puteți configura porturile de pe un dispozitiv Adaptor telefonic analogic (ATA) atribuit unui utilizator în Control Hub. În prezent, cele două configurații disponibile pentru dispozitivele ATA sunt pentru dispozitive cu două porturi și dispozitive cu 24 de porturi.
| 1 |
Conectați-vă la Control Hub. |
| 2 |
Accesați . |
| 3 |
Selectați un utilizator pe care să îl modificați și derulați la Dispozitive. |
| 4 |
Selectați un dispozitiv pe care doriți să îl adăugați sau să îl modificați. |
| 5 |
Sub Utilizatori pe acest dispozitiv, faceți clic pe Configurare porturi. |
| 6 |
Pentru a adăuga o configurație de port partajat, faceți clic pe pictogramă |
| 7 |
Introduceți numele sau numărul de telefon și selectați din opțiunile care apar, apoi faceți clic pe Salvare. Numai spațiile de lucru fără dispozitive apar în căutare. |
| 8 |
Dacă dispozitivul necesită compresie fax T.38, bifați caseta din coloana T.38 sau înlocuiți opțiunile de compresie la nivel de utilizator, apoi faceți clic pe Salvare. Un spațiu de lucru poate avea un ATA. Acest lucru este util pentru faxuri. |
 .
.Adăugarea de numere la locația dvs.
Puteți adăuga numere de telefon la dispozitivele de birou și de cameră din organizația de clienți în orice moment, indiferent dacă vă aflați în mijlocul unei versiuni de încercare sau ați fost convertit într-un abonament plătit.
Am mărit numărul de numere de telefon pe care le puteți adăuga în Control Hub de la 250 la 1000.
| 1 |
Conectați-vă la Control Hub. |
| 2 |
Accesați , apoi faceți clic pe Adăugați numere. |
| 3 |
Specificați locația și tipul de număr. Dacă portați numere, introduceți atât numerele de facturare actuale, cât și pe cele noi. |
| 4 |
Specificați Locația, Statul, Prefixul, Prefixul (opțional), apoi faceți clic pe Căutare. Sunt afișate numerele disponibile. |
| 5 |
Selectați numerele pe care doriți să le adăugați la locație. Numerele pe care le alegeți se mută în câmpul Numere selectate. |
| 6 |
Faceți clic pe Salvați. |
Verificați starea numerelor PSTN ordonate
Puteți vedea o listă de numere PSTN pe care organizația le-a comandat. Cu aceste informații, puteți vedea numerele neutilizate care sunt disponibile și numerele care au fost comandate și care vor deveni disponibile în curând.
| 1 |
Conectați-vă la Control Hub. |
| 2 |
Accesați . |
Accesorii conectate multiplatforme pentru telefon (MPP) - căști și module de expansiune cheie (KEM)
Când conectați accesorii (Headsets/KEMs) la un dispozitiv MPP, acestea apar ca articol de inventar în fila Dispozitive din Control Hub. Din inventarul Dispozitive Control Hub puteți afla modelul accesoriului, starea și cui aparține accesoriul. Când selectați un accesoriu, pot fi obținute informații suplimentare, cum ar fi numărul de serie al accesoriului și versiunea curentă de software. Câmpul stare accesoriu este raportat ca "online", atâta timp cât accesoriul este conectat la MPP. O cască conectată la MPP își va actualiza automat software-ul cu cea mai recentă versiune disponibilă de la Device Management.
|
Model de telefon |
Setul cu cască Cisco Seria 520 |
Setul cu cască Cisco Seria 530 |
Cisco Headset Seria 560 |
Setul cu cască Cisco Seria 730 |
|---|---|---|---|---|
|
Cisco IP Telefon 8811/8841/8845 |
— |
— |
RJ9 & RJ11 |
— |
|
Cisco IP Telefon 8851/8861/8865 |
USB |
USB |
USB RJ9 & RJ11 |
— |
|
Telefon IP Cisco 7811/7821/7841/7861 |
— |
— |
— |
— |
|
Telefon IP Cisco 6821/6841/6851/6861 |
— |
— |
— |
— |
|
Cisco IP Telefon 6871 |
USB |
USB |
USB |
— |
|
Cisco IP Conference Telefon 7832/8832 |
— |
— |
— |
— |
|
Model de telefon |
KEM |
|---|---|
|
Cisco IP Telefon 8811/8841/8845 |
— |
|
Cisco IP Telefon 8851/8861/8865 |
BEKEM CP-8800-A-KEM CP-8800-V-KEM |
|
Telefon IP Cisco 7811/7821/7841/7861 |
— |
|
Telefon IP Cisco 6821/6841/6861/6871 |
— |
|
Cisco IP Telefon 6851 |
CP-68KEM-3PCC |
|
Cisco IP Conference Telefon 7832/8832 |
— |
Pentru a depana problemele cu care se confruntă modulul de expansiune cheie (modulul de extindere a cheilor) pe telefoanele înregistrate la apelarea Webex, consultați Depanarea problemelor legate de modulele de expansiune cheie în Apelarea Webex pentru detalii.


