- Hjem
- /
- Artikel

Tak for din feedback.

Konfigurer og administrer Webex Calling-enheder
 I denne artikel
 Har du feedback?
Du kan tildele og administrere enheder for brugere og arbejdsområder i Control Hub. Vælg at tilføje ved hjælp af MAC-adressen eller ved at generere en aktiveringskode, der skal indtastes på selve enheden.
Når du tilføjer en enhed, vises en 16-cifret aktiveringskode. Aktiveringskoden udløber efter 30 dage for MPP-telefoner og efter 7 dage for Room-enheder.
Tilføj en telefon til en bruger
Med Control Hub kan du tildele en telefon til en bruger til personlig brug. Telefonerne, der er anført her, understøtter Webex Calling. Selvom alle disse telefoner kan tilføjes ved hjælp af en MAC-adresse, kan kun følgende delmængde registreres ved hjælp af en aktiveringskode:
-
Cisco IP-telefon i 6800-serien, multiplatformtelefoner (lydtelefoner – 6821, 6841, 6851, 6861, 6871)
-
Cisco IP-telefon i 7800-serien, multiplatformtelefoner (lydtelefoner – 7811, 7821, 7841, 7861)
-
Cisco IP-telefon i 8800-serien, multiplatformtelefoner (lydtelefoner – 8811, 8841, 8851, 8861)
-
Cisco IP-telefon i 8800-serien, multiplatformtelefoner (videotelefoner – 8845, 8865)
-
Cisco IP-konferencetelefon 7832 og 8832
-
Cisco Video Phone 8875
-
Cisco-bordtelefoner i 9800-serien
Du kan kun tildele DECT-basenheder (ikke DECT-håndsæt) i Control Hub. Når du har tildelt en baseenhed til en bruger, skal du manuelt parre et DECT-håndsæt med den baseenhed. Se flere oplysninger under Tilslut håndsættet til basisstationen.
| 1 | |
| 2 |
Gå til . Du kan også tilføje en enhed til brugeren fra afsnittet Brugere ved at gå til > vælg en bruger > .
|
| 3 |
Vælg Personlig brug for at tildele en enhed til en bruger, og klik derefter på Næste. |
| 4 |
Indtast enten brugernavnet eller det faktiske navn på telefonens ejer, vælg brugeren fra resultaterne, og klik derefter på Næste. |
| 5 |
Vælg den type enhed, du vil konfigurere for brugeren:
|
Tilføj en telefon til et nyt arbejdsområde
Når folk er på arbejde, samles de på steder som frokoststuer, lobbyer og konferencerum. Du kan opsætte delte Webex-enheder i disse arbejdsområder, tilføje tjenester og derefter se samarbejdet ske.
En arbejdsområdeenhed er ikke tildelt en bestemt bruger, men en fysisk placering, hvilket muliggør delt brug.
De anførte enheder understøtter Webex Calling. Du kan registrere de fleste af disse enheder ved hjælp af en MAC-adresse og kun registrere følgende delmængde ved hjælp af en aktiveringskode:
-
Cisco IP-telefon i 6800-serien, multiplatformtelefoner (lydtelefoner – 6821, 6841, 6851)
-
Cisco IP-telefon i 7800-serien, multiplatformtelefoner (lydtelefoner – 7811, 7821, 7841, 7861)
-
Cisco IP-telefon i 8800-serien, multiplatformtelefoner (lydtelefoner – 8811, 8841, 8851, 8861)
-
Cisco IP-telefon i 8800-serien, multiplatformtelefoner (videotelefoner – 8845, 8865)
-
Cisco IP-konferencetelefon 7832 og 8832
-
Cisco-bordtelefoner i 9800-serien
Før du begynder
- Du kan tilføje op til fem Cisco-bordtelefoner, Cisco MPP-telefoner, trådløse enheder, ATA'er, telefon-OS eller tredjepartsenheder til et arbejdsområde med en professionel arbejdsområdelicens.
- Du kan kun tilføje flere enheder til et professionelt arbejdsområde fra den nye arbejdsområdeside. Slå Prøv nye arbejdsområder til i øverste højre hjørne af arbejdsområdesiden for at bruge den nye arbejdsområdeside.
- Du kan kun tilføje én enhed til et arbejdsområde med en fælles arbejdsområdelicens.
| 1 | |
| 2 |
Gå til . Du kan også tilføje en enhed til et nyt arbejdsområde ved at gå til .
|
| 3 |
Vælg Delt brug, og klik derefter på Næste. |
| 4 |
Vælg Nyt arbejdsområde, og klik derefter på Næste. |
| 5 |
Indtast et navn til arbejdsområdet (f.eks. navnet på det fysiske rum), vælg rumtypen, tilføj rumkapaciteten, og vælg arbejdsområdets placering. Klik på Næste. Et arbejdsområdenavn må ikke være længere end 128 tegn og må ikke have %, #, <, >, /, \, og "tegn". |
| 6 |
Vælg den type enhed, du vil konfigurere til arbejdsområdet:
|
| 7 |
Klik på tjenesten Opkald, og vælg det abonnement og den licenstype, du vil tildele arbejdsområdet.
For at finde ud af mere om de funktioner, der er tilgængelige med licenserne, se Funktioner tilgængelige efter licenstype for Webex Calling. |
| 8 |
Tildel en placering og et telefonnummer (bestemt af den placering, du vælger), og klik derefter på Gem. Du kan også tildele et lokalnummer. Placeringen opdateres under den natlige resynkronisering. Hvis du vil tilføje yderligere enheder til et professionelt arbejdsområde, kan du gøre det på en af følgende måder:
For at ændre eller administrere de enheder, der er tildelt arbejdsområdet, se afsnittet Administrer en enhed for et arbejdsområde. |
 under kolonnen
 Gentildeling af en eksisterende telefon til en anden bruger eller enhed
For at genbruge en telefon, der er tildelt Webex-opkald bruger/arbejdsområde til en Webex-opkald bruger/arbejdsområde, skal du følge disse trin:
| 1 | |
| 2 |
Gå til User/Workspace hvor enheden i øjeblikket er tildelt. Du kan gentildele enheden i disse scenarier:
|
| 3 |
Gå til menuen indstillinger på telefonen, og fuldfør disse trin for at gentildele telefonen. |
| 4 |
Følg vejledningerne i Tilføj og tildel telefon til bruger eller Føj en telefon til et nyt arbejdsområde for at tildele eller tilføje en telefon til en bruger/et arbejdsområde. |
| 5 |
Når du tilføjer enheden i Control Hub, skal du udføre disse handlinger på telefonen: |
Tilføj et tavle, skrivebord eller rumenhed til en bruger
Ved at tildele en tavle-, skrivebords- eller rumenhed som en personlig enhed til en person, kan de få deres Webex-opkald og -møder direkte til deres enhed. For yderligere oplysninger, se Tildel en personlig tavle-, skrivebords- eller rumenhed til en bruger.
Tilføj et tavle, skrivebord eller rumenhed til et nyt arbejdsområde
Når folk er på arbejde, mødes de mange steder såsom frokostlokaler, lobbyer og konferencelokaler. Du kan opsætte delte Cisco Webex-enheder på disse arbejdsområder, tilføje tjenester og derefter opleve samarbejdet.
Hovedprincippet for en Workspaces-enhed er, at den ikke er tildelt en bestemt bruger, men snarere en fysisk placering, hvilket muliggør delt brug.
Enhederne angivet her understøtter Webex-opkald.
| 1 | |
| 2 |
Gå til . Du kan også tilføje en enhed til et nyt arbejdsområde fra afsnittet Arbejdsområder ved at navigere til .
|
| 3 |
Vælg Delt brug og klik på Næste. |
| 4 |
Vælg Nyt arbejdsområde og klik på Næste. |
| 5 |
Indtast et navn til arbejdsområdet (f.eks. navnet på det fysiske rum), vælg rumtypen, tilføj rumkapaciteten, og vælg placeringen af arbejdsområdet. Klik derefter på Næste. |
| 6 |
Vælg Cisco Room and Desk-enhed. |
| 7 |
Vælg en af følgende tjenester, og klik på Næste.
|
| 8 |
Hvis du har valgt en Cisco Webex Calling tjeneste, skal du vælge det abonnement og den licenstype, du vil tildele arbejdsområdet.
For at finde ud af mere om de funktioner, der er tilgængelige med licenserne, se Funktioner tilgængelige efter licenstype for Webex Calling. |
| 9 |
Tildel en placering, et telefonnummer (bestemt af den placering, du vælger) og et lokalnummer, og klik derefter på Gem. |
| 10 |
Aktivér enheden ved at bruge den medfølgende kode. Du kan kopiere eller udskrive aktiveringskoden eller sende den på e-mail. |
Lav massetilføjelse og -tildeling af enheder
For at tildele flere enheder til brugere og arbejdsområder kan du udfylde en CSV-fil med de nødvendige oplysninger og aktivere disse enheder i blot et par enkle trin.
- Du kan tilføje op til 5 Cisco-bordtelefoner, Cisco MPP-telefoner, ATA'er eller tredjepartsenheder til et arbejdsområde med en professionel arbejdsområdelicens.
- Du kan kun tilføje én enhed til et arbejdsområde med en licens til et fælles arbejdsområde.
Enhederne angivet her understøtter Webex-opkald. Du kan registrere alle enheder ved hjælp af en MAC-adresse; registrer dog følgende delmængde af enheder ved hjælp af en aktiveringskode:
-
Cisco IP-telefon i 6800-serien, multiplatformtelefoner (lydtelefoner – 6821, 6841, 6851)
-
Cisco IP-telefon i 7800-serien, multiplatformtelefoner (lydtelefoner – 7811, 7821, 7841, 7861)
-
Cisco IP-telefon i 8800-serien, multiplatformtelefoner (lydtelefoner – 8811, 8841, 8851, 8861)
-
Cisco IP-telefon i 8800-serien, multiplatformtelefoner (videotelefoner – 8845, 8865)
-
Cisco IP-konferencetelefon 7832 og 8832
-
Cisco Video Phone 8875
-
Cisco-bordtelefoner i 9800-serien
| 1 | ||||||||||||||||||||||||||||||||||||||
| 2 |
Gå til . | |||||||||||||||||||||||||||||||||||||
| 3 |
Vælg en af følgende muligheder, og klik på Download.
Du kan bruge følgende tabel til at forberede din CSV-fil.
Følgende felter er obligatoriske, når du tildeler en enhed til Webex Calling-brugere og arbejdsområder:
Disse felter for telefonnummer og lokalnummer hed tidligere Telefonnummer og Direkte linje; Disse kolonnenavne understøttes fortsat i en kort periode. Vi anbefaler, at du begrænser antallet af enheder til 1000 pr. CSV-fil. Hvis du vil tilføje mere end 1000 enheder, skal du bruge en anden CSV-fil. | |||||||||||||||||||||||||||||||||||||
| 4 |
Udfyld regnearket. | |||||||||||||||||||||||||||||||||||||
| 5 |
Overfør CSV-filen ved at trække og slippe den eller klikke på Vælg en fil. | |||||||||||||||||||||||||||||||||||||
| 6 |
Hvis MAC-adressen er tom, får du mulighed for at vælge, hvor aktiveringskoden skal sendes hen.
Du eller brugeren skal indtaste aktiveringskoden på enheden for at aktivere den. | |||||||||||||||||||||||||||||||||||||
| 7 |
Klik på Indsend. Viser den opdaterede status, når enhederne bliver aktive.
Multiplatformsenheder skal køre en firmwareindlæsning på 11.3.1 SR2 eller nyere for at brugerne kan indtaste aktiveringskoden på deres enhed. For information om opgradering af telefonens firmware, se denne artikel. |
Eksporter en enhedsliste
Hvis du vil se listen over enheder, der er tildelt brugere og arbejdsområder, kan du eksportere CSV-filen.
Log ind på Control Hub og gå til Enheder.
Vælg flere enheder fra enhedslisten, og vælg indstillingen Eksporter. Du kan vælge de felter, der skal inkluderes i CSV-filen, og eksportere indholdet til en lokal mappe.
Felterne, der vises i CSV-filen, afhænger af enhedens forbindelse til platformen. Derfor er nogle felter ikke tilgængelige i outputfilen.
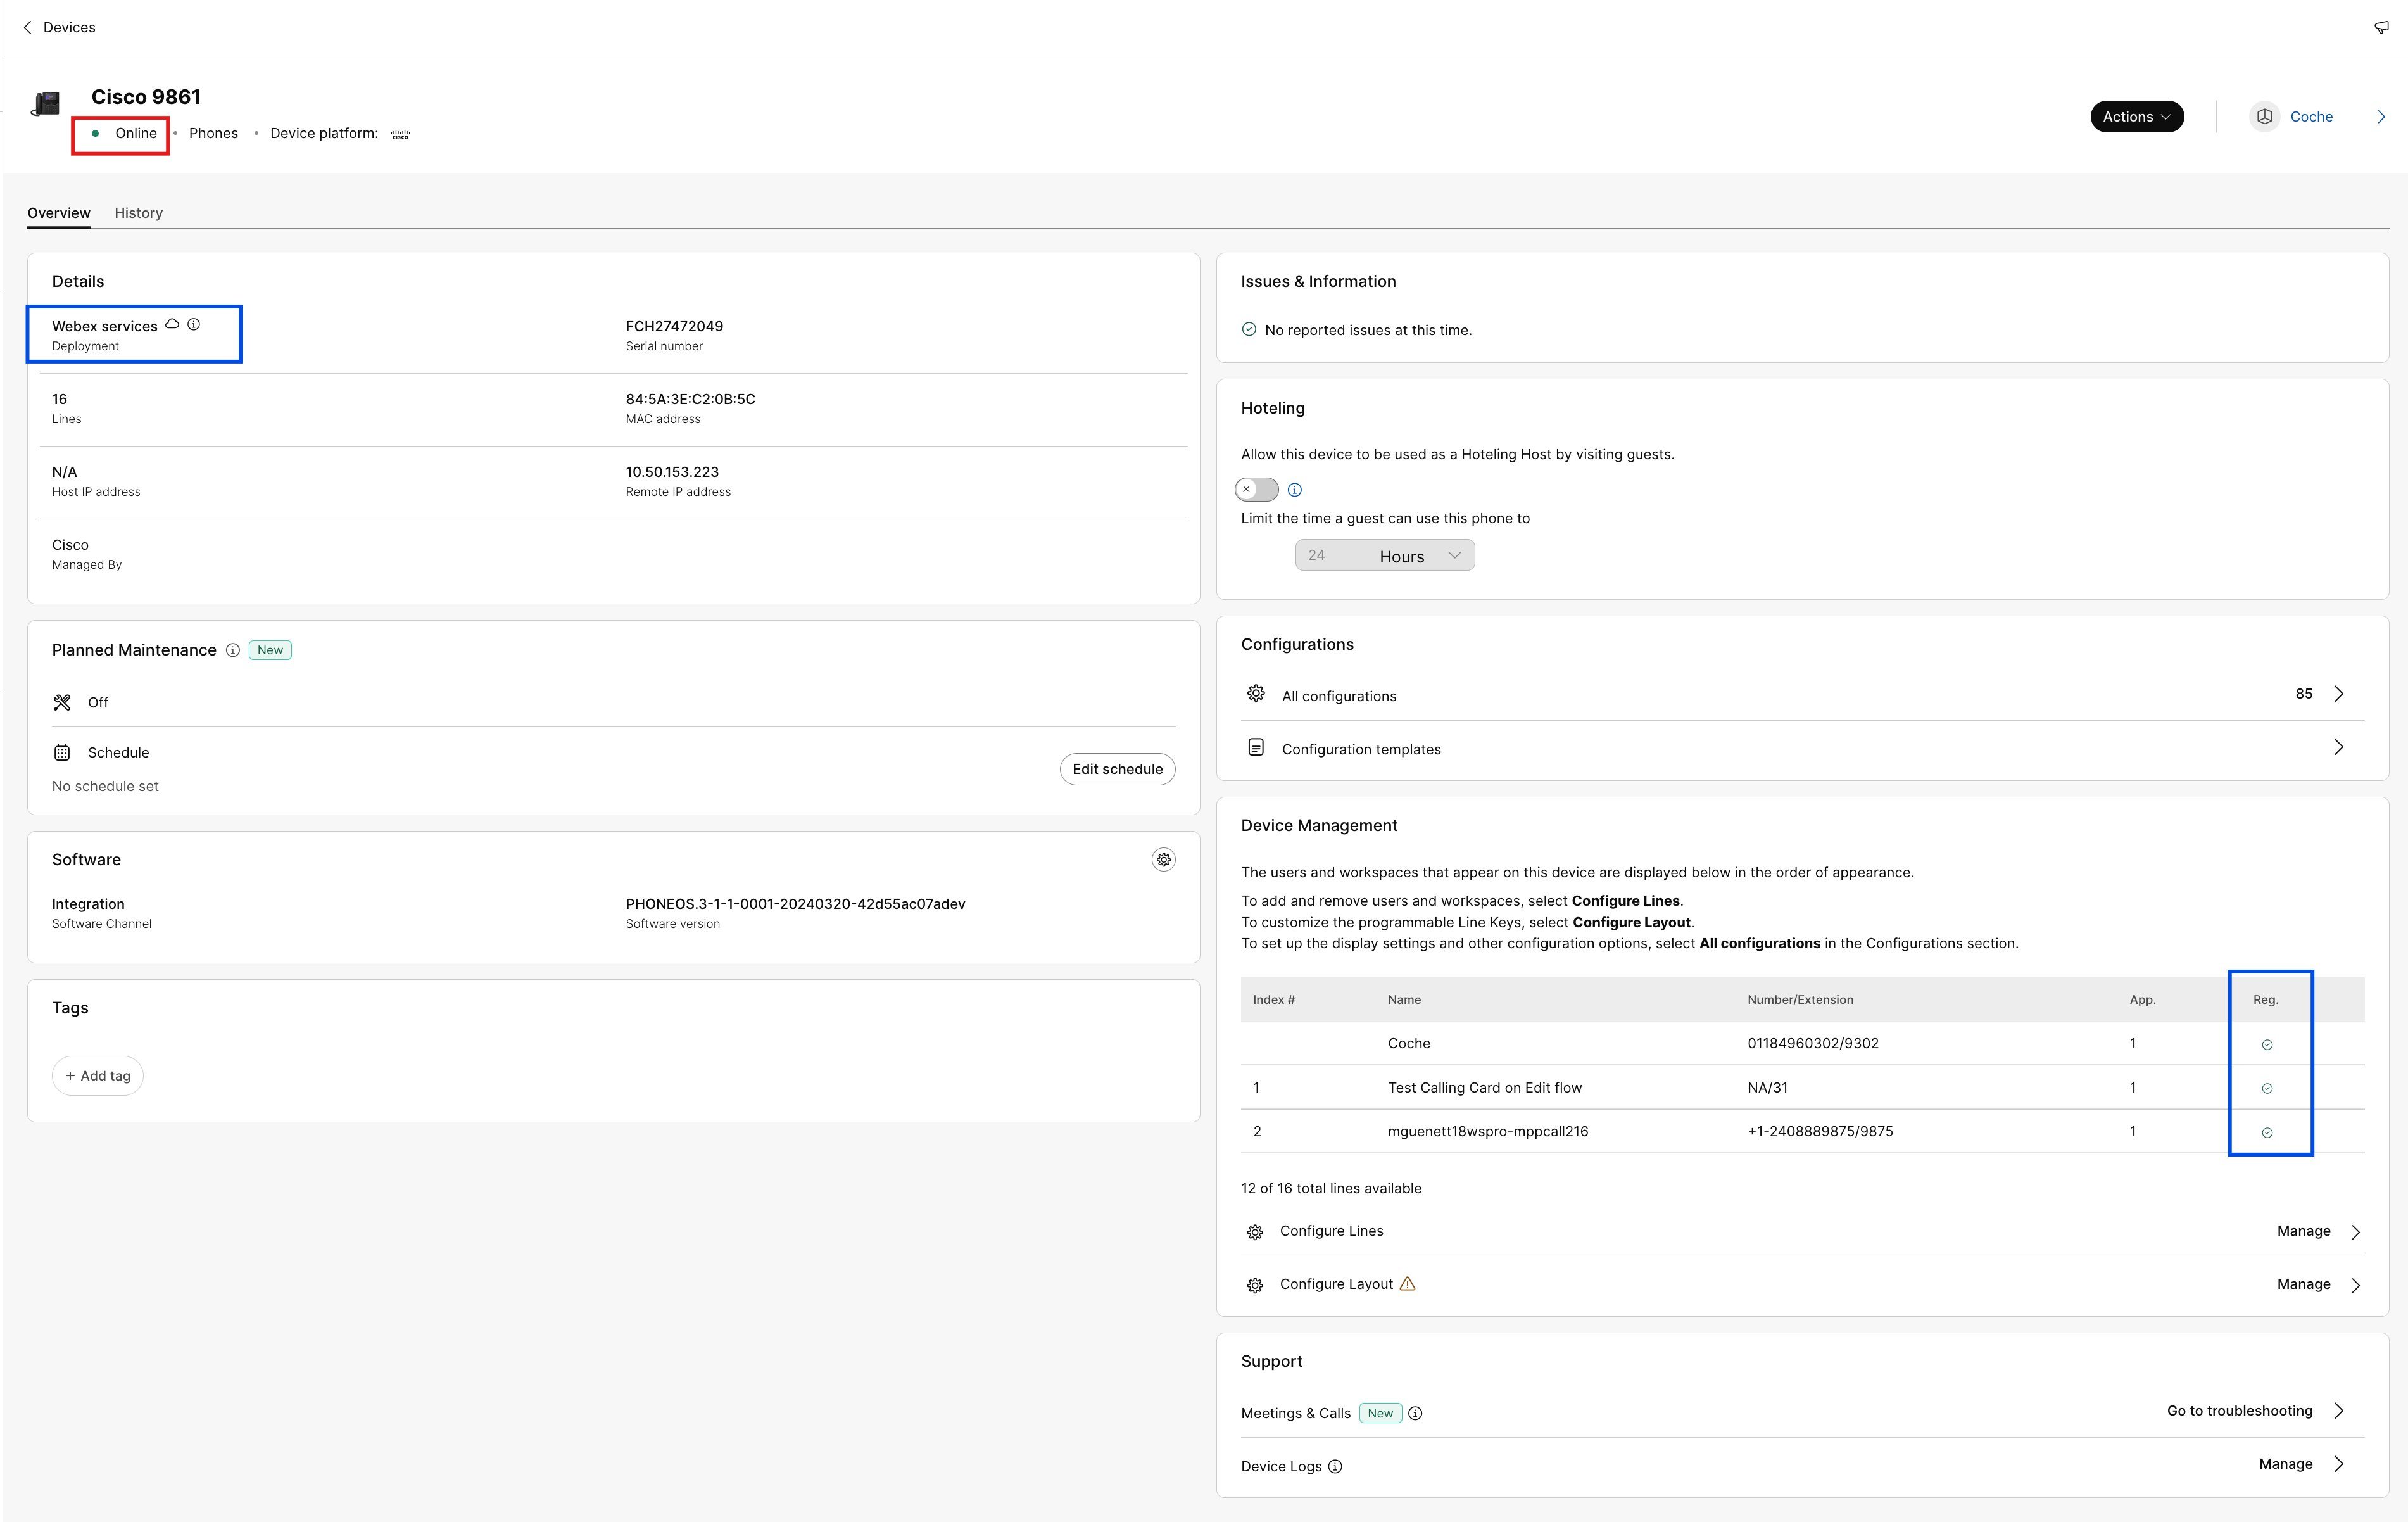
Administrer en enhed for en bruger
Du kan tilføje, fjerne, genstarte, kontrollere aktivering eller oprette en ny aktiveringskode for de enheder, der er tildelt til brugere inden for din organisation. Dette kan være nyttigt at se og administrere enheder på brugernes skærm, når det er nødvendigt.
| 1 | |
| 2 |
Gå til . |
| 3 |
Vælg en bruger, og klik på Enheder. |
| 4 |
Hvis du vil tilføje en enhed til denne bruger, skal du klikke på Tilføj enhed. Hvis brugeren allerede har fået tildelt en enhed, og du vil tilføje en anden enhed, skal du klikke på . For mere information om at tilføje enheden til en bruger, se afsnittet Tilføj telefoner til en bruger. |
| 5 |
Hvis du vil modificere en eksisterende enhed, skal du vælge enhedsnavnet. Dette fører dig til siden Enheder. Her kan du se og redigere enhedsindstillinger, slette enheden, genstarte enheden eller oprette en ny aktiveringskode til enheden, hvis det er nødvendigt. Se Konfigurer og opdater telefonindstillinger for at få yderligere oplysninger om konfiguration af telefonindstillinger. |
| 6 |
Hvis den enhed, der er tilføjet til brugeren, er Webex Opmærksom, vises valgmuligheden Webex Opmærksom under enhederne, som vist i diagrammet. Webex Aware angiver, at enheden har onboardet til Webex-platformen og har adgang til Webex-funktioner, der understøttes af telefonen.
|
| 7 |
Klik på Handlinger for at administrere enheden. Handlinger giver dig mulighed for at anvende konfigurationsændringer, genstarte enheden, rapportere et problem og indsamle enhedslogfiler eller slette enheden. Fanen Handlinger har disse valgmuligheder for en Webex-opmærksom-aktiveret enhed:
|
Administrer en enhed for et arbejdsområde
Du kan tilføje og administrere enheder direkte fra en arbejdsområdeprofil. Arbejdsområdeenheder kan inkludere ATA-enheder såsom faxmaskiner. Du kan også opsætte en arbejdsområdeenhed som vært for aktivitetsbaseret kontor. For mere information om hotelophold, se Hotelophold i Control Hub.
| 1 | |
| 2 |
Gå til . |
| 3 |
Vælg det arbejdsområde, der skal ændres. |
| 4 |
For at tilføje en enhed skal du klikke på Tilføj enhed i feltet Enheder. For mere information om at tilføje enheder til arbejdsområdet, se afsnittet Tilføj en telefon til et nyt arbejdsområde. |
| 5 |
Hvis du vil modificere en eksisterende enhed, skal du vælge enhedsnavnet. Dette fører dig til siden Enheder. Her kan du se og redigere enhedsindstillinger, slette enheden, genstarte enheden og aktivere enheden, så den kan bruges som vært for aktivitetsbaseret kontor. Se Konfigurer og opdater telefonindstillinger for at få yderligere oplysninger om konfiguration af telefonindstillinger. |
| 6 |
Hvis den enhed, der er tilføjet til arbejdsområdet, er Webex Opmærksom, vises valgmuligheden Webex Opmærksom under enhederne, som vist i diagrammet. Webex Opmærksom angiver, at enheden har onboardet til Webex-platformen og har adgang til Webex-funktioner, der understøttes af telefonen.
|
| 7 |
Klik på Handlinger for at administrere enheden. Handlinger hjælper med at anvende konfigurationsændringer eller opdatere firmware til MPP-enheder. Fanen Handlinger har disse valgmuligheder for en Webex-opmærksom-aktiveret enhed:
|
Konfigurer linjer - Tilføj og omarranger linjer
Funktionen Konfigurer linjer til tildeling af primære, delte og virtuelle linjer til telefoner tillader flere visninger af en delt linje på den samme enhed. Oplevelsen med at konfigurere porte for ATA'er er uændret.
Her er opdateringerne til funktionen Konfigurer linjer for MPP- og PhoneOS-enheder:
-
Primære linjer
-
Tildel ejeren af enheden, og sørg for, at den optager den første linjeposition på enheden.
-
Øg antallet af udseender på den række for at tilføje flere udseender.
-
-
Delte linjer / Virtuelle linjer
-
Tildel delte linjer fra enhver opkaldsaktiveret bruger eller arbejdsområde i organisationen med tilgængelige delte opkaldsappearances (SCA'er).
-
Øg antallet af udseender på den delte linjerække for at tilføje yderligere udseender.
De SCA-grænser, der er tilgængelige for brugeren eller arbejdsområdet, kan begrænse de tildelelige udseender.
-
Tildel et linjeindeks til hver delt linje. Du kan omarrangere de delte linjer ved at trække og slippe.
Du kan ikke adskille de individuelle udseender af en linje.
-
Brug brugerens til at arrangere placeringen af delte linjeindekser på en enhed.
-
-
Visninger
-
Konfigurer flere udseender af den samme primære, delte eller virtuelle linje som individuelle vægtede linjesæt.
-
Vægtede linjer har suffikset -1, -2 osv. (kun Cisco-telefoner).
-
Opkald ringer ind i den første tilgængelige vægtede linjevisning.
-
-
Nye oversigtsoplysninger (nederst på siden)
-
Unikke SIP-registreringslinjer – Viser antallet af unikke SIP-registreringskonti, som telefonen kan understøtte. Det maksimale antal konti, der i øjeblikket understøttes, er 16.
-
Samlet antal linjevisninger – Viser det samlede antal tildelbare linjevisninger, der understøttes af enheden. Hvis telefonmodellen understøtter KEM'er, inkluderer det maksimale antal visninger den udvidede kapacitet.
-
-
Masselinjetildeling og offentlige API'er
- Bulk CSV- og Public API-metoderne til tildeling af linjer inkluderer funktionen "Udseende".
For mere information om delte linjer på tværs af lokationer, se Konfiguration af delte linjer og virtuelle linjer på tværs af lokationer.
Når et hurtigopkald tilføjes til en telefon ved hjælp af et langt tryk på den ønskede linjetast, er hurtigopkaldet ikke synligt i Control Hub. Et hurtigopkald kan overskrives ved at konfigurere en delt linje på den pågældende linjetast.
| 1 | |
| 2 |
Gå til Brugere eller Arbejdsområder (afhængigt af hvor den enhed, der skal ændres, er tildelt). |
| 3 |
Vælg en bruger eller et arbejdsområde. |
| 4 |
Gå til Enheder og klik på en enhed, som du vil tilføje eller ændre de delte linjer for. Dette fører dig til siden Enheder. |
| 5 |
Under Enhedsstyringskal du klikke på Konfigurer linjer. |
| 6 |
For at tilføje et delt linjeudseende skal du klikke på ikonet Du kan tildele den samme delte linje eller virtuelle linje til flere individuelle linjetaster på en telefon. I kolonnen Udseende for den respektive linje skal du klikke på ikonet
Du kan tilføje linjerne i den rækkefølge, du ønsker, at de skal vises i. Hvis du vil ændre den rækkefølge, linjerne vises i, skal du slette dem og føje dem til listen i den rækkefølge, du ønsker, at de skal vises i. Hvis en bruger har numre fra andre users/groups konfigureret på deres enheder, kan du tilføje en Linjenavn til den delte linje. Denne linjeetiket hjælper med at identificere udseendet af en delt linje. Klik på |
| 7 |
Klik på Gem. For store organisationer skal administratoren vælge en placering, før yderligere opkaldslinjer konfigureres. Klik på ikonet For en almindelig organisation er lokationsfilteret ikke tilgængeligt, og administratoren kan vælge en linje. |
 , søge efter navn eller telefonnummer og vælge en linje.
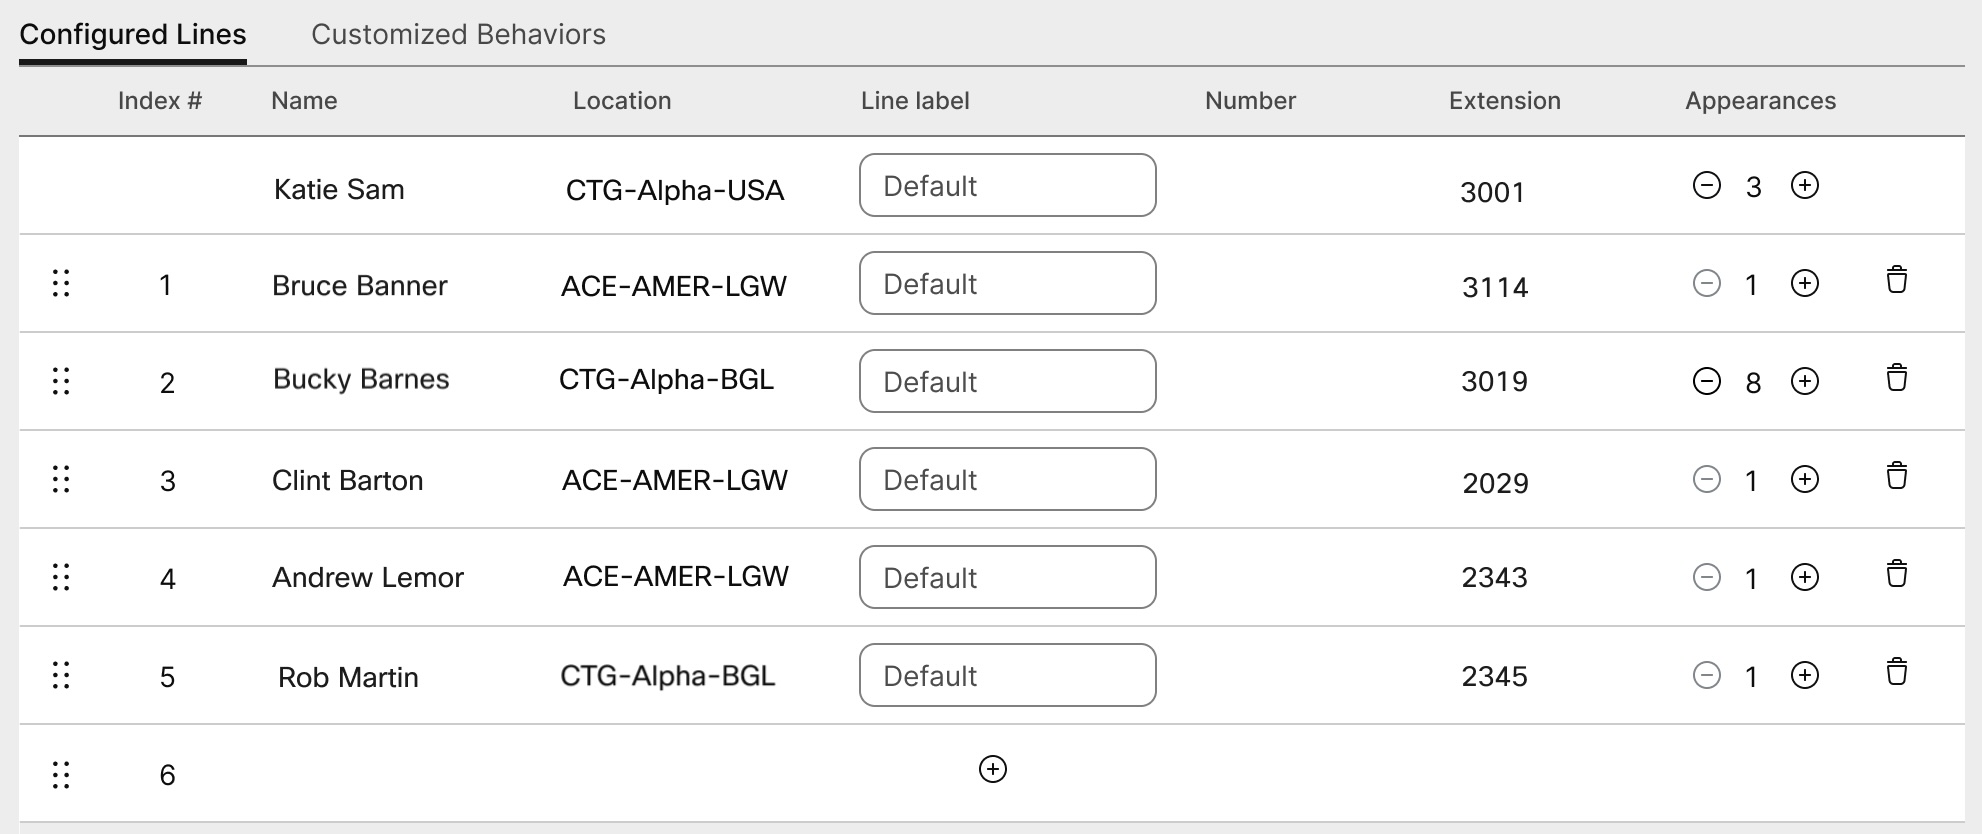
 -ikonet for at fjerne en linje. Du kan ikke fjerne den primære bruger online 1.
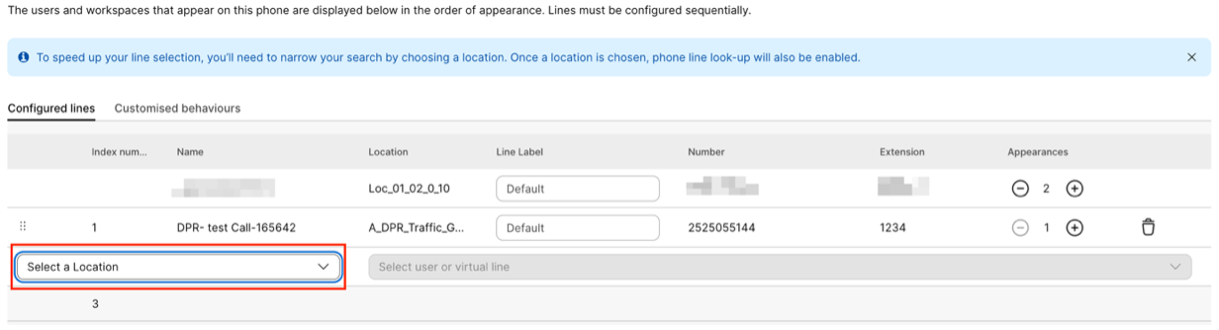
Konfigurer en ATA-enhed til en bruger
Du kan konfigurere portene på en analog telefonadapter (ATA)-enhed, der er tildelt en bruger i Control Hub. I øjeblikket er de to tilgængelige konfigurationer for ATA-enheder til enheder med to porte og enheder med 24 porte.
| 1 | |
| 2 |
Gå til . |
| 3 |
Vælg en bruger, der skal ændres, og rul til Enheder. |
| 4 |
Vælg en enhed, hvor du vil tilføje eller ændre. |
| 5 |
Under Brugere på denne enhed skal du klikke på Konfigurer porte. |
| 6 |
Hvis du vil tilføje en delt portkonfiguration, skal du klikke på |
| 7 |
Indtast navn eller telefonnummer, vælg mellem de valgmuligheder, der vises, og klik derefter på Gem. Kun arbejdsområder uden enheder vises i opslaget. |
| 8 |
Hvis enheden kræver T.38-faxkomprimering, skal du markere feltet i T.38-kolonnen eller tilsidesætte komprimeringsindstillingerne på brugerniveau og derefter klikke på Gem. Et arbejdsområde kan have en ATA. Dette er nyttigt for faxmaskiner. |
 -ikonet.
Tilføj numre til din placering
Du kan tilføje telefonnumre til fastnet- og lokaleenheder i din kundeorganisation når som helst, uanset om du er midt i en prøveperiode eller er skiftet til et betalt abonnement.
Vi har øget antallet af telefonnumre, du kan tilføje i Control Hub, fra 250 til 1000.
| 1 | |
| 2 |
Gå til , og klik derefter på Tilføj tal. |
| 3 |
Angiv placeringen og nummertypen. Hvis du overfører numre, skal du både indtaste dine aktuelle og de nye faktureringsnumre. |
| 4 |
Angiv Placering, Stat, Områdenummer, Præfiks (valgfrit), og klik derefter på Søg. Tilgængelige numre vises. |
| 5 |
Vælg de numre, du vil føje til placeringen. De tal, du vælger, flyttes over til feltet Valgte tal. |
| 6 |
Klik på Gem. |
Kontrollér status for bestilte PSTN-numre
Multiplatformtelefon (MPP) tilsluttet tilbehør—Headsets og Key Expansion Modules (KEMs)
Når du tilslutter tilbehør (Headsets/KEMs) til en MPP-enhed, vises de som en lagervare under fanen Enheder i Control Hub. I enhedsoversigten i Control Hub kan du se tilbehørets model, status og hvem tilbehøret tilhører. Når du vælger et tilbehør, kan du få yderligere oplysninger, såsom tilbehørets serienummer og aktuel softwareversion. Tilbehørets statusfelt rapporteres som "online", så længe tilbehøret er tilsluttet MPP. Et MPP-tilsluttet headset opgraderer automatisk dets software med den nyeste tilgængelige version i enhedsadministration.
|
Telefonmodel |
Cisco Headset 520-serien |
Cisco Headset 530-serien |
Cisco Headset 560-serien |
Cisco Headset 730-serien |
|---|---|---|---|---|
|
Cisco IP-telefon 8811/8841/8845 |
— |
— |
RJ9 og RJ11 |
— |
|
Cisco IP-telefon 8851/8861/8865 |
USB |
USB |
USB RJ9 og RJ11 |
— |
|
Cisco IP-telefon 7811/7821/7841/7861 |
— |
— |
— |
— |
|
Cisco IP-telefon 6821/6841/6851/6861 |
— |
— |
— |
— |
|
Cisco IP-telefon 6871 |
USB |
USB |
USB |
— |
|
Cisco IP Conference Phone 7832/8832 |
— |
— |
— |
— |
|
Telefonmodel |
KEM |
|---|---|
|
Cisco IP-telefon 8811/8841/8845 |
— |
|
Cisco IP-telefon 8851/8861/8865 |
BEKEM CP-8800-A-KEM CP-8800-V-KEM |
|
Cisco IP-telefon 7811/7821/7841/7861 |
— |
|
Cisco IP-telefon 6821/6841/6861/6871 |
— |
|
Cisco IP-telefon 6851 |
CP-68KEM-3PCC |
|
Cisco IP Conference Phone 7832/8832 |
— |
For at fejlfinde problemer med Key Expansion Module (nøgleudvidelsesmodul) på telefoner, der er tilmeldt Webex-opkald, se Fejlfinding af problemer med key expansion modules i Webex-opkald for yderligere oplysninger.


