- Start
- /
- Artikel

Hartelijk dank voor uw feedback

Webex Calling-apparaten configureren en beheren
 In dit artikel
 Feedback?
U kunt apparaten voor gebruikers en werkruimten toewijzen en beheren in Control Hub. Kies of u wilt toevoegen met het MAC-adres of door een activeringscode te genereren die u op het apparaat zelf wilt invoeren.
Bij het toevoegen van een apparaat wordt een 16-cijferige activeringscode weergegeven. De activeringscode verloopt na 30 dagen voor MPP-telefoons en na 7 dagen voor Room-apparaten.
Voeg een telefoonnummer toe aan een gebruiker
Met Control Hub kunt u een telefoon aan een gebruiker toewijzen voor persoonlijk gebruik. De hier vermelde telefoons ondersteunen Webex Calling. Hoewel al deze telefoons kunnen worden toegevoegd met behulp van een MAC-adres, kan slechts de volgende subset worden geregistreerd met een activeringscode:
-
Cisco IP-telefoons uit de 6800-serie voor meerdere platforms (audiotelefoons: 6821, 6841, 6851, 6861, 6871)
-
Cisco IP-telefoons uit de 7800-serie voor meerdere platforms (audiotelefoons: 7811, 7821, 7841, 7861)
-
Cisco IP-telefoons uit de 8800-serie voor meerdere platforms (audiotelefoons: 8811, 8841, 8851, 8861)
-
Cisco IP-telefoons uit de 8800-serie voor meerdere platforms (videotelefoons: 8845, 8865)
-
Cisco IP-conferentietelefoon 7832 en 8832
-
Cisco Video Phone 8875
-
Cisco bureautelefoon 9800-serie
In Control Hub kunt u alleen DECT-basisstations toewijzen (geen DECT-handsets). Nadat je een basisstation aan een gebruiker hebt toegewezen, koppel je handmatig een DECT-handset aan dat basisstation. Zie De handset aan het basisstation koppelen voor meer informatie.
| 1 | |
| 2 |
Ga naar . Je kunt ook een apparaat aan de gebruiker toevoegen vanuit het gedeelte Gebruikers door te navigeren naar > selecteer een gebruiker > .
|
| 3 |
Kies Persoonlijk gebruik om een apparaat aan een gebruiker toe te wijzen en klik vervolgens op Volgende. |
| 4 |
Voer de gebruikersnaam of de daadwerkelijke naam van de telefooneigenaar in, selecteer de gebruiker uit de resultaten en klik vervolgens op Volgende. |
| 5 |
Kies het type apparaat dat u voor de gebruiker wilt instellen:
|
Een telefoon toevoegen aan een nieuwe werkplek
Wanneer mensen aan het werk zijn, komen ze samen op plekken zoals kantines, lobby's en vergaderruimtes. In deze werkruimtes kunt u gedeelde Webex-apparaten instellen, services toevoegen en vervolgens de samenwerking volgen.
Een Workspaces-apparaat is niet toegewezen aan een specifieke gebruiker, maar aan een fysieke locatie, waardoor gedeeld gebruik mogelijk is.
De vermelde apparaten ondersteunen Webex Calling. Je kunt de meeste van deze apparaten registreren met een MAC-adres, en alleen de volgende subset registreren met een activeringscode:
-
Cisco IP-telefoons uit de 6800-serie voor meerdere platforms (audiotelefoons: 6821, 6841, 6851)
-
Cisco IP-telefoons uit de 7800-serie voor meerdere platforms (audiotelefoons: 7811, 7821, 7841, 7861)
-
Cisco IP-telefoons uit de 8800-serie voor meerdere platforms (audiotelefoons: 8811, 8841, 8851, 8861)
-
Cisco IP-telefoons uit de 8800-serie voor meerdere platforms (videotelefoons: 8845, 8865)
-
Cisco IP-conferentietelefoon 7832 en 8832
-
Cisco bureautelefoon 9800-serie
Voordat u begint
- Met een professionele Workspace-licentie kunt u maximaal vijf Cisco-bureautoestellen, Cisco MPP-telefoons, draadloze apparaten, ATA's, Phone OS-apparaten of apparaten van derden toevoegen aan een Workspace.
- Je kunt meerdere apparaten alleen aan een professionele werkruimte toevoegen via de pagina voor nieuwe werkruimtes. Schakel Nieuwe werkruimtes proberen in vanuit de rechterbovenhoek van de werkruimtepagina om de nieuwe werkruimtepagina te gebruiken.
- Met een licentie voor een gedeelde werkruimte kunt u slechts één apparaat aan een werkruimte toevoegen.
| 1 | |
| 2 |
Ga naar . Je kunt ook een apparaat toevoegen aan een nieuwe werkruimte door naar .
|
| 3 |
Kies Gedeeld gebruiken klik vervolgens op Volgende. |
| 4 |
Kies Nieuwe werkruimteen klik vervolgens op Volgende. |
| 5 |
Geef de werkplek een naam (bijvoorbeeld de naam van de fysieke ruimte), selecteer het ruimtetype, voeg de capaciteit van de ruimte toe en kies de locatie van de werkplek. Klik op Volgende. Een werkruimtenaam mag niet langer zijn dan 128 tekens en mag geen bepaalde eigenschappen hebben. %, #, <, >, /, \, en " personages. |
| 6 |
Kies het type apparaat dat u voor de werkplek wilt instellen:
|
| 7 |
Klik op de Calling service en kies het abonnement en het licentietype dat u aan de werkruimte wilt toewijzen.
Voor meer informatie over de functies die beschikbaar zijn met de licenties, zie Beschikbare functies per licentietype voor Webex Calling. |
| 8 |
Wijs een Locatie en Telefoonnummer toe (afhankelijk van de locatie die u kiest) en klik vervolgens op Opslaan. U hebt ook de optie om een toestel toe te wijzen. De locatie wordt tijdens de nachtelijke synchronisatie bijgewerkt. Als u extra apparaten wilt toevoegen aan een professionele werkplek, kunt u dat op een van de volgende manieren doen:
Zie de sectie Een apparaat voor een werkruimte beheren voor het wijzigen of beheren van de apparaten die aan de werkruimte zijn toegewezen. |
 onder de kolom
 Een bestaande telefoon opnieuw toewijzen aan een andere gebruiker of apparaat.
Als u een telefoon die is toegewezen aan een Webex Calling gebruiker/werkruimte opnieuw wilt gebruiken Webex Calling gebruiker/werkruimte, volgt u deze stappen:
| 1 | |
| 2 |
Ga naar de User/Workspace waar het apparaat momenteel is toegewezen. U kunt het apparaat opnieuw toewijzen in de volgende scenario's:
|
| 3 |
Ga aan de telefoon naar het instellingenmenu en voltooi deze stappen om de telefoon opnieuw toe te toewijzen. |
| 4 |
Volg de instructies in Telefoon toevoegen en toewijzen aan een gebruiker of Een telefoon toevoegen aan een nieuwe werkruimte om een telefoon aan een gebruiker/werkruimte toe te wijzen of toe te voegen. |
| 5 |
Nadat je het apparaat aan de Control Hub hebt toegevoegd, voer je de volgende stappen uit op de telefoon: |
Voeg een bord, bureau of kamerapparaat toe aan een gebruiker.
Door een Board-, Desk- of Room-apparaat aan iemand toe te wijzen als persoonlijk apparaat, kan die persoon zijn of haar Webex-gesprekken en -vergaderingen rechtstreeks op dat apparaat ontvangen. Zie voor meer informatie Een persoonlijk bord-, bureau- of kamerapparaat toewijzen aan een gebruiker.
Voeg een whiteboard, bureau of apparaat toe aan een nieuwe werkruimte.
Wanneer mensen aan het werk zijn, komen ze op veel werkplekken samen, zoals lunchruimtes, lobby's en conferentieruimten. U kunt gedeelde Cisco Webex-apparaten instellen op deze werkplekken, services toevoegen en vervolgens de samenwerking volgen.
Het kernprincipe van een Workspaces-apparaat is dat het niet aan een specifieke gebruiker is toegewezen, maar aan een fysieke locatie, waardoor gedeeld gebruik mogelijk is.
De apparaten die hier worden weergegeven, ondersteunen Webex Calling.
| 1 | |
| 2 |
Ga naar . Je kunt ook een apparaat toevoegen aan een nieuwe werkruimte vanuit het gedeelte Werkruimtes door te navigeren naar .
|
| 3 |
Kies Gedeeld gebruik en klik op Volgende. |
| 4 |
Kies Nieuwe werkruimte en klik op Volgende. |
| 5 |
Geef de werkplek een naam (bijvoorbeeld de naam van de fysieke ruimte), selecteer het ruimtetype, voeg de capaciteit van de ruimte toe en kies de locatie voor de werkplek. Klik vervolgens op Volgende. |
| 6 |
Kies Cisco Room and Desk-apparaat. |
| 7 |
Kies een van de volgende services en klik op Volgende.
|
| 8 |
Als u een Cisco Webex Calling -service hebt gekozen, selecteer dan het abonnement en het licentietype dat u aan de werkruimte wilt toewijzen.
Voor meer informatie over de functies die beschikbaar zijn met de licenties, zie Beschikbare functies per licentietype voor Webex Calling. |
| 9 |
Wijs een Locatie, Telefoonnummer (afhankelijk van de locatie die u kiest) en Toestel toe, en klik vervolgens op Opslaan. |
| 10 |
Activeer het apparaat met behulp van de verstrekte code. U kunt de activeringscode kopiëren, e-mailen of afdrukken. |
Apparaten in bulk toevoegen en toewijzen
Om meerdere apparaten aan gebruikers en werkruimtes toe te wijzen, kunt u een CSV-bestand vullen met de benodigde informatie en die apparaten in slechts een paar eenvoudige stappen activeren.
- Met een Professional-werkruimtelicentie kunt u maximaal 5 Cisco-desktelefoons, Cisco MPP-telefoons, ATA's of apparaten van derden toevoegen aan een werkruimte.
- Met een licentie voor een gedeelde werkruimte kunt u slechts één apparaat aan een werkplek toevoegen.
De apparaten die hier worden weergegeven, ondersteunen Webex Calling. U kunt alle apparaten registreren met behulp van een MAC-adres; registreer echter de volgende apparaten met behulp van een activeringscode:
-
Cisco IP-telefoons uit de 6800-serie voor meerdere platforms (audiotelefoons: 6821, 6841, 6851)
-
Cisco IP-telefoons uit de 7800-serie voor meerdere platforms (audiotelefoons: 7811, 7821, 7841, 7861)
-
Cisco IP-telefoons uit de 8800-serie voor meerdere platforms (audiotelefoons: 8811, 8841, 8851, 8861)
-
Cisco IP-telefoons uit de 8800-serie voor meerdere platforms (videotelefoons: 8845, 8865)
-
Cisco IP-conferentietelefoon 7832 en 8832
-
Cisco Video Phone 8875
-
Cisco bureautelefoon 9800-serie
| 1 | ||||||||||||||||||||||||||||||||||||||
| 2 |
Ga naar . | |||||||||||||||||||||||||||||||||||||
| 3 |
Kies een van de volgende opties en klik op Download.
Je kunt de volgende tabel gebruiken om je CSV-bestand voor te bereiden.
De volgende velden zijn verplicht bij het toewijzen van een apparaat aan Webex Calling-gebruikers en -werkruimten:
Deze velden voor telefoonnummer en toestelnummer hadden voorheen de titels Telefoonnummer en Directe lijn. ; Deze kolomnamen blijven nog korte tijd ondersteuning bieden. We raden u aan het aantal apparaten te beperken tot 1000 per CSV-bestand. Als u meer dan 1000 apparaten wilt toevoegen, gebruik dan een tweede CSV-bestand. | |||||||||||||||||||||||||||||||||||||
| 4 |
Vul de spreadsheet in. | |||||||||||||||||||||||||||||||||||||
| 5 |
Upload het CSV-bestand door het te slepen en neer te zetten of door op Een bestand kiezen te klikken. | |||||||||||||||||||||||||||||||||||||
| 6 |
Als het MAC-adres leeg is, krijg je de mogelijkheid om te kiezen waar de activeringscode naartoe moet worden gestuurd.
U of de gebruiker moet de activeringscode op het apparaat invoeren om het te activeren. | |||||||||||||||||||||||||||||||||||||
| 7 |
Klik op Verzenden. Geeft de bijgewerkte status weer wanneer de apparaten actief worden.
Multiplatformapparaten moeten firmwareversie 11.3.1 SR2 of hoger hebben om gebruikers in staat te stellen de activeringscode op hun apparaat in te voeren. Voor informatie over het upgraden van de telefoonfirmware, zie dit artikel. |
Exporteer een lijst met apparaten
Als u de lijst wilt bekijken van apparaten die aan gebruikers en werkruimtes zijn toegewezen, kunt u het CSV-bestand exporteren.
Meld u aan bij Control Hub en ga naar Apparaten.
Selecteer meerdere apparaten uit de apparatenlijst en selecteer de optie Exporteren. Je kunt zelf kiezen welke velden je in het CSV-bestand wilt opnemen en de inhoud exporteren naar een lokale map.
De velden die in het CSV-bestand worden weergegeven, zijn afhankelijk van de verbinding van het apparaat met het platform. Daarom zijn sommige velden niet beschikbaar in het uitvoerbestand.
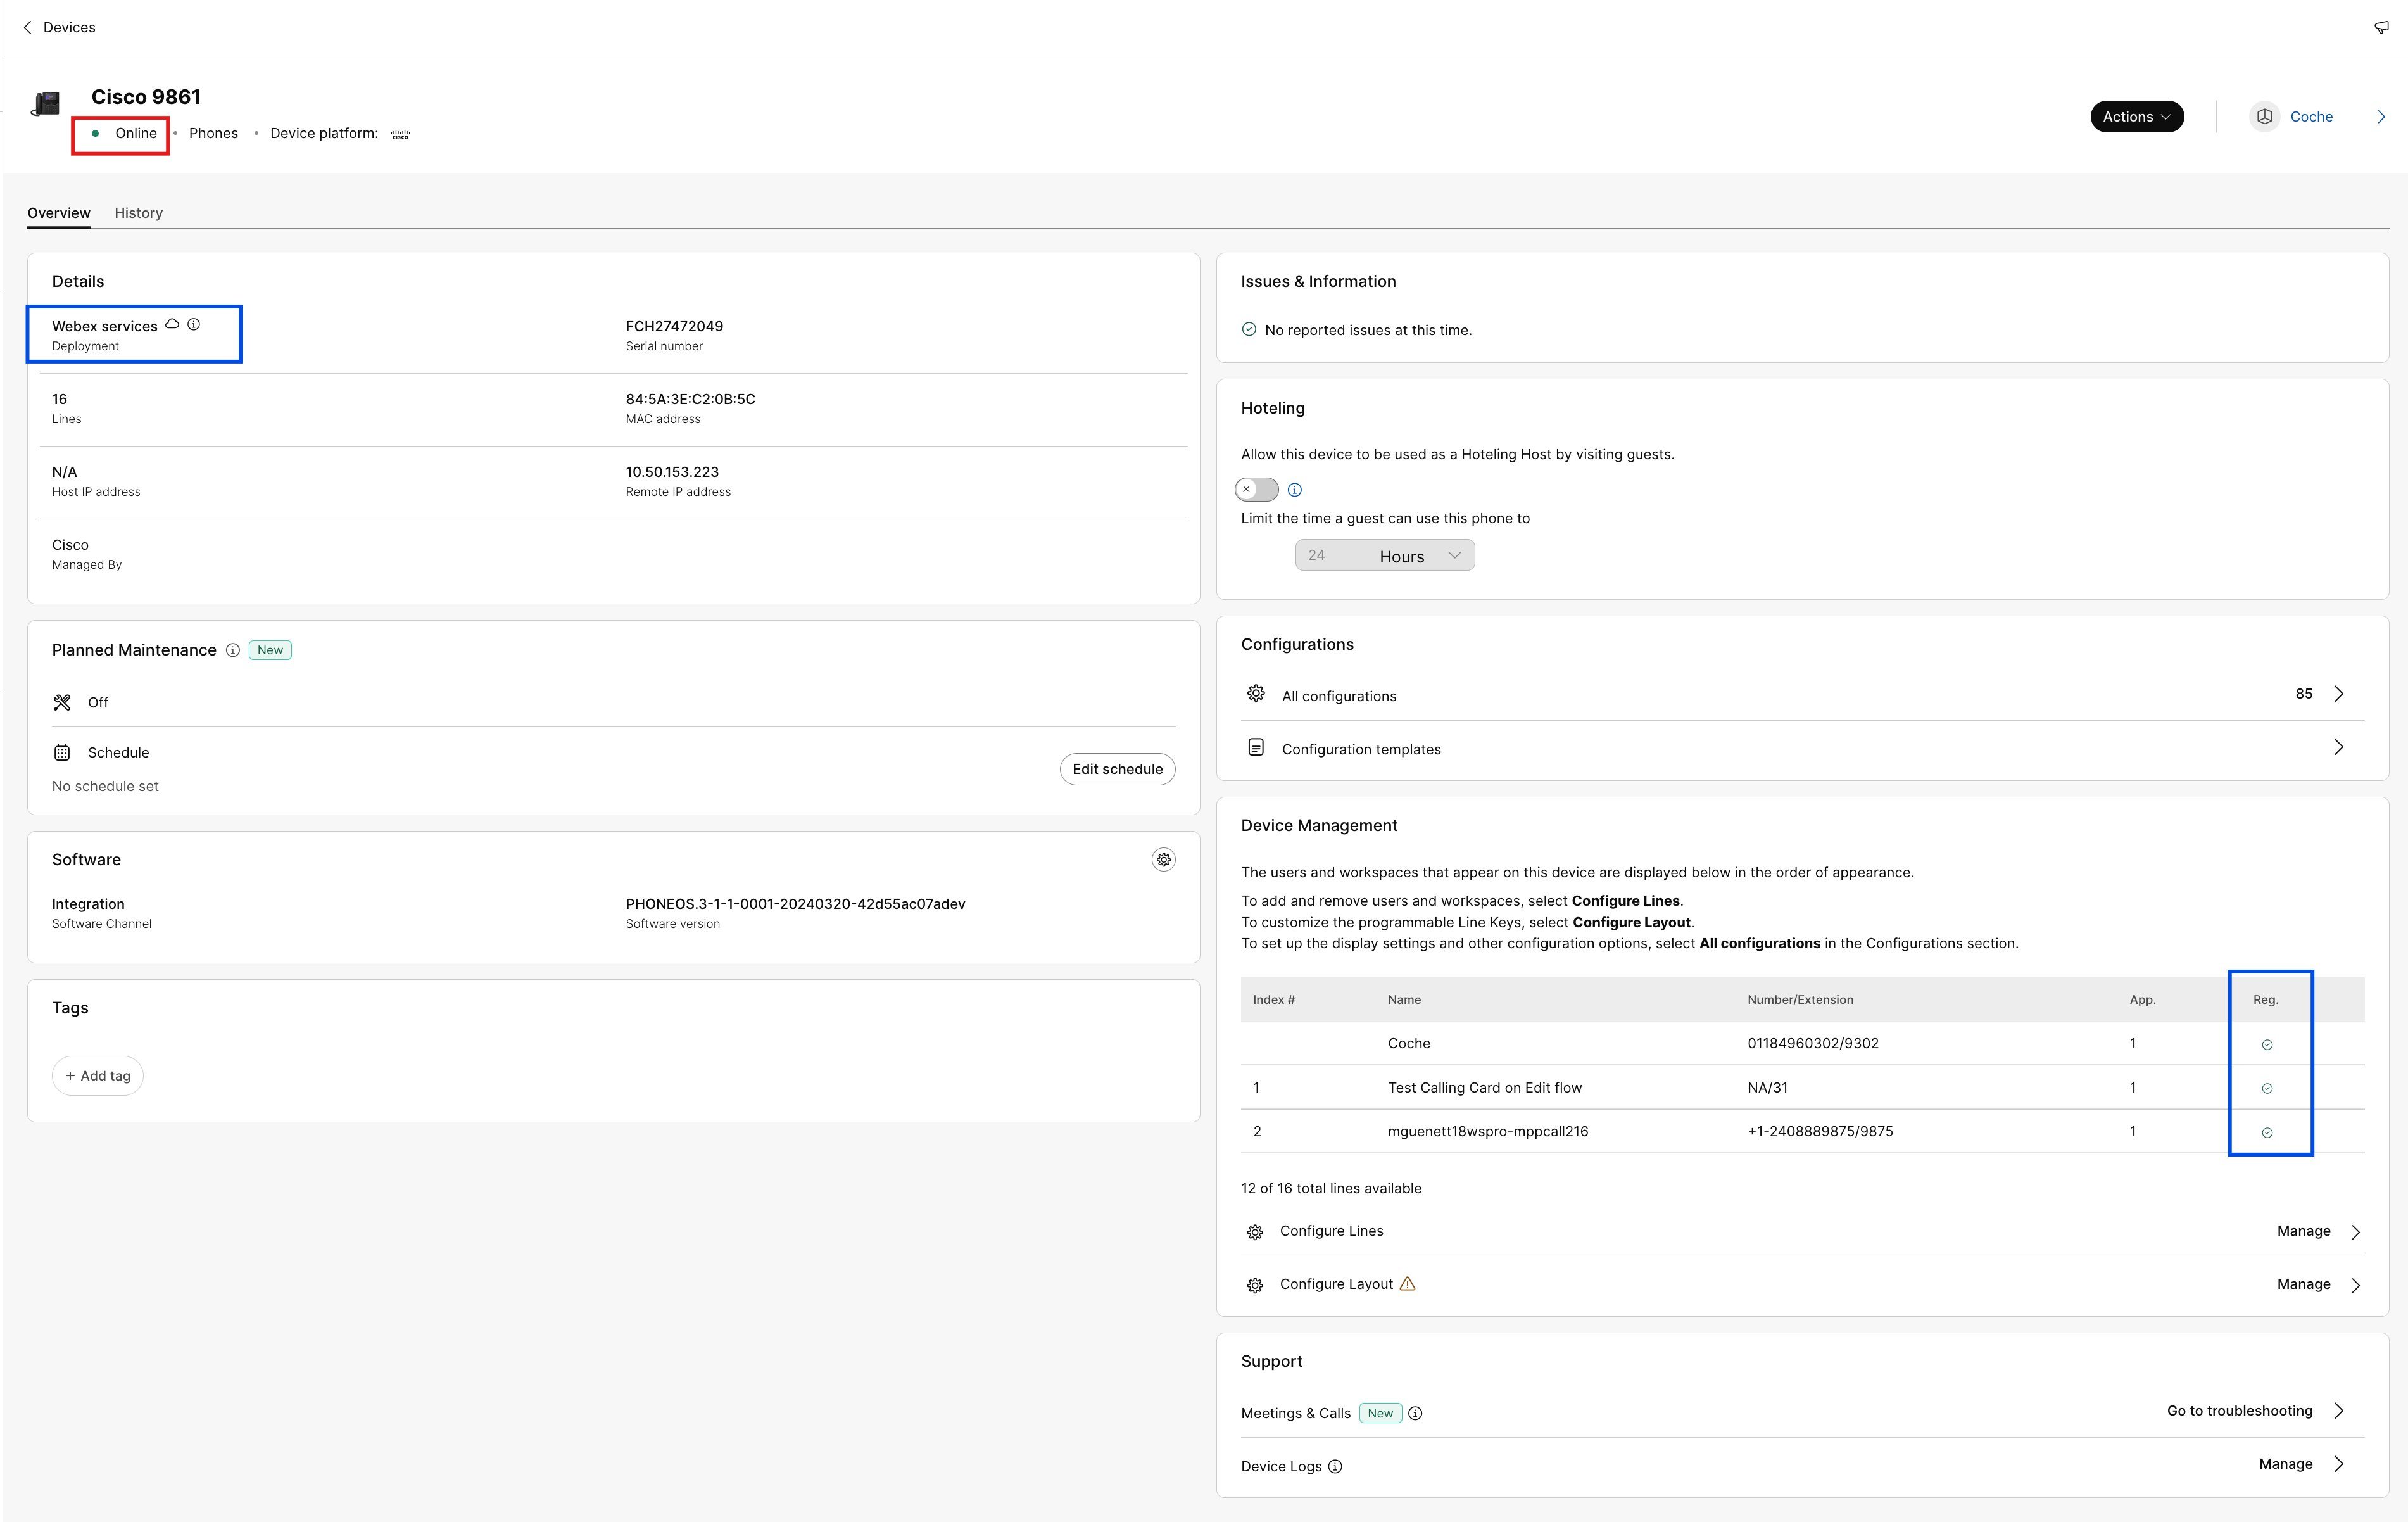
Een apparaat voor een gebruiker beheren
U kunt apparaten die zijn toegewezen aan gebruikers binnen uw organisatie toevoegen, verwijderen, opnieuw opstarten, activeren of een nieuwe activeringscode maken. Dit kan nuttig zijn om, indien nodig, apparaten op het scherm van de gebruiker weer te geven en te beheren.
| 1 | |
| 2 |
Ga naar . |
| 3 |
Selecteer een gebruiker en klik op Apparaten. |
| 4 |
Als u een apparaat wilt toevoegen aan deze gebruiker, klikt u op Apparaat toevoegen. Als er al een apparaat aan de gebruiker is toegewezen en u een ander apparaat wilt toevoegen, klikt u op . Voor meer informatie over het toevoegen van het apparaat aan een gebruiker, zie het gedeelte Telefoons toevoegen aan een gebruiker. |
| 5 |
Als u een bestaand apparaat wilt wijzigen, selecteert u de apparaatnaam. Dit brengt je naar de pagina Apparaten. Hier kunt u apparaatinstellingen weergeven en bewerken, het apparaat verwijderen, het apparaat opnieuw opstarten of een nieuwe activeringscode maken voor het apparaat, indien van toepassing. Zie Telefooninstellingen configureren en bijwerken voor meer informatie over het configureren van telefooninstellingen. |
| 6 |
Als het apparaat dat aan de gebruiker is toegevoegd Webex Aware is, wordt de Webex Aware-optie weergegeven onder de apparaten zoals weergegeven in het diagram. Webex Aware geeft aan dat het apparaat is geïntegreerde naar het Webex-platform en toegang heeft tot Webex-functies die worden ondersteund door de telefoon.
|
| 7 |
Klik op Acties om het apparaat te beheren. Met 'Acties' kunt u configuratiewijzigingen toepassen, het apparaat opnieuw opstarten, een probleem melden en apparaatlogboeken verzamelen, of het apparaat verwijderen. Op het tabblad Acties zijn de volgende opties beschikbaar voor een apparaat waar Webex Aware is ingeschakeld:
|
Een apparaat voor een werkplek beheren
Je kunt apparaten rechtstreeks vanuit een werkruimteprofiel toevoegen en beheren. Werkplekapparaten kunnen ATA-apparaten omvatten, zoals faxapparaten. U kunt ook een werkplekapparaat instellen als een Hoteling Host. Voor meer informatie over hoteling, zie Hoteling in Control Hub.
| 1 | |
| 2 |
Ga naar . |
| 3 |
Selecteer de werkruimte die u wilt wijzigen. |
| 4 |
Om een apparaat toe te voegen, klikt u op Apparaat toevoegen in de tegel Apparaten. Voor meer informatie over het toevoegen van apparaten aan een werkruimte, zie het gedeelte Een telefoon toevoegen aan een nieuwe werkruimte. |
| 5 |
Als u een bestaand apparaat wilt wijzigen, selecteert u de apparaatnaam. Dit brengt je naar de pagina Apparaten. Hier kunt u de apparaatinstellingen weergeven en bewerken, het apparaat verwijderen, het apparaat opnieuw opstarten en het apparaat inschakelen om te worden gebruikt als Hoteling Host. Zie Telefooninstellingen configureren en bijwerken voor meer informatie over het configureren van telefooninstellingen. |
| 6 |
Als het apparaat dat aan de werkruimte is toegevoegd Webex Aware is, wordt de Webex Aware-optie weergegeven onder de apparaten zoals weergegeven in het diagram. Webex Aware geeft aan dat het apparaat is geïntegreerde naar het Webex-platform en toegang heeft tot Webex-functies die worden ondersteund door de telefoon.
|
| 7 |
Klik op Acties om het apparaat te beheren. Acties helpen om configuratiewijzigingen toe te passen of firmware bij te werken voor de MPP-apparaten. Op het tabblad Acties zijn de volgende opties beschikbaar voor een apparaat waar Webex Aware is ingeschakeld:
|
Regels configureren - Regels toevoegen en de volgorde ervan wijzigen
Met de functie 'Lijnen configureren' kunt u primaire, gedeelde en virtuele lijnen aan telefoons toewijzen, waardoor een gedeelde lijn op meerdere apparaten kan verschijnen. De configuratie van poorten voor ATA's blijft ongewijzigd.
Hieronder vindt u de updates voor de functie 'Lijnen configureren' voor MPP- en PhoneOS-apparaten:
-
Primaire lijnen
-
Wijs de eigenaar van het apparaat toe en zorg ervoor dat deze op de eerste regel van het apparaat staat.
-
Verhoog het aantal weergaven in die rij om extra weergaven toe te voegen.
-
-
Gedeelde lijnen / Virtuele lijnen
-
Wijs gedeelde lijnen toe vanuit elke gebruiker of werkruimte binnen de organisatie met belfunctionaliteit en beschikbare gedeelde gespreksweergaven (Shared Call Appearances, SCA's).
-
Verhoog het aantal weergaven op de gedeelde regelrij om extra weergaven toe te voegen.
De SCA-limieten die beschikbaar zijn voor de gebruiker of werkruimte kunnen het aantal toewijsbare weergaven beperken.
-
Wijs een lijnindex toe aan elke gedeelde lijn. Je kunt de gedeelde lijnen herschikken door ze te slepen en neer te zetten.
Je kunt de afzonderlijke verschijningsvormen van een lijn niet van elkaar scheiden.
-
Gebruik de om de positie van gedeelde regelindexen op een apparaat te rangschikken.
-
-
Weergaven
-
Configureer meerdere weergaven van dezelfde primaire, gedeelde of virtuele lijn als afzonderlijke gewogen lijnsets.
-
Gewogen lijnen worden aangeduid met een -1, -2, enzovoort (alleen Cisco-telefoons).
-
Oproepen komen binnen op de eerst beschikbare gewogen lijn.
-
-
Nieuwe samenvattende informatie (onderaan de pagina)
-
Unieke SIP-registratielijnen – Toont het aantal unieke SIP-registratieaccounts dat de telefoon kan ondersteunen. Het maximaal aantal accounts dat momenteel wordt ondersteund, is 16.
-
Totaal aantal lijnweergaven – Toont het totale aantal toewijsbare lijnweergaven dat door het apparaat wordt ondersteund. Als het telefoonmodel KEM's ondersteunt, omvat het maximale aantal weergaven de uitgebreide capaciteit.
-
-
Bulklijntoewijzing en openbare API's
- De methoden Bulk CSV en Public API voor het toewijzen van regels omvatten de functionaliteit "Uiterlijk".
Voor meer informatie over gedeelde lijnen tussen locaties, zie Configuratie van gedeelde lijnen en virtuele lijnen tussen locaties.
Wanneer een snelkiesnummer aan een telefoon wordt toegevoegd door de gewenste lijntoets lang ingedrukt te houden, is het snelkiesnummer niet zichtbaar in Control Hub. Een snelkiesnummer kan worden overschreven door een gedeelde lijn aan die lijntoets te koppelen.
| 1 | |
| 2 |
Ga naar Gebruikers of Werkruimtes (afhankelijk van waaraan het te wijzigen apparaat is toegewezen). |
| 3 |
Selecteer een gebruiker of werkruimte. |
| 4 |
Ga naar Apparaten en klik op een apparaat waarvoor u de gedeelde lijnen wilt toevoegen of wijzigen. Dit brengt je naar de pagina Apparaten. |
| 5 |
Klik onder Apparaatbeheerop Lijnen configureren. |
| 6 |
Om een gedeelde lijnweergave toe te voegen, klikt u op het Je kunt dezelfde gedeelde lijn of virtuele lijn toewijzen aan meerdere afzonderlijke lijnknoppen op een telefoon. Klik in de kolom Weergaven van de betreffende regel op het
Je kunt de regels in de gewenste volgorde toevoegen. Als u de volgorde van de lijnen wilt wijzigen, verwijdert u ze en voegt u ze in de gewenste volgorde aan de lijst toe. Als een gebruiker nummers heeft van andere users/groups Als dit op hun apparaten is geconfigureerd, kunt u een Lijnlabel toevoegen voor de gedeelde lijn. Dit lijnlabel helpt om de verschillende gedeelde lijnvormen van elkaar te onderscheiden. Als u een lijn wilt verwijderen, klikt u op het pictogram |
| 7 |
Klik op Opslaan. Bij grote organisaties moet de beheerder een locatie selecteren voordat extra telefoonlijnen kunnen worden geconfigureerd. Klik op het Voor een reguliere organisatie is het locatiefilter niet beschikbaar en kan de beheerder een regel selecteren. |
 -pictogram, zoekt u op naam of telefoonnummer en kiest u een lijn.
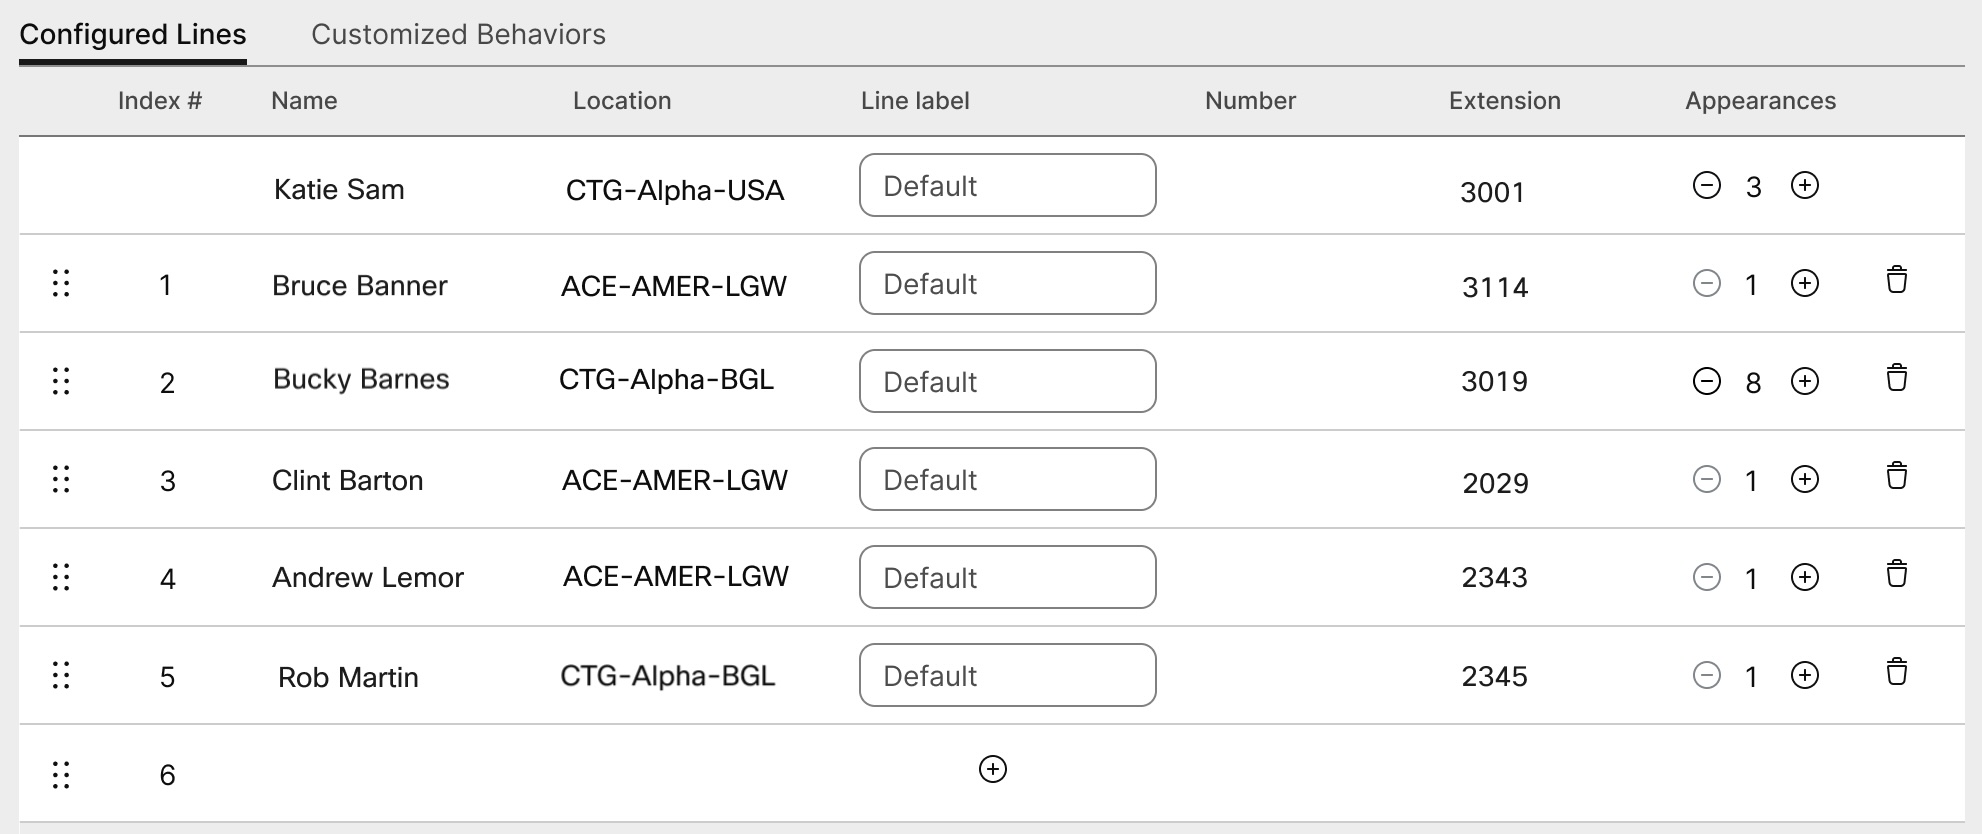
 . Je kunt de primaire gebruiker niet online verwijderen. 1.
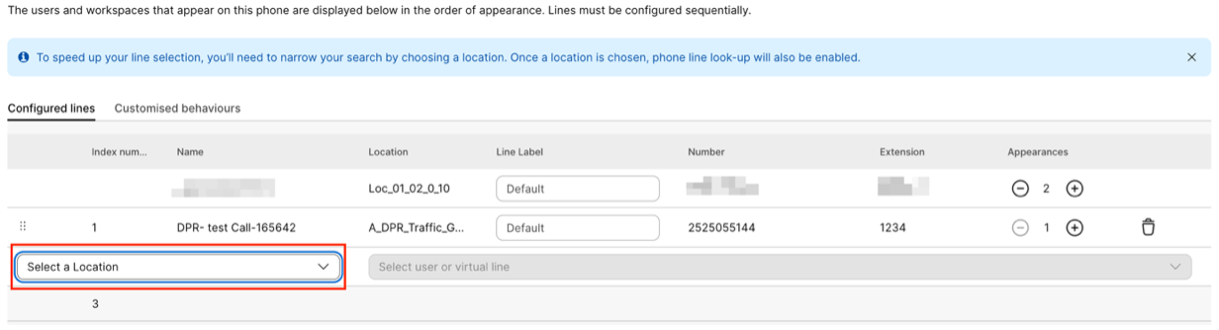
Een ATA-apparaat configureren voor een gebruiker
U kunt de poorten van een Analog Telephone Adapter (ATA)-apparaat dat aan een gebruiker is toegewezen, configureren in Control Hub. Momenteel zijn er twee configuraties beschikbaar voor ATA-apparaten: apparaten met twee poorten en apparaten met 24 poorten.
| 1 | |
| 2 |
Ga naar . |
| 3 |
Selecteer een gebruiker om te wijzigen en scroll naar Apparaten. |
| 4 |
Selecteer het apparaat waaraan u iets wilt toevoegen of wijzigen. |
| 5 |
Klik onder Gebruikers op dit apparaat op Poorten configureren. |
| 6 |
Als u een gedeelde poortconfiguratie wilt toevoegen, klikt u op het |
| 7 |
Voer de naam of het telefoonnummer in, maak een keuze uit de weergegeven opties en klik vervolgens op Opslaan. Alleen werkruimten zonder apparaten worden weergegeven in de zoekactie. |
| 8 |
Als het apparaat T.38-faxcompressie vereist, vink dan het vakje in de kolom T.38 aan of overschrijf de compressie-opties op gebruikersniveau en klik vervolgens op Opslaan. Een werkruimte kan een ATA hebben. Dit is nuttig voor faxapparaten. |
 -pictogram.
Nummers toevoegen aan uw locatie
U kunt telefoonnummers op elk moment toevoegen aan bureau- en ruimteapparaten in de organisatie van uw klant, ongeacht of u in het midden van een proefperiode bent of bent geconverteerd naar een betaald abonnement.
Het aantal telefoonnummers dat u kunt toevoegen in Control Hub is verhoogd van 250 naar 1000.
| 1 | |
| 2 |
Ga naar en klik vervolgens op Getallen toevoegen. |
| 3 |
Geef de locatie en het nummertype op. Als u nummers overdraagt, voert u zowel uw huidige als nieuwe factureringsnummers in. |
| 4 |
Geef de Locatie, Staat, Netnummer, Voorvoegsel (optioneel) op en klik vervolgens op Zoeken. Beschikbare nummers worden weergegeven. |
| 5 |
Selecteer de nummers die u aan de locatie wilt toevoegen. De nummers die u kiest, worden verplaatst naar het veld Geselecteerde nummers. |
| 6 |
Klik op Opslaan. |
De status van bestelde PSTN-nummers controleren
MPP-accessoires (Multiplatform Phone) - Headsets en key Expansion Modules (KEM's)
Wanneer u accessoires aansluit (Headsets/KEMs) Voor een MPP-apparaat verschijnen ze als een inventarisitem onder het tabblad Apparaten in de Control Hub. In het overzicht van Control Hub-apparaten kunt u het accessoiremodel, de status en de eigenaar van het accessoire bekijken. Als u een accessoire selecteert, kunt u aanvullende informatie zien, zoals het serienummer van de accessoire en de huidige softwareversie. Het accessoirestatusveld geeft 'online' aan zolang de accessoire is verbonden met MPP. De software van een headset die is aangesloten op MPP wordt automatisch bijgewerkt naar de nieuwste versie die beschikbaar is via Apparaatbeheer.
|
Telefoonmodel |
Cisco-headset 520-serie |
Cisco-headset 530-serie |
Cisco-headset 560-serie |
Cisco-headset 730-serie |
|---|---|---|---|---|
|
Cisco IP-telefoon 8811/8841/8845 |
— |
— |
RJ9 & RJ11 |
— |
|
Cisco IP-telefoon 8851/8861/8865 |
USB |
USB |
USB RJ9 & RJ11 |
— |
|
Cisco IP-telefoon 7811/7821/7841/7861 |
— |
— |
— |
— |
|
Cisco IP-telefoon 6821/6841/6851/6861 |
— |
— |
— |
— |
|
Cisco IP-telefoon 6871 |
USB |
USB |
USB |
— |
|
Cisco IP-conferentietelefoon 7832/8832 |
— |
— |
— |
— |
|
Telefoonmodel |
KEM |
|---|---|
|
Cisco IP-telefoon 8811/8841/8845 |
— |
|
Cisco IP-telefoon 8851/8861/8865 |
BEKEM CP-8800-A-KEM CP-8800-V-KEM |
|
Cisco IP-telefoon 7811/7821/7841/7861 |
— |
|
Cisco IP-telefoon 6821/6841/6861/6871 |
— |
|
Cisco IP-telefoon 6851 |
CP-68KEM-3PCC |
|
Cisco IP-conferentietelefoon 7832/8832 |
— |
Als u problemen wilt oplossen die met de Key Expansion Module (sleuteluitbreidingsmodule) op telefoons die bij Webex Calling zijn geregistreerd, gaat u naar Problemen met key expansion Modules oplossen Webex Calling meer informatie.


