- ホーム
- /
- 投稿記事

コメントありがとうございます。

Webex Calling デバイスの設定と管理
 この記事の内容
 フィードバックがある場合
Control Hub でユーザーとワークスペースにデバイスを割り当て、管理できます。MAC アドレスで追加するか、デバイスに入力するアクティベーション コードを生成して追加するかを選択します。
デバイスを追加すると、16 桁のアクティベーション コードが表示されます。アクティベーション コードは、MPP 電話の場合は 30 日後に、Room デバイスの場合は 7 日後に期限切れになります。
ユーザーに電話を追加する
Control Hub を使用すると、個人使用のためにユーザーに電話を割り当てることができます。 ここ に記載されている電話機は Webex Calling をサポートしています。これらすべての電話機は MAC アドレスを使用して追加できますが、アクティベーション コードを使用して登録できるのは次のサブセットのみです。
-
Cisco IP Phone 6800 シリーズ マルチプラットフォーム電話(音声電話- 6821、6841、6851、6861、6871)
-
Cisco IP Phone 7800 シリーズマルチプラットフォーム電話 (音声電話7811、-6821、7841、7861)
-
Cisco IP Phone 8800 シリーズ マルチプラットフォーム電話 (音声電話-8811、8841、8851、8861)
-
Cisco IP Phone 8800 シリーズ マルチ プラットフォーム電話 (ビデオ電話-8845、8865)
-
Cisco IP 電話会議 Phone 7832 および 8832
-
Cisco Video Phone 8875
-
Cisco Desk Phone 9800 シリーズ
コントロール ハブでは、DECT ベース デバイス (DECT ハンドセットではない) のみを割り当てることができます。ベースユニットをユーザーに割り当てた後、DECT ハンドセットをそのベースユニットに手動でペアリングします。詳細については、「ハンドセットを基地局に接続する」を参照してください。
| 1 | |
| 2 |
。 > ユーザーを選択 > 。
|
| 3 |
個人使用 を選択してユーザーにデバイスを割り当て、 次へをクリックします。 |
| 4 |
携帯電話の所有者のユーザー名または実際の名前を入力し、結果からユーザーを選択して、 次へをクリックします。 |
| 5 |
ユーザーに設定するデバイスの種類を選択します。
|
電話を新しいワークスペースに追加する
人々は仕事中、ランチルーム、ロビー、会議室などの場所に集まります。これらのワークスペースで共有 Webex デバイスを設定し、サービスを追加して、コラボレーションが実現するのを確認できます。
ワークスペース デバイスは特定のユーザーに割り当てられるのではなく、物理的な場所に割り当てられるため、共有使用が可能になります。
リストされているデバイス は Webex Calling をサポートしています。これらのデバイスのほとんどは MAC アドレスを使用して登録できますが、アクティベーション コードを使用して登録できるのは次のサブセットのみです。
-
Cisco IP Phone 6800 シリーズマルチプラットフォーム電話 (音声電話-6821、6841、6851)
-
Cisco IP Phone 7800 シリーズマルチプラットフォーム電話 (音声電話7811、-6821、7841、7861)
-
Cisco IP Phone 8800 シリーズ マルチプラットフォーム電話 (音声電話-8811、8841、8851、8861)
-
Cisco IP Phone 8800 シリーズ マルチ プラットフォーム電話 (ビデオ電話-8845、8865)
-
Cisco IP 電話会議 Phone 7832 および 8832
-
Cisco Desk Phone 9800 シリーズ
開始する前に
- プロフェッショナル Workspace ライセンスを使用すると、最大 5 台の Cisco デスクフォン、Cisco MPP 電話、ワイヤレス、ATA、Phone OS、またはサードパーティ製デバイスを Workspace に追加できます。
- プロフェッショナル ワークスペースに複数のデバイスを追加できるのは、新しいワークスペース ページからのみです。新しいワークスペース ページを使用するには、ワークスペース ページの右上隅にある 新しいワークスペースを試す をオンにします。
- 共通エリア Workspace ライセンスを持つ Workspace に追加できるデバイスは 1 つだけです。
| 1 | |
| 2 |
。 。
|
| 3 |
共有使用を選択し、 次へをクリックします。 |
| 4 |
新しいワークスペースを選択し、 次へをクリックします。 |
| 5 |
ワークスペースの名前 (物理的な部屋の名前など) を入力し、部屋のタイプを選択し、部屋の収容人数を追加して、ワークスペースの場所を選択します。[次へ] をクリックします。 ワークスペース名は128文字以内で、 %, #, <, >、 /, \, および " 文字。 |
| 6 |
ワークスペースに設定するデバイスの種類を選択します。
|
| 7 |
通話 サービスをクリックし、ワークスペースに割り当てるサブスクリプションとライセンスの種類を選択します。
ライセンスで利用できる機能の詳細については、 Webex Calling のライセンス タイプ別に利用できる機能を参照してください。 |
| 8 |
[ロケーション]、[電話番号](選択したロケーションによって決まるもの) を割り当てて、[保存] をクリックします。拡張機能を割り当てるオプションもあります。 場所は夜間の再同期中に更新されます。 プロフェッショナルなワークスペースに追加のデバイスを追加する場合は、次のいずれかの方法で実行できます。
ワークスペースに割り当てられたデバイスを変更または管理するには、 ワークスペースのデバイスの管理 セクションを参照してください。 |
 をクリックし、
 既存の電話を別のユーザーまたはデバイスに再割り当てする
あるユーザー/workspace に割り当てられた電話Webex Callingユーザー/workspace Webex Callingに割り当てられた電話を再利用するには、次の手順を実行します:
ユーザーにボード、デスク、またはルームデバイスを追加する
Board、Desk、または Room デバイスを個人用デバイスとして割り当てると、Webex 通話や会議を自分のデバイスで直接受けられるようになります。詳細については、 個人用の Board、Desk、または Room デバイスをユーザーに割り当てるを参照してください。
新しいワークスペースにボード、デスク、またはルームデバイスを追加する
ユーザーが職場にいる際、ランチ ルーム、ロビー、会議室など、多くのワークスペースに集まります。これらの場所にある共有 Cisco Webex デバイスをセットアップし、サービスを追加し、コラボレーションの様子を確認できます。
Workspaces デバイスの基本原則は、特定のユーザーに割り当てられるのではなく、物理的な場所に割り当てられ、共有使用が可能になることです。
ここに記載されているデバイスは Webex Calling をサポートしています。
| 1 | |
| 2 |
。 。
|
| 3 |
共有使用 を選択し、 次へをクリックします。 |
| 4 |
新しいワークスペース を選択し、 次へをクリックします。 |
| 5 |
ワークスペースの名前 (物理的な部屋の名前など) を入力し、部屋のタイプを選択し、部屋の収容人数を追加して、ワークスペースの場所を選択します。[次へ] をクリックします。 |
| 6 |
Cisco Room and Desk デバイスを選択します。 |
| 7 |
以下のいずれかのサービスを選択し、 次へをクリックします。
|
| 8 |
Cisco Webex Calling サービスを選択した場合は、ワークスペースに割り当てるサブスクリプションとライセンスの種類を選択します。
ライセンスで利用できる機能の詳細については、 Webex Calling のライセンス タイプ別に利用できる機能を参照してください。 |
| 9 |
[ロケーション]、[電話番号](選択したロケーションによって決まるもの)、および [内線番号] を割り当てて、[保存] をクリックします。 |
| 10 |
与えられたコードを使用してデバイスを有効にします。アクティベーション コードはコピー、メール、または印刷により使用できます。 |
デバイスを一括で追加し、割り当てる
複数のデバイスをユーザーとワークスペースに割り当てるには、必要な情報を CSV ファイルに入力し、簡単な手順でそれらのデバイスをアクティブ化できます。
- プロフェッショナル ワークスペース ライセンスを使用すると、最大 5 台の Cisco デスク フォン、Cisco MPP フォン、ATA、またはサードパーティ製デバイスをワークスペースに追加できます。
- 共通エリア ワークスペース ライセンスを持つワークスペースに追加できるデバイスは 1 つだけです。
ここに記載されているデバイスは Webex Calling をサポートしています。MAC アドレスを使用してすべてのデバイスを登録できますが、次のデバイスのサブセットはアクティベーション コードを使用して登録します。
-
Cisco IP Phone 6800 シリーズマルチプラットフォーム電話 (音声電話-6821、6841、6851)
-
Cisco IP Phone 7800 シリーズマルチプラットフォーム電話 (音声電話7811、-6821、7841、7861)
-
Cisco IP Phone 8800 シリーズ マルチプラットフォーム電話 (音声電話-8811、8841、8851、8861)
-
Cisco IP Phone 8800 シリーズ マルチ プラットフォーム電話 (ビデオ電話-8845、8865)
-
Cisco IP 電話会議 Phone 7832 および 8832
-
Cisco Video Phone 8875
-
Cisco Desk Phone 9800 シリーズ
| 1 | ||||||||||||||||||||||||||||||||||||||
| 2 |
。 | |||||||||||||||||||||||||||||||||||||
| 3 |
次のいずれかのオプションを選択し、 ダウンロードをクリックします。
次の表を使用して CSV ファイルを準備できます。
Webex Calling ユーザーとワークスペースにデバイスを割り当てる場合、次のフィールドは必須です。
これらの電話番号と内線フィールドは、以前は ディレクトリ番号 と 直通電話というタイトルでした。 ; これらの列名は、しばらくの間サポートされ続けます。 CSV ファイルあたりのデバイス数を 1000 に制限することをお勧めします。1000 台を超えるデバイスを追加する場合は、2 番目の CSV ファイルを使用します。 | |||||||||||||||||||||||||||||||||||||
| 4 |
スプレッドシートに入力します。 | |||||||||||||||||||||||||||||||||||||
| 5 |
CSV ファイルをドラッグ アンド ドロップするか、[ファイルを選択] をクリックしてアップロードします。 | |||||||||||||||||||||||||||||||||||||
| 6 |
MAC アドレスが空白の場合は、アクティベーション コードの送信先を選択するオプションが表示されます。
アクティベーションするには、あなたまたはユーザーがデバイスにアクティベーション コードを入力する必要があります。 | |||||||||||||||||||||||||||||||||||||
| 7 |
[送信] をクリックします。 デバイスがアクティブになったときに更新されたステータスを表示します。
ユーザーがデバイスでアクティベーション コードを入力するには、マルチプラットフォーム デバイスで 11.3.1 SR2 以降のファームウェア ロードが実行されている必要があります。電話機のファームウェアのアップグレードについては、 こちら の記事を参照してください。 |
デバイスリストをエクスポートする
ユーザーとワークスペースに割り当てられたデバイスのリストを表示する場合は、CSV ファイルをエクスポートできます。
Control Hub にサインインし、 デバイスに移動します。
デバイスリストから複数のデバイスを選択し、 エクスポート オプションを選択します。CSV ファイルに含めるフィールドを選択し、コンテンツをローカル フォルダーにエクスポートできます。
CSV ファイルに表示されるフィールドは、デバイスとプラットフォームの接続によって異なります。したがって、一部のフィールドは出力ファイルで使用できません。
ユーザーのデバイスを管理する
組織のユーザーに割り当てられたデバイスの、新しいアクティベーション コードを追加、削除、再起動、チェック、または作成することができます。これは、必要に応じてユーザーの画面でデバイスを表示し、管理する場合に役立ちます。
| 1 | |
| 2 |
。 |
| 3 |
ユーザーを選択し、 デバイスをクリックします。 |
| 4 |
このユーザーにデバイスを追加するには、[デバイスの追加] をクリックします。 ユーザーにすでにデバイスが割り当てられていて、別のデバイスを追加する場合は、 。 ユーザーにデバイスを追加する方法の詳細については、 ユーザーに電話を追加する セクションを参照してください。 |
| 5 |
既存のデバイスを変更するには、デバイス名を選択します。 「デバイス」ページに移動します。ここでは、デバイス設定を表示および編集したり、デバイスを削除したり、デバイスを再起動したり、必要に応じてデバイスの新しいアクティベーションコードを作成したりできます。電話設定の構成についての詳細は、「電話設定の構成と更新」を参照してください。 |
| 6 |
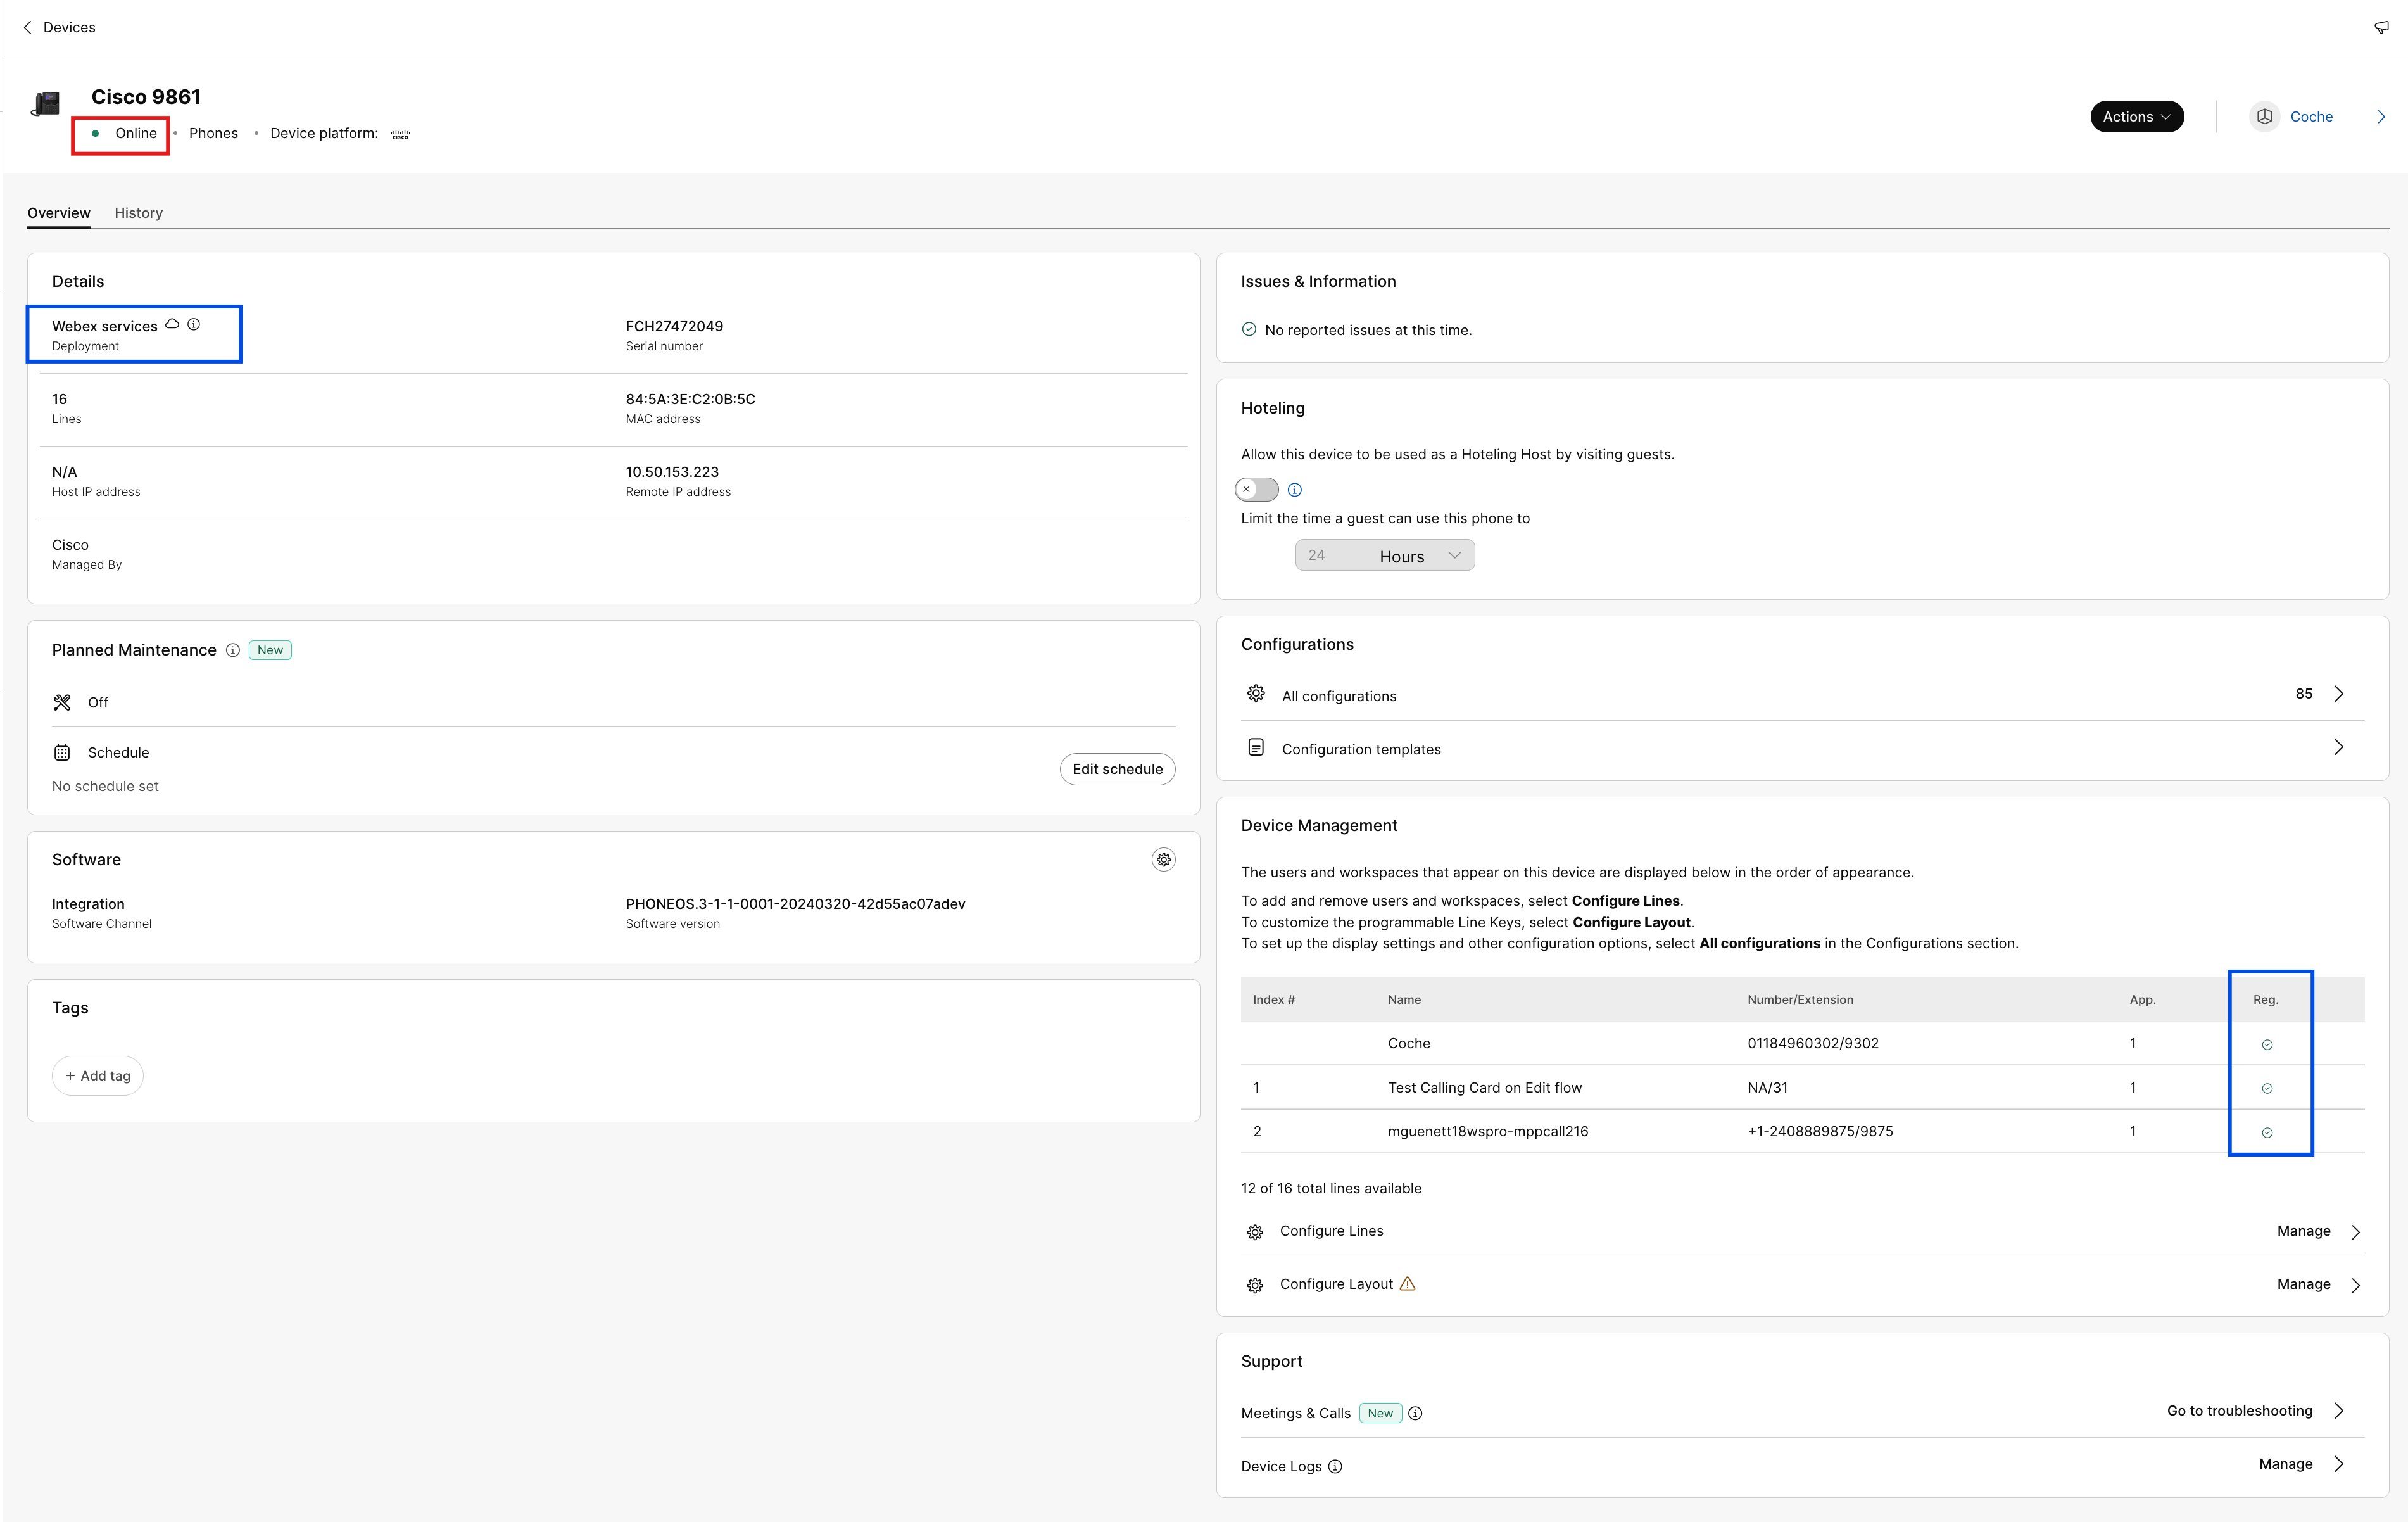
ユーザーに追加されたデバイスが Webex Aware の場合、図に示すように、Webex Aware オプションがデバイスの下に表示されます。Webex Aware は、デバイスが Webex プラットフォームにオンボードされ、電話によってサポートされている Webex 機能にアクセス権を持つことを示します。
|
| 7 |
[アクション ] を クリックしてデバイスを管理します。アクションを使用すると、構成の変更を適用したり、デバイスを再起動したり、問題を報告してデバイス ログを収集したり、デバイスを削除したりできます。 [アクション] タブには Webex Aware 対応デバイスの次のオプションがあります。
|
ワークスペースのデバイスを管理する
ワークスペース プロファイルから直接デバイスを追加および管理できます。ワークスペースのデバイスにはファックスのような ATA デバイスを含めることが可能です。また、ワークスペースのデバイスをホテリングホストとしてセットアップすることもできます。ホテリングの詳細については、 Control Hub のホテリングを参照してください。
| 1 | |
| 2 |
. |
| 3 |
変更するワークスペースを選択します。 |
| 4 |
デバイスを追加するには、 デバイス タイルの [ デバイスの追加 をクリックします。 ワークスペースにデバイスを追加する方法の詳細については、 新しいワークスペースに電話を追加する セクションを参照してください。 |
| 5 |
既存のデバイスを変更するには、デバイス名を選択します。 「デバイス」ページに移動します。ここでは、デバイス設定を表示および編集したり、デバイスを削除したり、デバイスを再起動したり、デバイスをホテリングホストとして使用したりできます。電話設定の構成についての詳細は、「電話設定の構成と更新」を参照してください。 |
| 6 |
ワークスペースに追加されたデバイスが Webex Aware である場合、Webex Aware オプションがデバイスの下に図のように表示されます。Webex Aware は、デバイスが Webex プラットフォームにオンボードされ、電話によってサポートされている Webex 機能にアクセス可能なことを示します。
|
| 7 |
[アクション ] を クリックしてデバイスを管理します。アクションは構成変更を適用するか、MPP デバイスのファームウェアをアップデートするのに役立ちます。 [アクション] タブには Webex Aware 対応デバイスの次のオプションがあります。
|
ラインの設定 - ラインの追加と並べ替え
電話機にプライマリ回線、共有回線、仮想回線を割り当てる回線設定機能により、同じデバイス上に共有回線を複数表示できるようになります。ATA のポートの構成エクスペリエンスは変更されていません。
MPP および PhoneOS デバイスの回線設定機能の更新は次のとおりです。
-
プライマリライン
-
デバイスの所有者を割り当て、それがデバイスの最初の行の位置を占めるようにします。
-
追加の外観を追加するには、その行の外観を増やします。
-
-
共有回線 / 仮想ライン
-
利用可能な共有通話アピアランス (SCA) を使用して、組織内の通話が有効な任意のユーザーまたはワークスペースから共有回線を割り当てます。
-
追加の外観を追加するには、共有ラインの行の外観を増やします。
ユーザーまたはワークスペースで使用可能な SCA 制限により、割り当て可能な外観が制限される場合があります。
-
各共有回線に回線インデックスを割り当てます。共有ラインはドラッグアンドドロップで並べ替えることができます。
線の個々の外観を分離することはできません。
-
ユーザーの デバイス上の共有回線インデックスの位置を調整します。
-
-
アピアランス
-
同じプライマリ ライン、共有ライン、または仮想ラインの複数の外観を個別の加重ライン セットとして構成します。
-
重み付けされた回線には、-1、-2 などの接尾辞が付きます (Cisco 電話のみ)。
-
通話は、最初に利用可能な重み付けされた回線アピアランスに着信します。
-
-
新しい概要情報(ページ下部)
-
固有の SIP 登録回線 – 電話機がサポートできる固有の SIP 登録アカウントの数を表示します。現在サポートされているアカウントの最大数は 16 です。
-
合計ライン アピアランス – デバイスでサポートされている割り当て可能なライン アピアランスの合計数を表示します。電話機モデルが KEM をサポートしている場合、最大出現回数には拡張容量が含まれます。
-
-
一括ライン割り当てとパブリック API
- 行を割り当てるためのバルク CSV およびパブリック API メソッドには、「外観」機能が含まれます。
拠点間の共有回線の詳細については、 拠点間の共有回線と仮想回線の設定を参照してください。
目的の回線キーを長押しして電話にスピード ダイヤルを追加しても、そのスピード ダイヤルは Control Hub に表示されません。スピード ダイヤルは、その回線キーに共有回線を設定することで上書きできます。
| 1 | |
| 2 |
ユーザー または ワークスペース に移動します (変更するデバイスが割り当てられている場所によって異なります)。 |
| 3 |
ユーザーまたはワークスペースを選択します。 |
| 4 |
デバイス に移動し、共有回線を追加または変更するデバイスをクリックします。 「デバイス」ページに移動します。 |
| 5 |
デバイス管理で、 回線の設定をクリックします。 |
| 6 |
共有回線の外観を追加するには、 同じ共有回線または仮想回線を、電話機の複数の個別の回線キーに割り当てることができます。各回線の 表示回数 列で
表示したい順序で行を追加できます。共有回線のアピアランスを並べ替えるには、表示したい順番になるようにリストを削除し、追加します。 ユーザーが他の users/groups デバイス上で設定されている場合は、共有回線に 回線ラベル を追加できます。この回線ラベルは、共有回線の外観を他の回線の外観と区別するのに役立ちます。 回線を削除するには、 |
| 7 |
[保存] をクリックします。 大規模な組織の場合、管理者は追加の通話回線を構成する前に場所を選択する必要があります。 通常の組織の場合、場所フィルターは使用できず、管理者が行を選択できます。 |
 アイコンをクリックし、名前または電話番号で検索して回線を選択します。
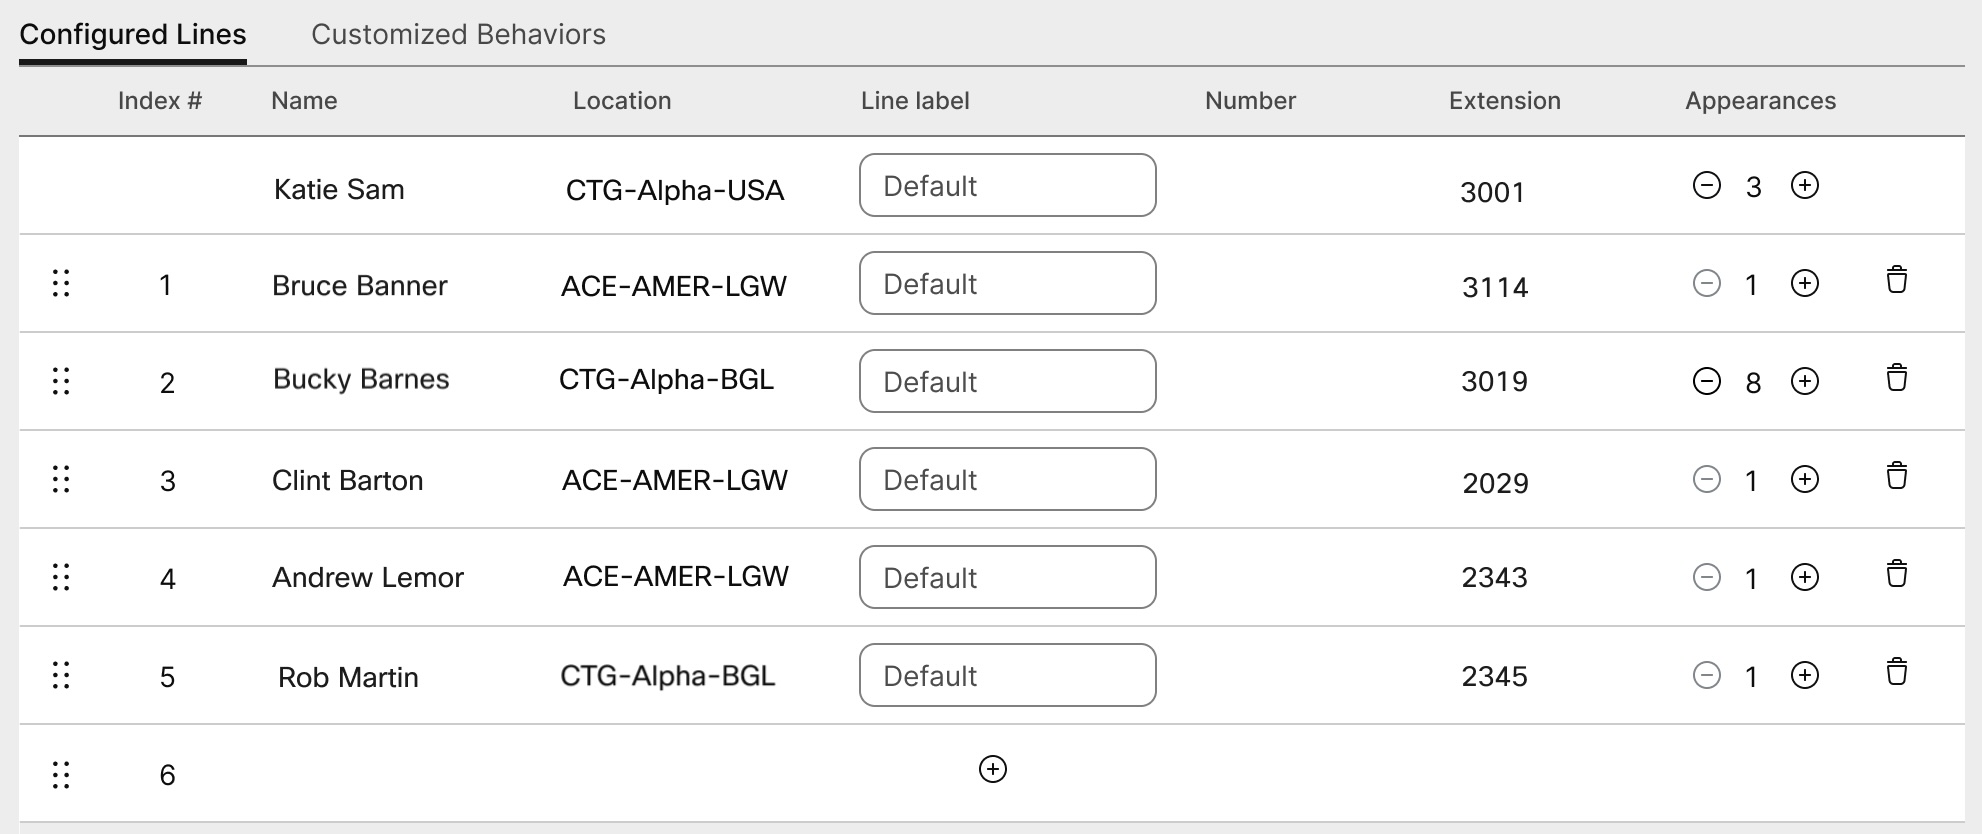
 アイコンをクリックします。オンラインでプライマリユーザーを削除することはできません1.
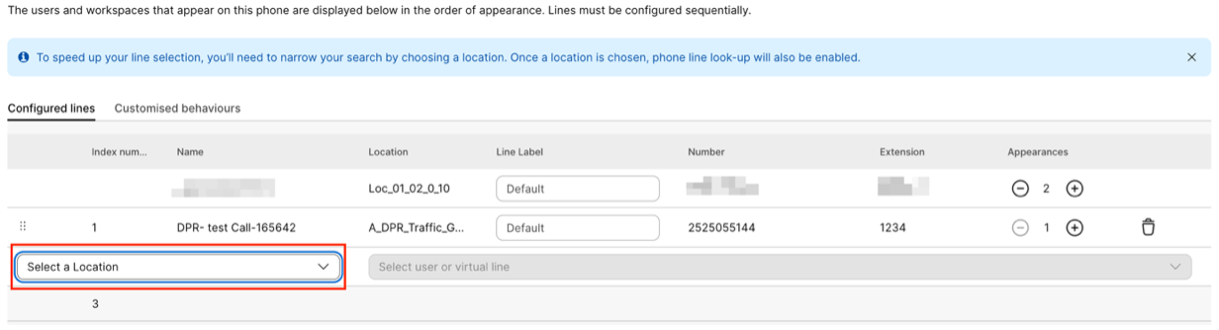
ユーザーの ATA デバイスを設定する
Control Hub で、ユーザーに割り当てられたアナログ電話アダプタ (ATA) デバイスのポートを設定できます。現在、使用可能な ATA デバイスの構成は、2 つのポートを持つデバイスと 24 ポートを持つデバイスの 2 つです。
| 1 | |
| 2 |
。 |
| 3 |
変更するユーザーを選択し、 デバイスまでスクロールします。 |
| 4 |
追加または変更するデバイスを選択します。 |
| 5 |
[このデバイス上のユーザー] で、[ポートを設定する] をクリックします。 |
| 6 |
共有ポートの設定を追加するには、 |
| 7 |
名前または電話番号を入力し、表示されるオプションから選択し、次に [保存] をクリックします。 ルックアップには、デバイスのないワークスペースだけが表示されます。 |
| 8 |
デバイスで T.38 FAX 圧縮が必要な場合は、T.38 列のボックスをオンにするか、ユーザー レベルの圧縮オプションを上書きして、 保存をクリックします。 ワークスペースには ATA を含めることができます。これはファックスに便利です。 |
 アイコンをクリックします。
自分のロケーションに番号を追加する
電話番号は、トライアル中であるか、有料のサブスクリプションに変更したかには関わりなく、顧客の卓上電話および室内デバイスにいつでも追加できます。
Control Hub に追加できる電話番号の数が 250 から 1000 に増えました。
| 1 | |
| 2 |
をクリックし、 番号の追加をクリックします。 |
| 3 |
[ロケーション] と [番号タイプ] を指定します。番号を移行する場合には、現在の新しい請求番号と新しい番号の両方を入力してください。 |
| 4 |
場所、 州、 市外局番、 プレフィックス (オプション) を指定して、 検索をクリックします。 利用可能な番号が表示されます。 |
| 5 |
場所に追加する番号を選択します。 選択した番号は 選択した番号 フィールドに移動します。 |
| 6 |
[保存] をクリックします。 |
注文した PSTN 番号のステータスを確認する
マルチプラットフォーム電話 (MPP) 接続アクセサリ— ヘッドセットおよびキー拡張モジュール (KEM)
アクセサリを接続すると (Headsets/KEMs) MPP デバイスに追加すると、コントロール ハブの [デバイス] タブにインベントリ項目として表示されます。Control Hub のデバイス インベントリでは、アクセサリのモデル、ステータス、アクセサリの所有者を確認できます。アクセサリを選択すると、アクセサリのシリアル番号や現在のソフトウェア バージョンなどの追加情報を取得できます。アクセサリが MPP に接続されている限り、アクセサリ ステータスのフィールドは「オンライン」と報告されます。MPP 接続されたヘッドセットは、デバイス管理から最新バージョンのソフトウェアを取得して自動アップグレードされます。
|
機種 |
Cisco ヘッドセット 520 シリーズ |
Cisco ヘッドセット 530 シリーズ |
Cisco ヘッドセット 560 シリーズ |
Cisco ヘッドセット 730 シリーズ |
|---|---|---|---|---|
|
Cisco IP Phone 8811/8841/8845 |
— |
— |
RJ9 & RJ11 |
— |
|
Cisco IP Phone 8851/8861/8865 |
USB |
USB |
USB RJ9 & RJ11 |
— |
|
Cisco IP Phone 7811/7821/7841/7861 |
— |
— |
— |
— |
|
Cisco IP Phone 6821/6841/6851/6861 |
— |
— |
— |
— |
|
Cisco IP Phone 6871 |
USB |
USB |
USB |
— |
|
Cisco IP Conference Phone 7832/8832 |
— |
— |
— |
— |
|
機種 |
KEM |
|---|---|
|
Cisco IP Phone 8811/8841/8845 |
— |
|
Cisco IP Phone 8851/8861/8865 |
BEKEM CP-8800-A-KEM CP-8800-V-KEM |
|
Cisco IP Phone 7811/7821/7841/7861 |
— |
|
Cisco IP Phone 6821/6841/6861/6871 |
— |
|
Cisco IP Phone 6851 |
CP-68KEM-3PCC |
|
Cisco IP Conference Phone 7832/8832 |
— |
Webex Calling に登録された電話で、キー拡張モジュール (キー拡張モジュール) が直面する問題のトラブルシューティングを行う場合、詳細については、Webex Calling の Key Expansion Modules の問題をトラブルシューティングするを参照してください。


