- Главная
- /
- Статья

Благодарим вас за обратную связь.

Настройка устройств Webex Calling и управление ими
 В этой статье
 Отправить обратную связь?
В Control Hub можно назначать устройства для пользователей и рабочих пространств и управлять ими. Выберите вариант добавления с помощью MAC-адреса или создания кода активации, который затем необходимо будет ввести на устройстве.
При добавлении устройства отображается 16-значный код активации. Срок действия кода активации истекает через 30 дней для телефонов MPP и через 7 дней для устройств Room.
Добавить телефон пользователю
С помощью Control Hub вы можете назначить пользователю телефон для личного пользования. Указанные здесь телефоны поддерживают звонки Webex. Хотя все эти телефоны можно добавить, используя MAC-адрес, только следующие модели можно зарегистрировать с помощью кода активации:
-
Многоплатформенные телефоны Cisco IP Phone 6800 Series (телефоны для аудиовызовов: 6821, 6841, 6851, 6861, 6871)
-
Многоплатформенные IP-телефоны Cisco серии 7800 (телефоны для аудиовызовов: 7811, 7821, 7841, 7861)
-
Многоплатформенные IP-телефоны Cisco серии 8800 (телефоны для аудиовызовов: 8811, 8841, 8851, 8861)
-
Многоплатформенные IP-телефоны Cisco серии 8800 (телефоны для видеозвонков: 8845, 8865)
-
Cisco IP Conference Phone 7832 и 8832
-
Cisco Video Phone 8875
-
Стационарный телефон Cisco серии 9800
В центре управления можно назначать только базовые устройства DECT (а не трубки DECT). После назначения базового блока пользователю, выполните ручное сопряжение DECT-трубки с этим базовым блоком. Дополнительную информацию см. в статье Подключение трубки к базовой станции.
| 1 | |
| 2 |
Перейти к . Также вы можете добавить устройство к пользователю из раздела «Пользователи», перейдя в > выберите пользователя > .
|
| 3 |
Выберите Личное использование для назначения устройства пользователю, а затем нажмите Далее. |
| 4 |
Введите либо имя пользователя, либо фактическое имя владельца телефона, выберите пользователя из результатов и нажмите Далее. |
| 5 |
Выберите тип устройства, которое вы хотите настроить для пользователя:
|
Добавление телефона в новое рабочее пространство
Когда люди находятся на работе, они собираются в таких местах, как столовые, вестибюли и конференц-залы. В этих рабочих пространствах можно настроить совместное использование устройств Webex, добавить сервисы, а затем наблюдать за процессом совместной работы.
Устройство в рамках системы Workspaces не привязано к конкретному пользователю, а к определенному физическому местоположению, что позволяет использовать его совместно.
Перечисленные устройства поддерживают звонки Webex. Большинство этих устройств можно зарегистрировать, используя MAC-адрес, а следующие — только с помощью кода активации:
-
Многоплатформенные IP-телефоны Cisco серии 6800 (телефоны для аудиовызовов: 6821, 6841, 6851)
-
Многоплатформенные IP-телефоны Cisco серии 7800 (телефоны для аудиовызовов: 7811, 7821, 7841, 7861)
-
Многоплатформенные IP-телефоны Cisco серии 8800 (телефоны для аудиовызовов: 8811, 8841, 8851, 8861)
-
Многоплатформенные IP-телефоны Cisco серии 8800 (телефоны для видеозвонков: 8845, 8865)
-
Cisco IP Conference Phone 7832 и 8832
-
Стационарный телефон Cisco серии 9800
Прежде чем начать
- С профессиональной лицензией Workspace вы можете добавить в Workspace до пяти настольных телефонов Cisco, телефонов Cisco MPP, беспроводных устройств, ATA-адаптеров, устройств Phone OS или устройств сторонних производителей.
- Добавить несколько устройств в профессиональное рабочее пространство можно только со страницы создания нового рабочего пространства. Включите «Попробовать новые рабочие пространства» в правом верхнем углу страницы рабочего пространства, чтобы использовать новую страницу рабочего пространства.
- В рабочую область с лицензией для общей рабочей области можно добавить только одно устройство.
| 1 | |
| 2 |
Перейти к . Вы также можете добавить устройство в новое рабочее пространство, перейдя в .
|
| 3 |
Выберите Совместное использование, затем нажмите Далее. |
| 4 |
Выберите Новое рабочее пространство, затем нажмите Далее. |
| 5 |
Введите название для рабочего пространства (например, название физического помещения), выберите тип помещения, укажите вместимость помещения и укажите местоположение рабочего пространства. Щелкните Далее. Название рабочей области не может быть длиннее 128 символов и не может содержать %, #, <, >, /, \, и "персонажей". |
| 6 |
Выберите тип устройства, которое вы хотите установить на рабочем месте:
|
| 7 |
Щелкните Вызов службы и выберите тип подписки и лицензии, которые вы хотите назначить рабочему пространству.
Чтобы узнать больше о функциях, доступных в рамках лицензий, см. Функции, доступные в зависимости от типа лицензии для Webex Calling. |
| 8 |
Назначьте Местоположение и Номер телефона (определяемый выбранным местоположением), а затем щелкните Сохранить. Также предусмотрен параметр для назначения добавочного номера. Местоположение обновляется во время ночной синхронизации. Если вы хотите добавить дополнительные устройства в профессиональное рабочее пространство, вы можете сделать это одним из следующих способов:
Чтобы изменить или управлять устройствами, назначенными рабочему пространству, см. раздел Управление устройством для рабочего пространства. |
 в столбце
 Переназначение существующего телефона другому пользователю или устройству.
Чтобы повторно использовать телефон, который назначен для одного Webex Calling/рабочего пространства другому Webex Calling/workspace, выполните следующие действия:
Добавьте пользователю доску, стол или устройство для комнаты.
Назначение устройства, используемого в качестве личного устройства для проведения совещаний, работы за столом или в аудитории, позволяет пользователю получать доступ к звонкам и совещаниям Webex непосредственно на это устройство. Для получения более подробной информации см. Назначение пользователю персонального устройства для доски, стола или комнаты.
Добавьте доску, стол или устройство для комнаты в новое рабочее пространство.
Когда люди на работе, они собираются во многих рабочих пространствах, таких как столовые, холлы и конференц-залы. Вы можете настроить устройства Cisco Webex в совместном доступе, расположенные в таких рабочих пространствах, добавить службы, а затем посмотреть, как проходит совместная работа.
Основной принцип работы устройств Workspaces заключается в том, что они не привязаны к конкретному пользователю, а к определенному физическому местоположению, что позволяет использовать их совместно.
Перечисленные здесь устройства поддерживают Webex Calling.
| 1 | |
| 2 |
Перейти к . Также вы можете добавить устройство в новое рабочее пространство из раздела «Рабочие пространства», перейдя по пути .
|
| 3 |
Выберите Совместное использование и нажмите Далее. |
| 4 |
Выберите Новое рабочее пространство и нажмите Далее. |
| 5 |
Введите название для рабочего пространства (например, название физического помещения), выберите тип помещения, укажите вместимость помещения и укажите местоположение рабочего пространства. Затем щелкните Далее. |
| 6 |
Выберите Устройство Cisco для переговорной комнаты и рабочего стола. |
| 7 |
Выберите одну из следующих услуг и нажмите Далее.
|
| 8 |
Если вы выбрали услугу Cisco Webex Calling, выберите подписку и тип лицензии, которые хотите назначить рабочему пространству.
Чтобы узнать больше о функциях, доступных в рамках лицензий, см. Функции, доступные в зависимости от типа лицензии для Webex Calling. |
| 9 |
Назначьте местоположение, номер телефона (определяемый выбранным местоположением), добавочный номер, а затем щелкните Сохранить. |
| 10 |
Активируйте устройство с помощью предоставленного кода. Код активации можно скопировать, отправить по электронной почте или распечатать. |
Массовое добавление и назначение устройств
Для назначения нескольких устройств пользователям и рабочим местам можно заполнить CSV-файл необходимой информацией и активировать эти устройства всего за несколько простых шагов.
- С лицензией Professional Workspace вы можете добавить в рабочее пространство до 5 настольных телефонов Cisco, телефонов Cisco MPP, ATA-адаптеров или устройств сторонних производителей.
- С лицензией на использование общего рабочего пространства к рабочему пространству можно добавить только одно устройство.
Перечисленные здесь устройства поддерживают Webex Calling. Все устройства можно зарегистрировать по MAC-адресу; однако для следующих устройств следует использовать код активации:
-
Многоплатформенные IP-телефоны Cisco серии 6800 (телефоны для аудиовызовов: 6821, 6841, 6851)
-
Многоплатформенные IP-телефоны Cisco серии 7800 (телефоны для аудиовызовов: 7811, 7821, 7841, 7861)
-
Многоплатформенные IP-телефоны Cisco серии 8800 (телефоны для аудиовызовов: 8811, 8841, 8851, 8861)
-
Многоплатформенные IP-телефоны Cisco серии 8800 (телефоны для видеозвонков: 8845, 8865)
-
Cisco IP Conference Phone 7832 и 8832
-
Cisco Video Phone 8875
-
Стационарный телефон Cisco серии 9800
| 1 | ||||||||||||||||||||||||||||||||||||||
| 2 |
Перейти к . | |||||||||||||||||||||||||||||||||||||
| 3 |
Выберите один из следующих вариантов и нажмите Скачать.
Для подготовки CSV-файла вы можете использовать следующую таблицу.
При назначении устройства пользователям и рабочим пространствам Webex Calling обязательны следующие поля:
Эти поля «Номер телефона» и «Добавочный номер» ранее назывались Номер справочника и Прямая линия; Названия этих столбцов продолжают поддерживаться в течение короткого времени. Рекомендуется указывать в файле CSV не более 1000 устройств. Если вы хотите добавить более 1000 устройств, используйте второй CSV-файл. | |||||||||||||||||||||||||||||||||||||
| 4 |
Заполните таблицу. | |||||||||||||||||||||||||||||||||||||
| 5 |
Загрузите файл CSV, перетащив его или щелкнув Выбрать файл. | |||||||||||||||||||||||||||||||||||||
| 6 |
Если MAC-адрес не указан, вам будет предложено выбрать, куда будет отправлен код активации.
Для активации устройства вам или пользователю необходимо ввести код активации на самом устройстве. | |||||||||||||||||||||||||||||||||||||
| 7 |
Нажмите кнопку Отправить. Отображает обновленный статус при активации устройств.
Для ввода кода активации на мультиплатформенных устройствах необходимо установить прошивку версии 11.3.1 SR2 или более поздней. Для получения информации об обновлении прошивки телефона см. эту статью. |
Экспорт списка устройств
Чтобы просмотреть список устройств, назначенных пользователям и рабочим местам, вы можете экспортировать CSV-файл.
Войдите в Центр управления и перейдите в Устройства.
Выберите несколько устройств из списка и выберите опцию Экспорт. Вы можете выбрать поля для включения в CSV-файл и экспортировать его содержимое в локальную папку.
Поля, отображаемые в CSV-файле, зависят от способа подключения устройства к платформе. Поэтому некоторые поля отсутствуют в выходном файле.
Управление устройством для пользователя
Можно добавить, удалить, перезагрузить, проверить активацию или создать новый код активации для устройств, которые назначены пользователям в вашей организации. Это может быть полезно при необходимости для просмотра устройств на экране пользователей и управления ими.
| 1 | |
| 2 |
Перейти к . |
| 3 |
Выберите пользователя и нажмите Устройства. |
| 4 |
Чтобы добавить устройство для этого пользователя, щелкните Добавить устройство. Если пользователю уже назначено устройство, и вы хотите добавить еще одно устройство, нажмите . Для получения дополнительной информации о добавлении устройства к пользователю см. раздел Добавление телефонов к пользователю. |
| 5 |
Чтобы изменить добавленное устройство, выберите его название. Это переведет вас на страницу «Устройства». Здесь можно просматривать и редактировать параметры устройства, удалять и перезагружать устройства, а также создавать для устройства новый код активации, если это возможно. Дополнительные сведения о настройке параметров телефона см. в статье Настройка и обновление параметров телефона. |
| 6 |
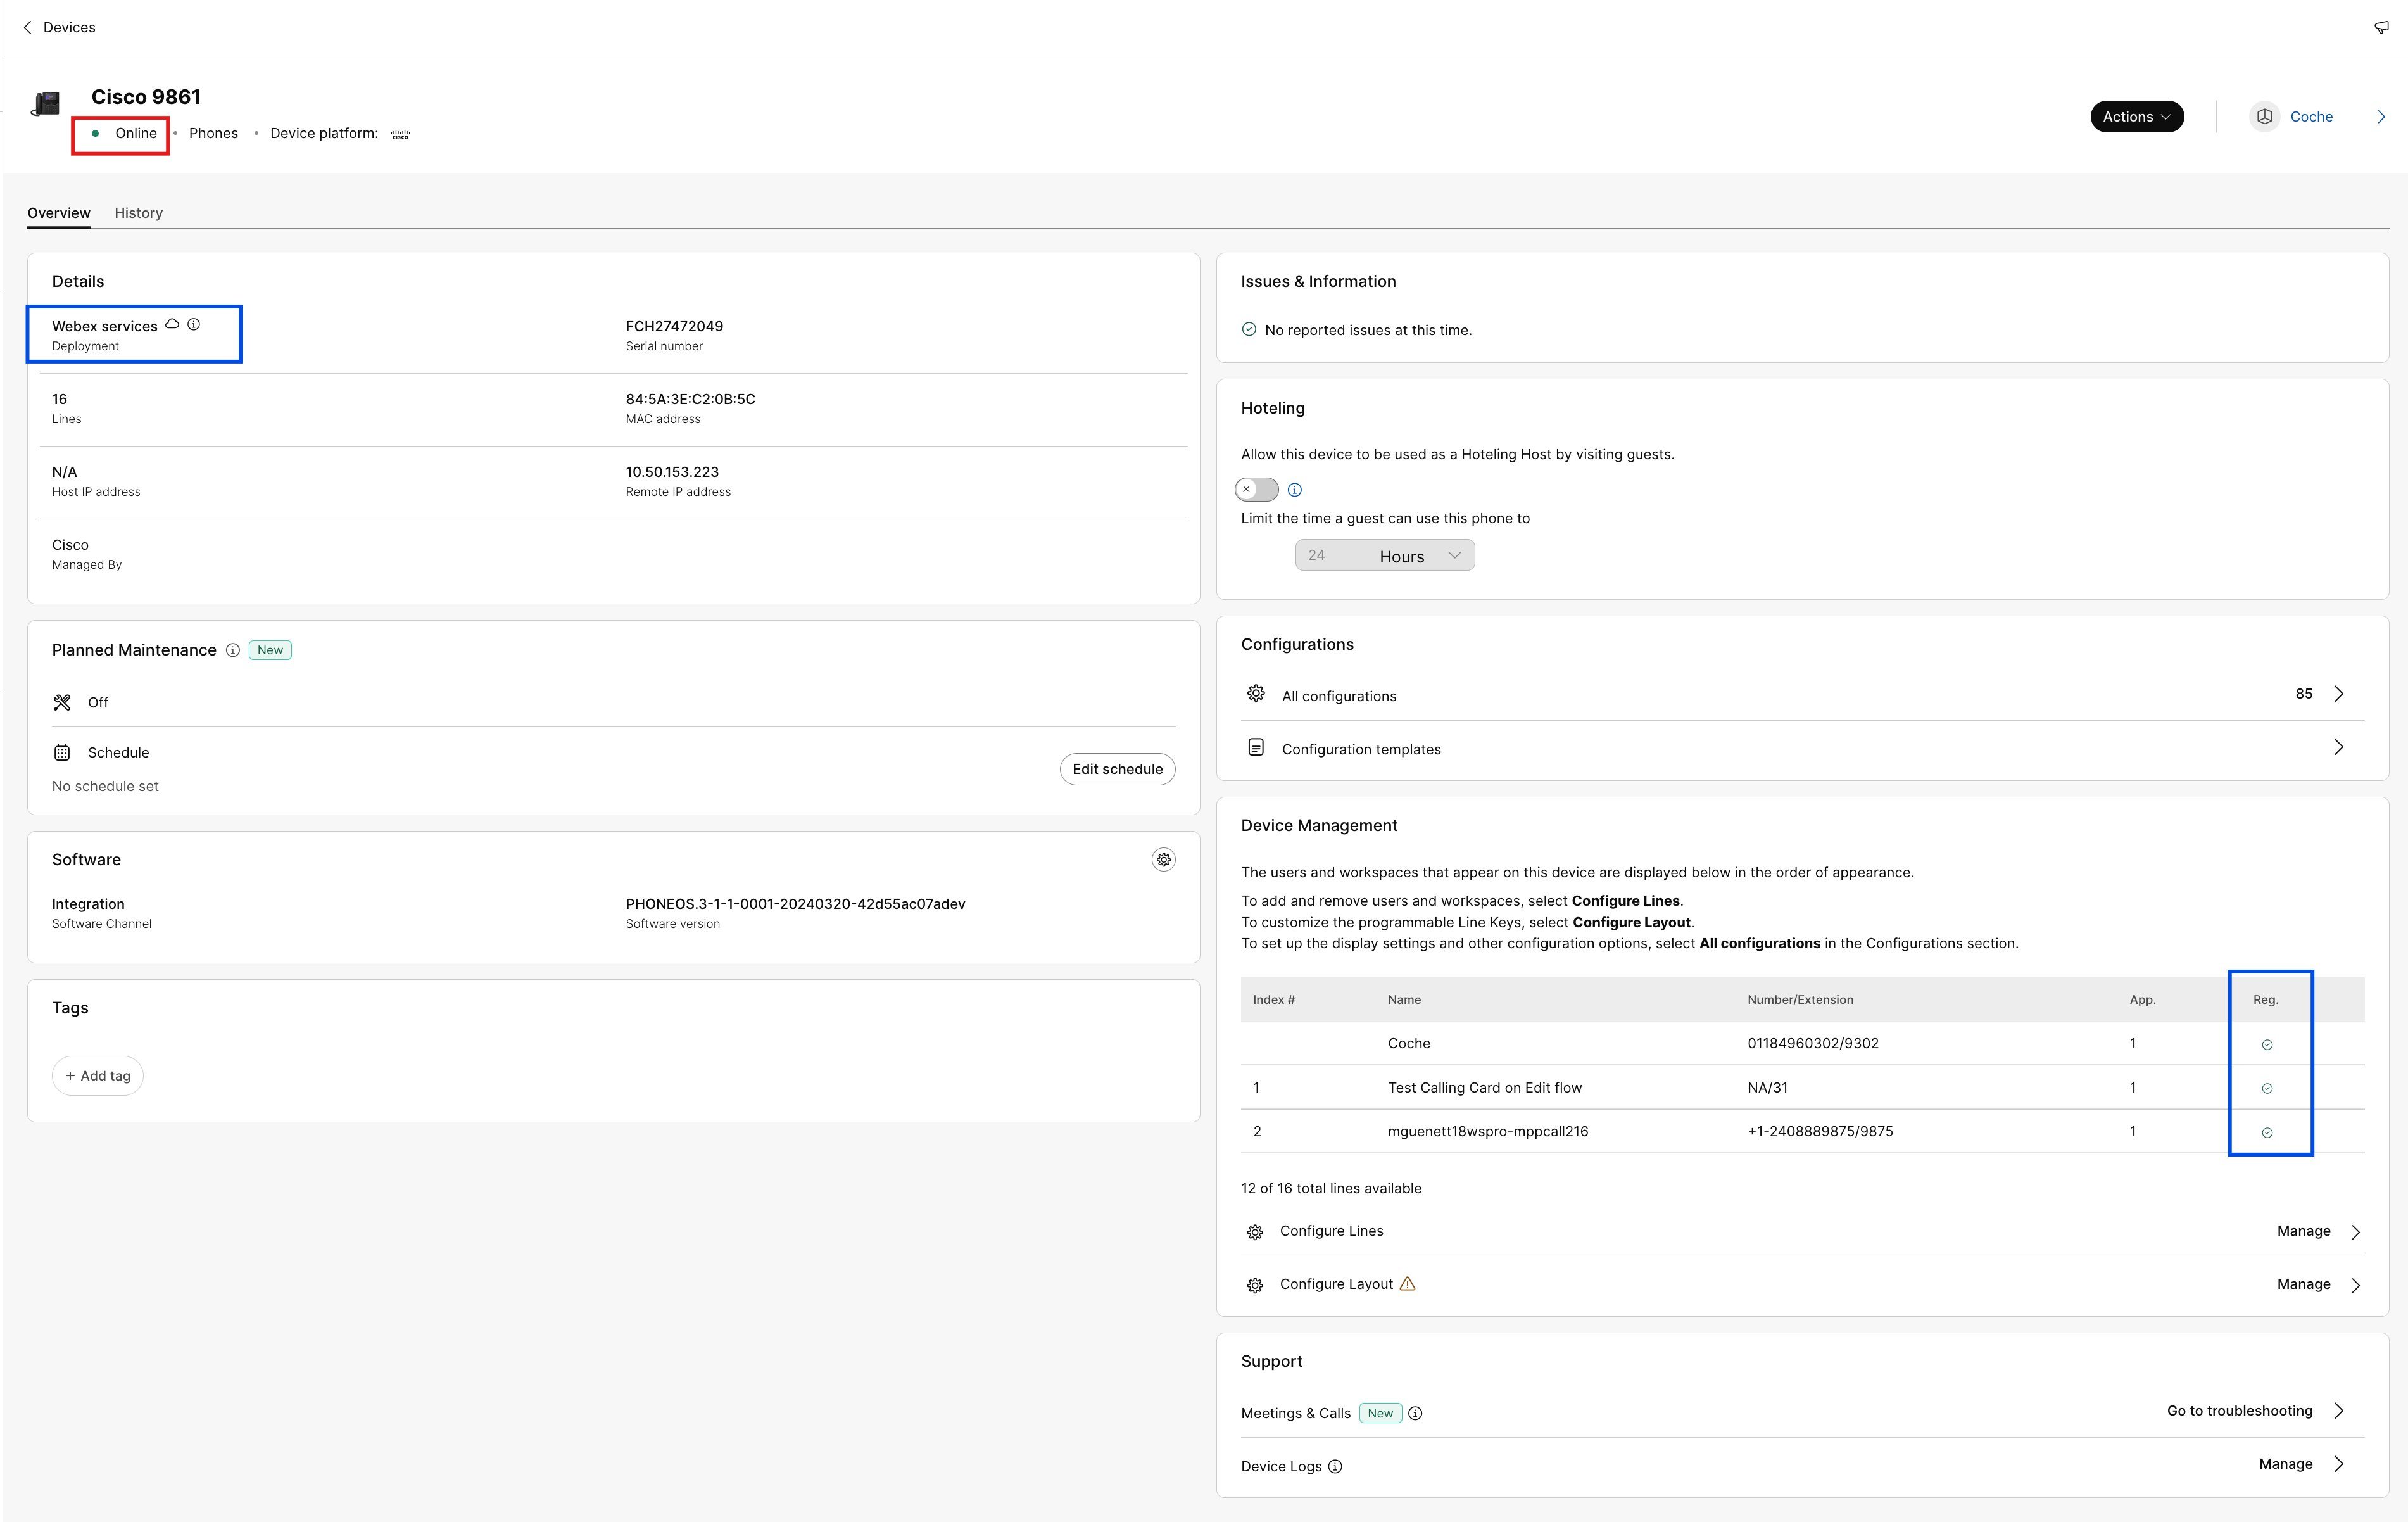
Если устройство, добавленное пользователю с webex Aware, отображается под устройствами, как показано на схеме. Webex Aware указывает на то, что устройство было присоединено к платформе Webex и имеет доступ к функциям Webex, поддерживаемным телефоном.
|
| 7 |
Щелкните Действия для управления устройством. Функция «Действия» позволяет применять изменения конфигурации, перезагружать устройство, сообщать о проблеме и собирать журналы устройства, а также удалять устройство. На вкладке Действия доступны указанные параметры для устройства с поддержкой Webex Aware.
|
Управление устройством для рабочего пространства
Вы можете добавлять устройства и управлять ими непосредственно из профиля рабочей области. К устройствам рабочего пространства могут относиться устройства ATA, например факсы. Также можн настроить устройство рабочего пространства в качестве организатора резервирования рабочего места. Для получения дополнительной информации о режиме «хотелинга» см. Режим «хотелинга» в Control Hub.
| 1 | |
| 2 |
Перейти к . |
| 3 |
Выберите рабочую область для внесения изменений. |
| 4 |
Чтобы добавить устройство, нажмите Добавить устройство в плитке Устройства. Для получения дополнительной информации о добавлении устройств в рабочую область см. раздел Добавление телефона в новую рабочую область. |
| 5 |
Чтобы изменить добавленное устройство, выберите его название. Это переведет вас на страницу «Устройства». Здесь можно просматривать и редактировать параметры устройства, удалять и перезагружать устройство, а также включать функцию использования устройства в качестве организатора резервирования рабочего места. Дополнительные сведения о настройке параметров телефона см. в статье Настройка и обновление параметров телефона. |
| 6 |
Если устройством, добавленным в Workspace, является Webex Aware, параметр Webex Aware отображается под устройствами, как показано на схеме. Webex Aware указывает на то, что устройство было присоединено к платформе Webex и имеет доступ к функциям Webex, которые поддерживаются телефоном.
|
| 7 |
Щелкните Действия для управления устройством. Действия помогают применять изменения конфигурации или обновлять микропрограмму для устройств MPP. На вкладке Действия доступны указанные параметры для устройства с поддержкой Webex Aware.
|
Настройка строк — добавление и изменение порядка строк
Функция «Настройка линий» позволяет назначать телефонам основные, общие и виртуальные линии, обеспечивая многократное отображение общей линии на одном устройстве. Интерфейс настройки портов для ATA-адаптеров остался без изменений.
Вот обновления для функции «Настройка линий» для устройств MPP и PhoneOS:
-
Основные линии
-
Назначьте владельца устройства и убедитесь, что он занимает первую строчку в списке пользователей устройства.
-
Увеличьте количество появлений в этой строке, чтобы добавить дополнительные появления.
-
-
Общие линии связи / Виртуальные линии
-
Назначайте общие линии связи любому пользователю или рабочему пространству в организации, поддерживающему функцию вызовов, при наличии доступных общих номеров вызова (SCA).
-
Увеличьте количество вхождений в строке общей строки, чтобы добавить дополнительные вхождения.
Ограничения SCA, доступные для пользователя или рабочего пространства, могут ограничивать количество назначаемых появлений.
-
Присвойте каждой общей строке индекс строки. Вы можете изменить порядок общих линий с помощью перетаскивания.
Нельзя разделить отдельные проявления линии.
-
Использовать пользовательские для изменения положения общих индексов строк на устройстве.
-
-
Отображения
-
Настройте отображение одной и той же основной, общей или виртуальной линии в нескольких экземплярах в виде отдельных взвешенных наборов линий.
-
Взвешенные линии обозначаются суффиксом -1, -2 и так далее (только для телефонов Cisco).
-
Звонки поступают на первую доступную линию с учетом веса номера.
-
-
Новая сводная информация (внизу страницы)
-
Количество уникальных SIP-регистрируемых линий — показывает число уникальных учетных записей для SIP-регистрации, которые может поддерживать телефон. В настоящее время поддерживается максимальное количество учетных записей — 16.
-
Общее количество назначенных строк – показывает общее количество назначаемых строк, поддерживаемых устройством. Если модель телефона поддерживает модули KEM, максимальное количество появлений включает расширенную емкость.
-
-
Групповое назначение строк и общедоступные API
- Для назначения строк с помощью методов массовой обработки CSV-файлов и публичного API используется функциональность «Внешний вид».
Для получения дополнительной информации о совместном использовании линий в разных местах см. Настройка совместного использования линий и виртуальных линий в разных местах.
Если при добавлении номера быстрого набора на телефон удерживаемой клавишей нужной линии, номер быстрого набора не отображается в Центре управления. Быстрый набор можно перезаписать, настроив общую линию для этой клавиши.
| 1 | |
| 2 |
Перейдите в Пользователи или Рабочие области (в зависимости от того, к какому устройству привязано изменение). |
| 3 |
Выберите пользователя или рабочее пространство. |
| 4 |
Перейдите в Устройства и щелкните устройство, для которого вы хотите добавить или изменить общие линии. Это переведет вас на страницу «Устройства». |
| 5 |
В разделе Управление устройстваминажмите Настройка линий. |
| 6 |
Чтобы добавить общую линию, нажмите значок Вы можете назначить одну и ту же общую или виртуальную линию нескольким отдельным клавишам на телефоне. В столбце Количество появлений соответствующей строки нажмите значок
Вы можете добавлять строки в том порядке, в котором хотите, чтобы они отображались. Чтобы изменить внешний вид линий, удалите его и добавьте в список в предпочтительном порядке отображения. Если у пользователя есть номера из других источников users/groups В настройках устройств можно добавить метку линии ( Line label ) для общей линии. Эта метка помогает отличить одно общее появление линии от другого. Чтобы удалить линию, щелкните пиктограмму |
| 7 |
Щелкните Сохранить. В крупных организациях администратору необходимо выбрать местоположение, прежде чем настраивать дополнительные телефонные линии. Нажмите на значок Для обычной организации фильтр по местоположению недоступен, и администратор может выбрать строку кода. |
 , выполните поиск по имени или номеру телефона и выберите линию.
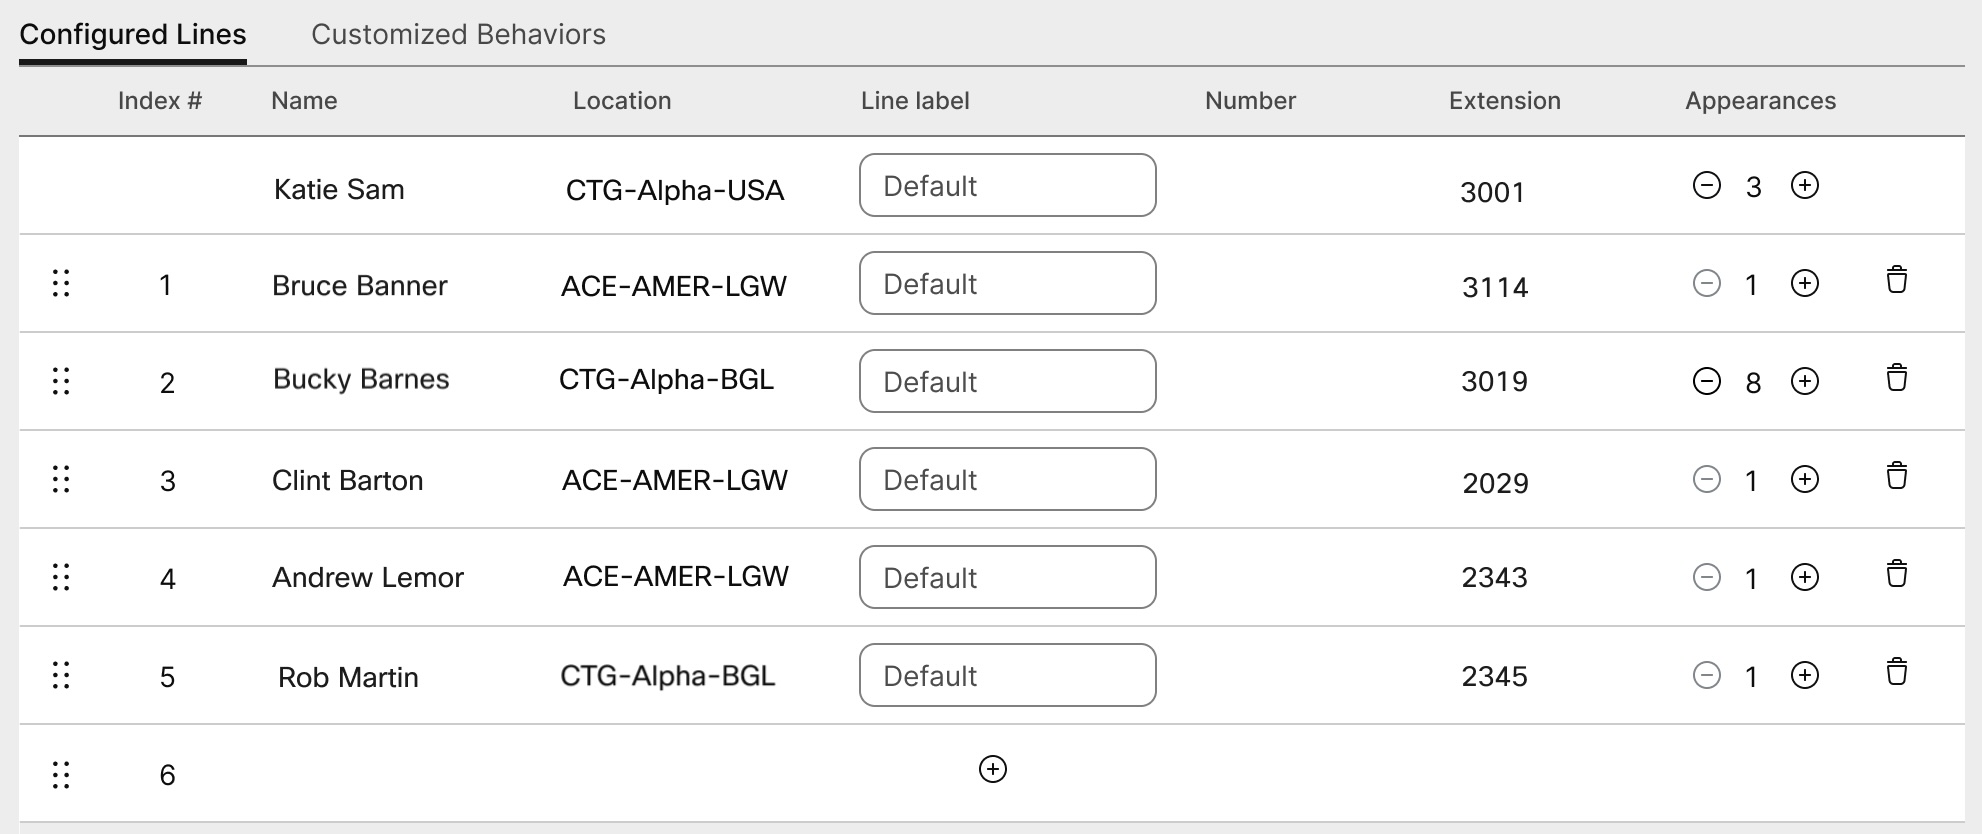
 . Удалить основного пользователя в режиме онлайн невозможно. 1.
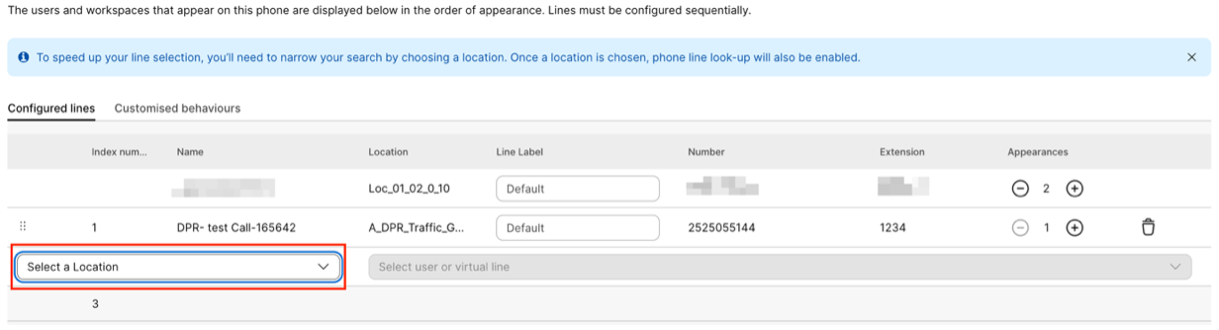
Настройка устройства ATA для пользователя
В панели управления можно настроить порты на аналоговом телефонном адаптере (ATA), назначенном пользователю. В настоящее время доступны две конфигурации для устройств ATA: с двумя портами и с 24 портами.
| 1 | |
| 2 |
Перейти к . |
| 3 |
Выберите пользователя для внесения изменений и прокрутите до раздела Устройства. |
| 4 |
Выберите устройство, на которое вы хотите добавить или изменить данные. |
| 5 |
В области Пользователи на этом устройстве щелкните Настройка портов. |
| 6 |
Чтобы добавить конфигурацию общего порта, щелкните пиктограмму |
| 7 |
Введите имя или номер телефона и выберите один из появившихся вариантов, затем щелкните Сохранить. В поиске будут отображаться только рабочие пространства без устройств. |
| 8 |
Если устройство требует сжатия факса по протоколу T.38, установите флажок в столбце T.38 или отмените параметры сжатия на уровне пользователя, а затем нажмите Сохранить. Рабочее пространство может иметь устройство ATA. Это необходимо для факсов. |
 .
.Добавление номеров к вашему местоположению
Добавить номера телефонов к стационарным устройствам или устройствам комнаты в вашей клиентской организации можно в любое время независимо от того, истек срок действия пробной версии или нет.
Мы увеличили количество телефонных номеров, которые можно добавить в Control Hub, с 250 до 1000.
| 1 | |
| 2 |
Перейти к , а затем нажмите Добавить числа. |
| 3 |
Укажите Местоположение и Тип номера. Если выполняется перенос номеров, введите как текущие, так и новые номера телефона для выставления счета. |
| 4 |
Укажите Местоположение, Штат, Код города, Префикс (необязательно), а затем нажмите Поиск. Отображаются доступные номера. |
| 5 |
Выберите номера, которые вы хотите добавить к местоположению. Выбранные вами числа перемещаются в поле Выбранные числа. |
| 6 |
Щелкните Сохранить. |
Проверка состояния заказанных номеров PSTN
Подключенные к многоплатформенным телефонам (MPP): гарнитуры и кноповые модули расширения (KEMS)
При подключении аксессуаров (Headsets/KEMs) Для устройства MPP они отображаются как элемент инвентаризации на вкладке «Устройства» в Центре управления. В ассортиментном списке устройств Control Hub можно найти модель принадлежности, состояние и пользователя, к которому относится принадлежность. При выборе принадлежности можно получить дополнительную информацию, например серийный номер принадлежности и текущую версию программного обеспечения. Поле состояния принадлежности находится в состоянии "онлайн" при условии подключения принадлежности к MPP. Гарнитура, подключенная к MPP, автоматически модернизирует свое программное обеспечение до последней версии, доступной в службе управления устройствами.
|
Модель телефона |
Гарнитура Cisco серии 520 |
Гарнитура Cisco серии 530 |
Гарнитура Cisco серии 560 |
Гарнитура Cisco серии 730 |
|---|---|---|---|---|
|
Cisco IP Phone 8811/8841/8845 |
— |
— |
RJ9 и RJ11 |
— |
|
Cisco IP Phone 8851/8861/8865 |
от USB |
от USB |
от USB RJ9 и RJ11 |
— |
|
Cisco IP Phone 7811/7821/7841/7861 |
— |
— |
— |
— |
|
Cisco IP Phone 6821/6841/6851/6861 |
— |
— |
— |
— |
|
Cisco IP Phone 6871 |
от USB |
от USB |
от USB |
— |
|
Cisco IP Conference Phone 7832/8832 |
— |
— |
— |
— |
|
Модель телефона |
KEM |
|---|---|
|
Cisco IP Phone 8811/8841/8845 |
— |
|
Cisco IP Phone 8851/8861/8865 |
BEKEM CP-8800-A-KEM CP-8800-V-KEM |
|
Cisco IP Phone 7811/7821/7841/7861 |
— |
|
Cisco IP Phone 6821/6841/6861/6871 |
— |
|
Cisco IP Phone 6851 |
CP-68KEM-3PCC |
|
Cisco IP Conference Phone 7832/8832 |
— |


