- Головна
- /
- Стаття

Дякуємо за відгук.

Налаштування пристроїв Webex Calling і керування ними
 У цій статті
 Надіслати відгук?
У Control Hub можна керувати пристроями й призначати їх для користувачів і робочих просторів. Виберіть варіант додавання за допомогою MAC-адреси або створення коду активації, який потрібно ввести на самому пристрої.
Під час додавання пристрою відображається 16-значний код активації. Код активації діє 30 днів для телефонів MPP та 7 днів для пристроїв Room.
Додати телефон до користувача
За допомогою Control Hub ви можете призначити телефон користувачеві для особистого користування. Телефони, перелічені тут, підтримують Webex Calling. Хоча всі ці телефони можна додати за допомогою MAC-адреси, лише наступну підмножину можна зареєструвати за допомогою коду активації:
-
Багатоплатформові IP-телефони Cisco серії 6800 (телефони для аудіозв’язку: 6821, 6841, 6851, 6861, 6871)
-
Багатоплатформові IP-телефони Cisco серії 7800 (телефони для аудіозв’язку: 7811, 7821, 7841, 7861)
-
Багатоплатформові IP-телефони Cisco серії 8800 (телефони для аудіозв’язку: 8811, 8841, 8851, 8861)
-
Багатоплатформові IP-телефони Cisco серії 8800 (телефони для відеозв’язку: 8845, 8865)
-
IP-телефон Cisco для конференц-зв’язку 7832 і 8832
-
Cisco Video Phone 8875
-
Настільний телефон Cisco серії 9800
Ви можете призначити лише базові пристрої DECT (не трубки DECT) у Control Hub. Після того, як ви призначите базовий блок користувачеві, вручну з’єднайте трубку DECT з цією базою. Додаткову інформацію див. в статті Підключення трубки до базової станції.
| 1 |
Увійдіть у Центркерування. |
| 2 |
Перейти до . Ви також можете додати пристрій до користувача з розділу «Користувачі», перейшовши до > виберіть користувача > .
|
| 3 |
Виберіть Особисте використання, щоб призначити пристрій користувачеві, а потім натисніть Далі. |
| 4 |
Введіть ім’я користувача або фактичне ім’я власника телефону, виберіть користувача з результатів і натисніть Далі. |
| 5 |
Виберіть тип пристрою, який ви хочете налаштувати для користувача:
|
Додавання телефону до нового робочого простору
Коли люди на роботі, вони збираються в таких місцях, як обідні кімнати, вестибюлі та конференц-зали. Ви можете налаштувати спільні пристрої Webex у цих робочих просторах, додати служби, а потім спостерігати за процесом співпраці.
Пристрій робочої області не призначається конкретному користувачеві, а фізичному розташуванню, що дозволяє спільне використання.
Пристрої, перелічені, підтримують Webex Calling. Ви можете зареєструвати більшість цих пристроїв за допомогою MAC-адреси, а за допомогою коду активації – лише наступну підмножину:
-
Багатоплатформові IP-телефони Cisco серії 6800 (телефони для аудіозв’язку: 6821, 6841, 6851)
-
Багатоплатформові IP-телефони Cisco серії 7800 (телефони для аудіозв’язку: 7811, 7821, 7841, 7861)
-
Багатоплатформові IP-телефони Cisco серії 8800 (телефони для аудіозв’язку: 8811, 8841, 8851, 8861)
-
Багатоплатформові IP-телефони Cisco серії 8800 (телефони для відеозв’язку: 8845, 8865)
-
IP-телефон Cisco для конференц-зв’язку 7832 і 8832
-
Настільний телефон Cisco серії 9800
Перш ніж почати
- Ви можете додати до п’яти настільних телефонів Cisco, телефонів Cisco MPP, бездротових пристроїв, пристроїв ATA, телефонної ОС або пристроїв сторонніх виробників до робочого простору з професійною ліцензією Workspace.
- Ви можете додати кілька пристроїв до професійного робочого простору лише зі сторінки нового робочого простору. Увімкніть опцію «Спробувати нові робочі простори » у верхньому правому куті сторінки робочого простору, щоб використовувати нову сторінку робочого простору.
- Ви можете додати лише один пристрій до робочого простору з ліцензією на робочий простір загальної області.
| 1 |
Увійдіть у Центркерування. |
| 2 |
Перейти до . Ви також можете додати пристрій до нового робочого простору, перейшовши до розділу .
|
| 3 |
Виберіть Спільне використання, а потім натисніть Далі. |
| 4 |
Виберіть Нове робоче середовище, а потім натисніть Далі. |
| 5 |
Введіть назву робочого простору (наприклад, назву фізичної кімнати), виберіть тип кімнати, додайте місткість кімнати та виберіть розташування робочого простору. Клацніть Далі. Назва робочої області не може містити більше 128 символів і не може містити %, #, <, >, /, \, та "символи". |
| 6 |
Виберіть тип пристрою, який ви хочете налаштувати для робочого простору:
|
| 7 |
Клацніть службу Виклик та виберіть тип підписки й ліцензії, які потрібно призначити робочій області.
Щоб дізнатися більше про функції, доступні з ліцензіями, див. Функції, доступні за типом ліцензії для Webex Calling. |
| 8 |
Призначте розташування і номер телефону (визначається вибраним розташуванням), а потім клацніть Зберегти. Також можна призначити додатковий номер. Розташування оновлюється під час щонічної повторної синхронізації. Якщо ви хочете додати додаткові пристрої до професійного робочого простору, ви можете зробити це одним із наведених нижче способів.
Щоб змінити або керувати пристроями, призначеними робочій області, див. розділ Керування пристроєм для робочої області. |
 у стовпці
 Перепризначення існуючого телефону іншому користувачеві або пристрою
Щоб повторно використати телефон, призначений одному користувачу/робочій області Webex Calling іншому користувачу/робочій області Webex Calling, виконайте наведені нижче дії.
| 1 |
Увійдіть у Центркерування. |
| 2 |
Перейдіть до User/Workspace де наразі призначено пристрій. Перепризначити пристрій можна в таких сценаріях:
|
| 3 |
На телефоні зайдіть в меню налаштувань і виконайте ці дії для перепризначення телефону. |
| 4 |
Дотримуйтеся вказівок у розділі Додавання та призначення телефону користувачу або Додавання телефону до нової робочої області для призначення або додавання телефону до користувача або робочої області. |
| 5 |
Після додавання пристрою до Центру керування виконайте такі дії на телефоні: |
Додати дошку, стіл або пристрій у кімнаті до користувача
Призначення пристрою дошки, столу або кімнати як особистого пристрою комусь дозволяє йому здійснювати виклики та зустрічі Webex безпосередньо на свій пристрій. Докладніше див. у статті Призначення персональної дошки, столу або пристрою кімнати користувачеві.
Додавання дошки, столу або пристрою в кімнаті до нового робочого простору
У робочий час користувачі збираються разом у різних робочих просторах, як-от у їдальні, холі або конференц-залі. Можна налаштувати пристрої Cisco Webex, які знаходяться в спільному використанні в цих робочих просторах, додати до них служби, а потім переглянути, як проходить співпраця.
Ключовий принцип пристрою Workspaces полягає в тому, що він не призначається конкретному користувачеві, а фізичному розташуванню, що дозволяє спільне використання.
Пристрої, перелічені тут, підтримують Webex Calling.
| 1 |
Увійдіть у Центркерування. |
| 2 |
Перейти до . Ви також можете додати пристрій до нового робочого простору з розділу «Робочі простори», перейшовши до .
|
| 3 |
Виберіть Спільне використання та натисніть Далі. |
| 4 |
Виберіть Нове робоче середовище та натисніть Далі. |
| 5 |
Введіть назву робочої області (наприклад, назву фізичної кімнати), виберіть тип кімнати, додайте місткість кімнати та виберіть розташування для робочої області. Потім клацніть Далі. |
| 6 |
Виберіть пристрій Cisco Room and Desk. |
| 7 |
Виберіть одну з наступних служб і натисніть Далі.
|
| 8 |
Якщо ви обрали послугу Cisco Webex Calling, виберіть підписку та тип ліцензії, які потрібно призначити робочому простору.
Щоб дізнатися більше про функції, доступні з ліцензіями, див. Функції, доступні за типом ліцензії для Webex Calling. |
| 9 |
Призначте місцезнаходження, номер телефону (визначається вибраним вами місцезнаходженням), додатковий номер, а потім натисніть Зберегти. |
| 10 |
Активуйте пристрій за допомогою наданого коду. Код активації можна скопіювати, надіслати електронною поштою або роздрукувати. |
Масове додавання і призначення пристроїв
Щоб призначити кілька пристроїв користувачам і робочим просторам, ви можете заповнити CSV-файл необхідною інформацією та активувати ці пристрої лише за кілька простих кроків.
- Ви можете додати до 5 настільних телефонів Cisco, телефонів Cisco MPP, ATA або пристроїв сторонніх виробників до робочої області з ліцензією Professional workspace.
- Ви можете додати лише один пристрій до робочої області з ліцензією на робочу область загального призначення.
Пристрої, перелічені тут, підтримують Webex Calling. Ви можете зареєструвати всі пристрої за допомогою MAC-адреси; проте зареєструйте наступну підмножину пристроїв за допомогою коду активації:
-
Багатоплатформові IP-телефони Cisco серії 6800 (телефони для аудіозв’язку: 6821, 6841, 6851)
-
Багатоплатформові IP-телефони Cisco серії 7800 (телефони для аудіозв’язку: 7811, 7821, 7841, 7861)
-
Багатоплатформові IP-телефони Cisco серії 8800 (телефони для аудіозв’язку: 8811, 8841, 8851, 8861)
-
Багатоплатформові IP-телефони Cisco серії 8800 (телефони для відеозв’язку: 8845, 8865)
-
IP-телефон Cisco для конференц-зв’язку 7832 і 8832
-
Cisco Video Phone 8875
-
Настільний телефон Cisco серії 9800
| 1 |
Увійдіть у Центркерування. | |||||||||||||||||||||||||||||||||||||
| 2 |
Перейти до . | |||||||||||||||||||||||||||||||||||||
| 3 |
Виберіть один із наведених нижче варіантів і натисніть Завантажити.
Ви можете скористатися наступною таблицею для підготовки CSV-файлу.
Наступні поля є обов’язковими для заповнення під час призначення пристрою користувачам і робочим просторам Webex Calling:
Ці поля «Номер телефону» та «Додаткова інформація» раніше мали назви «Номер довідника » та «Пряма лінія» ; ці назви стовпців продовжуватимуть підтримуватися протягом короткого часу. Рекомендується в одному файлі CSV вказувати не більше 1000 пристроїв. Якщо ви хочете додати більше 1000 пристроїв, скористайтеся другим CSV-файлом. | |||||||||||||||||||||||||||||||||||||
| 4 |
Заповніть електронну таблицю. | |||||||||||||||||||||||||||||||||||||
| 5 |
Передайте файл CSV, перетягнувши його або клацнувши Вибрати файл. | |||||||||||||||||||||||||||||||||||||
| 6 |
Якщо MAC-адреса порожня, ви отримаєте опцію вибору, куди буде надіслано код активації.
Вам або користувачеві потрібно ввести код активації на пристрої для його активації. | |||||||||||||||||||||||||||||||||||||
| 7 |
Клацніть Надіслати. Відображає оновлений стан, коли пристрої стають активними.
Щоб користувачі могли ввести код активації на своєму пристрої, на багатоплатформних пристроях має бути встановлено прошивку версії 11.3.1 SR2 або пізнішої. Щоб отримати інформацію про оновлення прошивки телефону, див. цю статтю. |
Експорт списку пристроїв
Якщо ви хочете переглянути список пристроїв, призначених користувачам і робочим просторам, ви можете експортувати CSV-файл.
Увійдіть у Центр керування та перейдіть до розділу Пристрої.
Виберіть кілька пристроїв зі списку пристроїв і виберіть опцію Експорт. Ви можете вибрати поля, які потрібно включити до CSV-файлу, та експортувати вміст до локальної папки.
Поля, що відображаються у файлі CSV, залежать від підключення пристрою до платформи. Таким чином, деякі поля недоступні у вихідному файлі.
Керування пристроєм для користувача
Пристрої, які призначено користувачам у вашій організації, можна додати, видалити, перезавантажити, перевірити їхню активацію або створити для них новий код активації. Це може бути корисним у разі необхідності перегляду й керування пристроями на екрані «Користувачі».
| 1 |
Увійдіть у Центркерування. |
| 2 |
Перейти до . |
| 3 |
Виберіть користувача та натисніть Пристрої. |
| 4 |
Щоб додати пристрій до цього користувача, клацніть Додати пристрій. Якщо користувачеві вже призначено пристрій, і ви хочете додати ще один пристрій, натисніть . Щоб отримати додаткові відомості про додавання пристрою до користувача, див. розділ Додавання телефонів до користувача. |
| 5 |
Щоб змінити наявний пристрій, виберіть ім’я пристрою. Це перенаправить вас на сторінку "Пристрої". Тут можна переглянути й змінити налаштування пристрою, видалити або перезавантажити його, а також створити новий код активації для пристрою, якщо це можливо. Додаткову інформацію про налаштування параметрів телефону див. в статті Налаштування і оновлення параметрів телефону. |
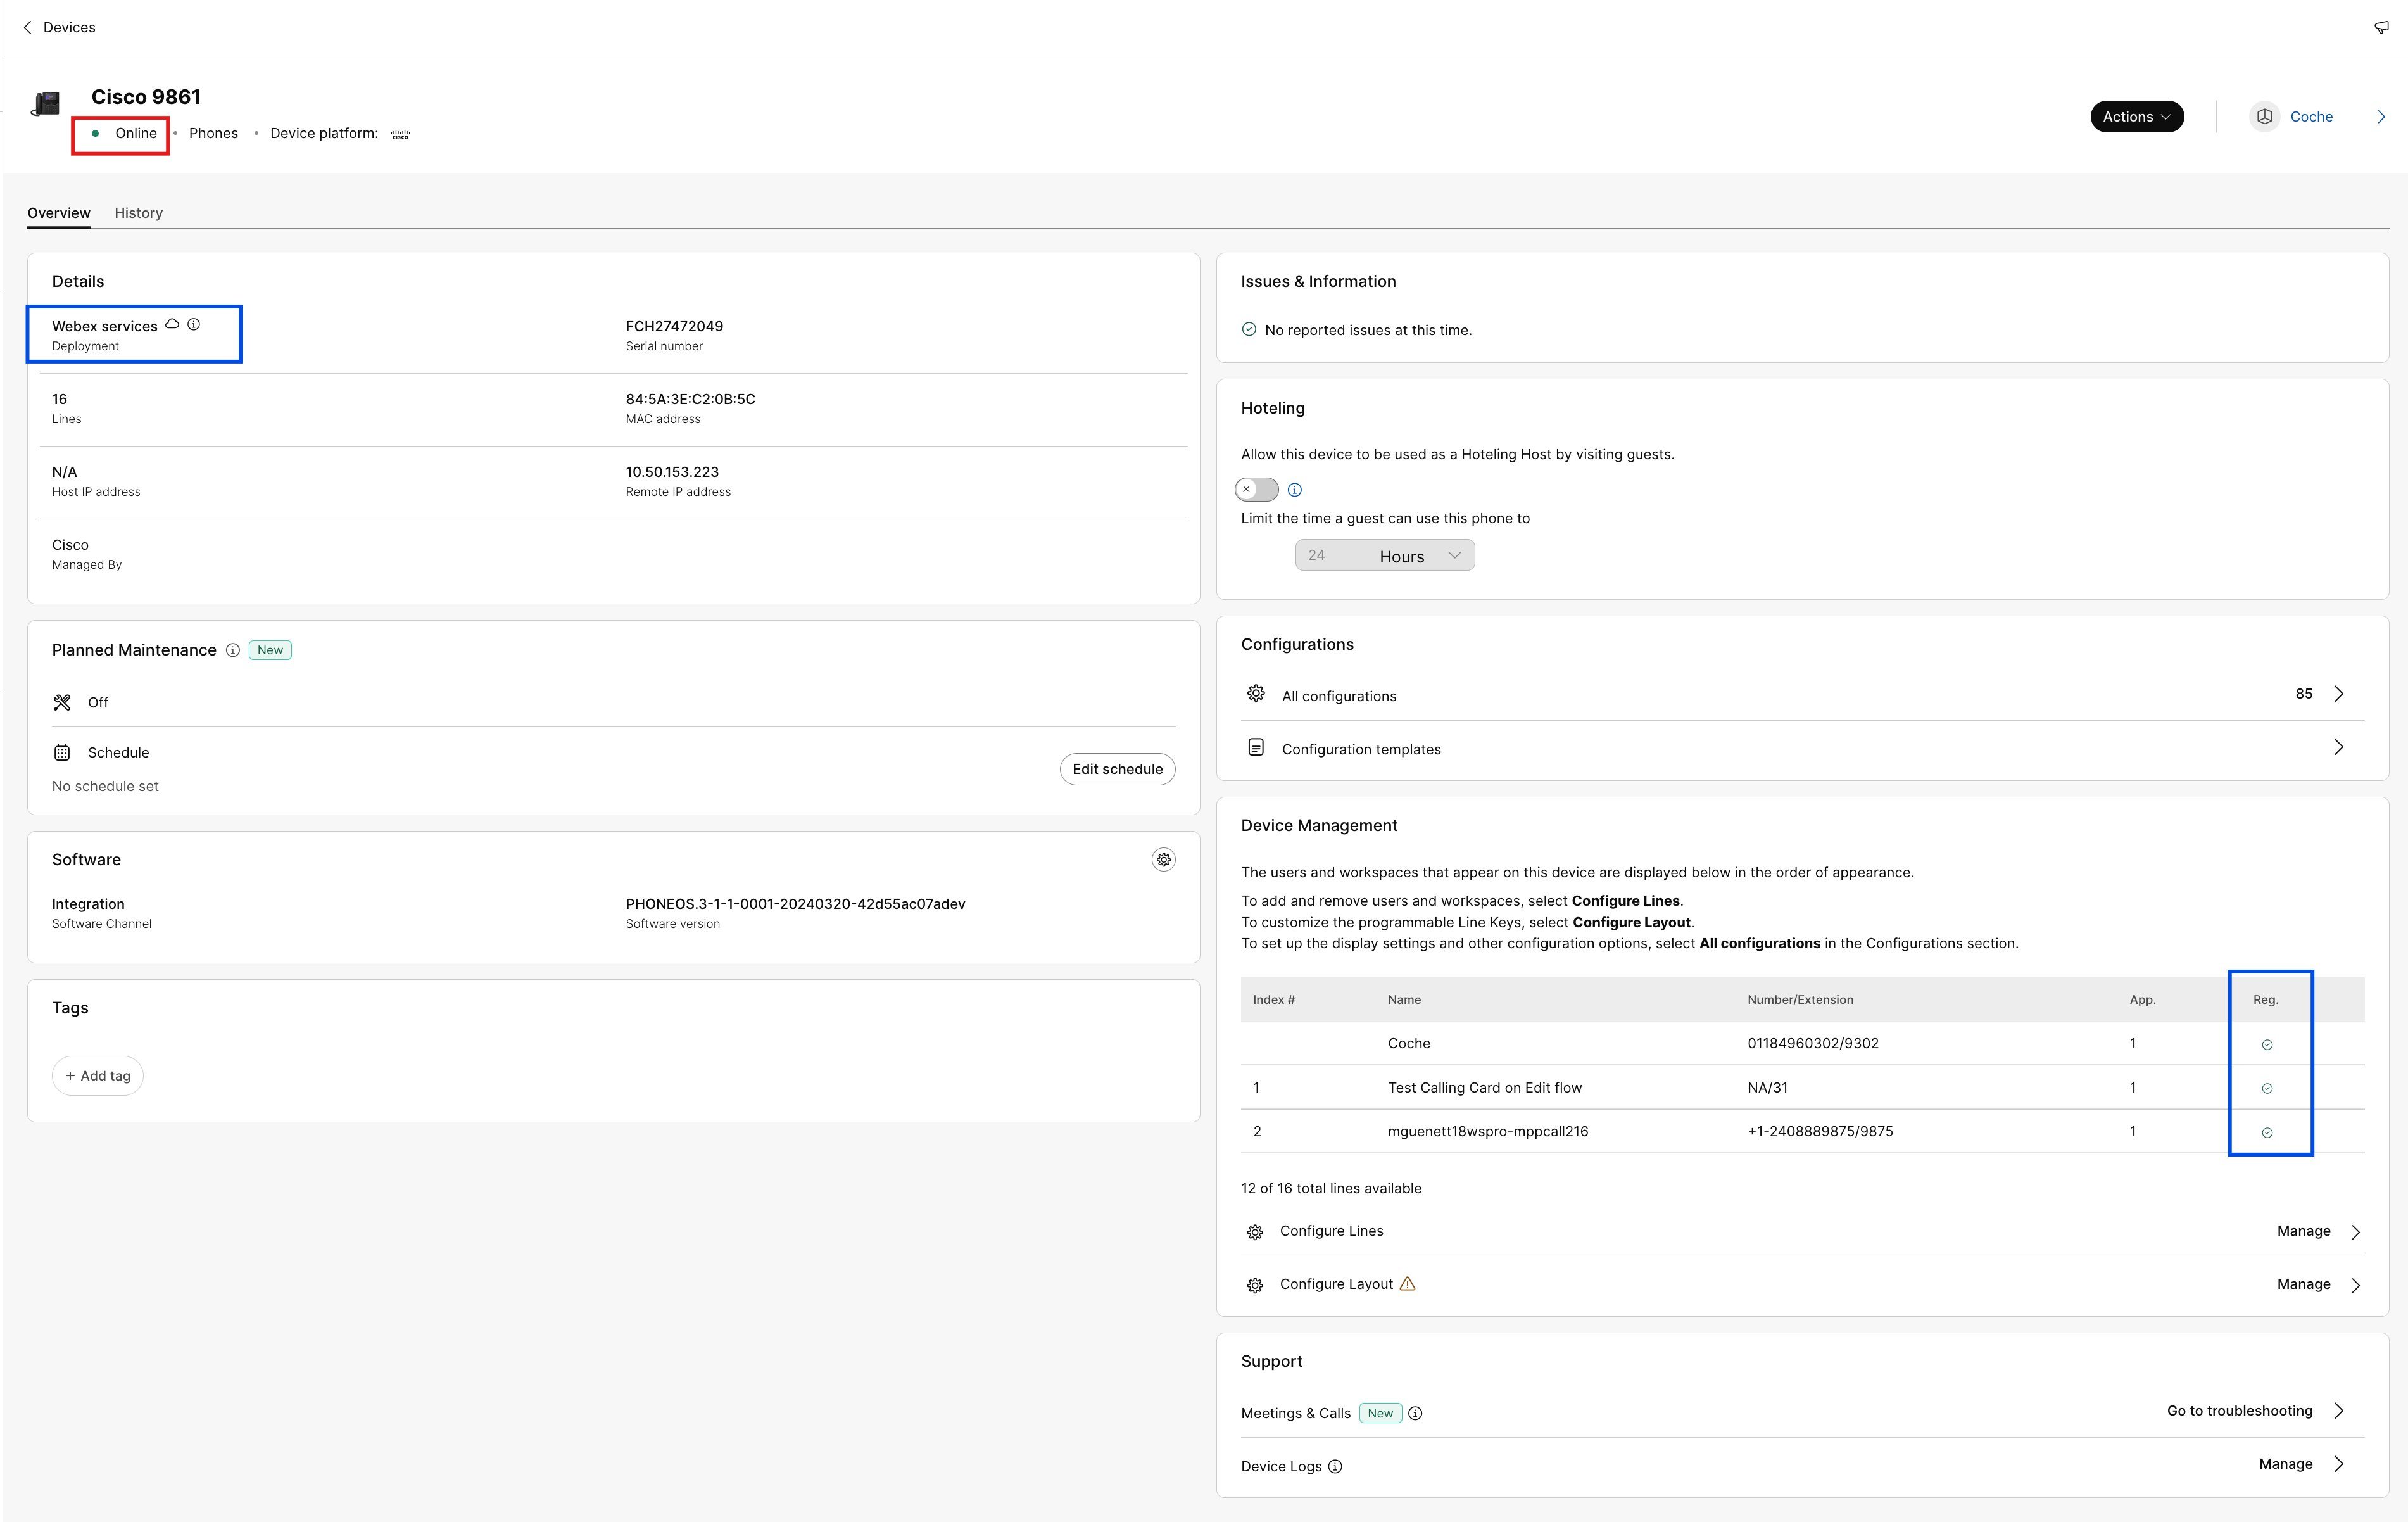
| 6 |
Якщо до користувача додано пристрій Webex Aware, у розділі пристроїв буде відображено параметр Webex Aware, як показано на схемі. Елемент Webex Aware вказує на те, що пристрій приєднано до платформи Webex і він має доступ до функцій Webex, які підтримуються телефоном.
|
| 7 |
Щоб керувати пристроєм, клацніть Дії. Дії дозволяють застосовувати зміни конфігурації, перезавантажувати пристрій, повідомляти про проблему та збирати журнали пристрою або видаляти пристрій. Вкладка «Дії» містить наведені нижче параметри для пристрою з підтримкою Webex Aware.
|
Керування пристроєм для робочого простору
Ви можете додавати пристрої та керувати ними безпосередньо з профілю робочої області. Пристрої робочого простору можуть включати пристрої ATA, як-от факсимільні апарати. Пристрій робочого простору також можна налаштувати як ресурс для резервування. Щоб отримати додаткові відомості про розміщення готелів, див. Розміщення готелів у Control Hub.
| 1 |
Увійдіть у Центркерування. |
| 2 |
Перейти до . |
| 3 |
Виберіть робочу область для зміни. |
| 4 |
Щоб додати пристрій, натисніть Додати пристрій на плитці [ Пристрої. Щоб отримати додаткові відомості про додавання пристроїв до робочої області, див. розділ Додавання телефону до нової робочої області. |
| 5 |
Щоб змінити наявний пристрій, виберіть ім’я пристрою. Це перенаправить вас на сторінку "Пристрої". Тут можна переглянути й змінити налаштування пристрою, видалити або перезавантажити його, а також увімкнути пристрій як ресурс для резервування. Додаткову інформацію про налаштування параметрів телефону див. в статті Налаштування і оновлення параметрів телефону. |
| 6 |
Якщо до робочого простору додано пристрій Webex Aware, у розділі пристроїв буде відображено параметр Webex Aware, як показано на схемі. Елемент Webex Aware вказує на те, що пристрій приєднано до платформи Webex і він має доступ до функцій Webex, які підтримуються телефоном.
|
| 7 |
Щоб керувати пристроєм, клацніть Дії. У розділі дій можна застосувати зміни конфігурації або оновити мікропрограмне забезпечення пристроїв MPP. Вкладка «Дії» містить наведені нижче параметри для пристрою з підтримкою Webex Aware.
|
Налаштування ліній – додавання та зміна порядку ліній
Функція «Налаштування ліній» для призначення основних, спільних та віртуальних ліній телефонам дозволяє використовувати спільну лінію кілька разів на одному пристрої. Налаштування портів для ATA не змінилося.
Ось оновлення для функції «Налаштування ліній» для пристроїв MPP та PhoneOS:
-
Основні лінії
-
Призначте власника пристрою та переконайтеся, що він займає позицію першого рядка на пристрої.
-
Збільште кількість появ у цьому рядку, щоб додати додаткові появи.
-
-
Спільні лінії / Віртуальні лінії
-
Призначайте спільні лінії від будь-якого користувача або робочої області з увімкненою функцією викликів в організації за допомогою доступних спільних явних викликів (SCA).
-
Збільште кількість варіантів вигляду в рядку спільного рядка, щоб додати додаткові варіанти вигляду.
Обмеження SCA, доступні для користувача або робочої області, можуть обмежувати кількість призначених виглядів.
-
Призначте індекс лінії кожній спільній лінії. Ви можете змінити порядок спільних ліній за допомогою перетягування.
Ви не можете відокремити окремі появи лінії.
-
Використовуйте користувацькі для впорядкування розташування спільних індексів рядків на пристрої.
-
-
Індикації
-
Налаштуйте кілька варіантів відображення однієї основної, спільної або віртуальної лінії як окремих зважених наборів ліній.
-
Зважені лінії мають суфікс -1, -2 тощо (лише для телефонів Cisco).
-
Дзвінки надходять на першу доступну зважену лінію.
-
-
Нова зведена інформація (внизу сторінки)
-
Унікальні лінії реєстрації SIP – показує кількість унікальних облікових записів реєстрації SIP, які телефон може підтримувати. Максимальна кількість підтримуваних облікових записів наразі становить 16.
-
Загальна кількість появ ліній – показує загальну кількість призначених появ ліній, що підтримуються пристроєм. Якщо модель телефону підтримує KEM, максимальна кількість появ включає розширену ємність.
-
-
Масове призначення рядків та публічні API
- Методи Bulk CSV та Public API для призначення рядків включають функціональність «Зовнішній вигляд».
Щоб отримати додаткові відомості про спільну лінію між локаціями, див. Налаштування спільних ліній та віртуальних ліній між локаціями.
Коли швидкий набір додається до телефону за допомогою тривалого натискання потрібної клавіші лінії, швидкий набір не відображається в Control Hub. Швидкий набір можна перезаписати, налаштувавши спільну лінію для цієї клавіші.
| 1 |
Увійдіть у Центркерування. |
| 2 |
Перейдіть до розділу Користувачі або Робочі області (залежно від того, де призначено пристрій, який потрібно змінити). |
| 3 |
Виберіть користувача або робочу область. |
| 4 |
Перейдіть до розділу Пристрої та виберіть пристрій, для якого потрібно додати або змінити спільні лінії. Це перенаправить вас на сторінку "Пристрої". |
| 5 |
У розділі Керування пристрояминатисніть Налаштувати лінії. |
| 6 |
Щоб додати вигляд спільної лінії, натисніть значок Ви можете призначити одну й ту саму спільну лінію або віртуальну лінію кільком окремим клавішам ліній на телефоні. У стовпці «Появи» відповідного рядка натисніть значок
Ви можете додавати рядки в потрібному порядку. Щоб змінити порядок індикації ліній, видаліть їх і додайте до списку в тому порядку, в якому вони мають відображатися. Якщо користувач має номери з інших users/groups налаштовано на їхніх пристроях, ви можете додати мітку лінії для спільної лінії. Ця мітка лінії допомагає відрізнити один спільний вигляд лінії від іншого. Щоб видалити лінію, клацніть значок |
| 7 |
Клацніть Зберегти. Для великих організацій адміністратор повинен вибрати розташування перед налаштуванням додаткових ліній виклику. натисніть значок Для звичайної організації фільтр розташування недоступний, і адміністратор може вибрати рядок. |
 , виконайте пошук за іменем або номером телефону та виберіть лінію.
 . Ви не можете видалити основного користувача онлайн 1.
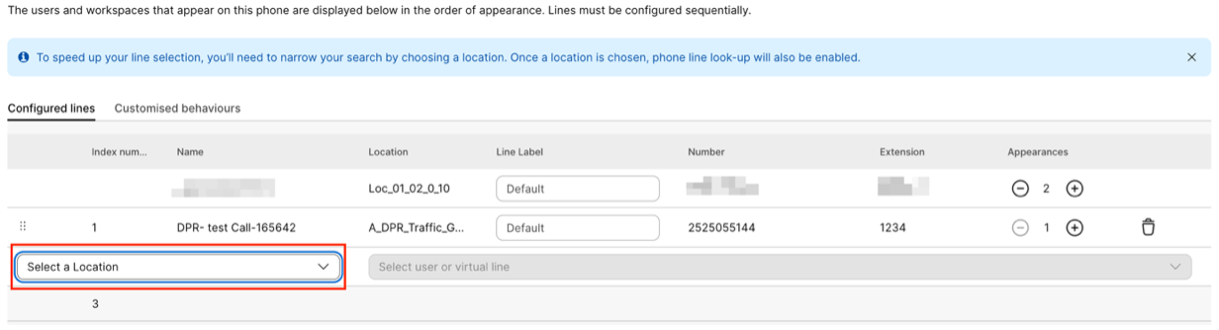
Налаштування пристрою ATA для користувача
Ви можете налаштувати порти на пристрої аналогового телефонного адаптера (ATA), призначеному користувачеві в Control Hub. Наразі доступні дві конфігурації для пристроїв ATA: для пристроїв з двома портами та для пристроїв з 24 портами.
| 1 |
Увійдіть у Центркерування. |
| 2 |
Перейти до . |
| 3 |
Виберіть користувача для зміни та перейдіть до Пристрої. |
| 4 |
Виберіть пристрій, який потрібно додати або змінити. |
| 5 |
У розділі Користувачі на цьому пристрої клацніть Налаштувати порти. |
| 6 |
Щоб додати конфігурацію спільного порту, клацніть значок |
| 7 |
Введіть ім’я або номер телефону й виберіть один із параметрів, які буде відображено, а потім клацніть Зберегти. Під час пошуку буде відображено лише робочі простори без пристроїв. |
| 8 |
Якщо пристрій вимагає стиснення факсів за стандартом T.38, поставте прапорець у стовпці T.38 або змініть параметри стиснення на рівні користувача, а потім натисніть кнопку «Зберегти» . У робочому просторі може знаходитися ATA. Це корисно для факсимільних апаратів. |
 .
.Додавання номерів до розташування
Додати номери телефону до настільних і кімнатних пристроїв у вашій клієнтській організації можна будь-коли, незалежно від того, чи використовується пробна версія, чи виконано перетворення в платну передплату.
Ми збільшили кількість телефонних номерів, які можна додати в Control Hub, з 250 до 1000.
| 1 |
Увійдіть у Центркерування. |
| 2 |
Перейти до , а потім натисніть Додати числа. |
| 3 |
Укажіть Розташування і Тип номера. У разі перенесення номерів укажіть як поточний, так і новий номери для виставлення рахунку. |
| 4 |
Вкажіть Місцезнаходження, Штат, Код міста, Префікс (необов’язково), а потім натисніть Пошук. Відображаються доступні номери. |
| 5 |
Виберіть номери, які потрібно додати до розташування. Вибрані вами числа переміщуються до поля Вибрані числа. |
| 6 |
Клацніть Зберегти. |
Перевірка стану замовлених номерів PSTN
Можна переглядати список номерів PSTN, які замовила ваша організація. За допомогою цієї інформації ви можете побачити невикористані номери, які є в наявності, а також замовлені номери, які незабаром стануть доступними.
| 1 |
Увійдіть у Центркерування. |
| 2 |
Перейти до . |
Аксесуари, підключені до багатоплатформного телефону (MPP) — гарнітури та модулі розширення ключів (KEM)
Під час підключення аксесуарів (Headsets/KEMs) до пристрою MPP, вони відображаються як елемент інвентарю на вкладці «Пристрої» в Центрі керування. У розділі «Облік пристроїв» у Control Hub наведено дані про модель аксесуара, стан і користувача, якому належить аксесуар. Під час вибору аксесуара можна отримати додаткову інформацію, як-от серійний номер аксесуара й поточну версію його програмного забезпечення. Якщо аксесуар підключено до MPP, у полі стану аксесуара буде вказано значення «Онлайн». Для гарнітури, підключеної до MPP, програмне забезпечення буде автоматично оновлено до останньої версії, доступної в розділі «Керування пристроями».
|
Модель телефону |
Гарнітура Cisco серії 520 |
Гарнітура Cisco серії 530 |
Гарнітура Cisco серії 560 |
Гарнітура Cisco серії 730 |
|---|---|---|---|---|
|
IP-телефон Cisco 8811/8841/8845 |
— |
— |
RJ9 і RJ11 |
— |
|
IP-телефон Cisco 8851/8861/8865 |
USB |
USB |
USB RJ9 і RJ11 |
— |
|
IP-телефон Cisco 7811/7821/7841/7861 |
— |
— |
— |
— |
|
IP-телефон Cisco 6821/6841/6851/6861 |
— |
— |
— |
— |
|
IP-телефон Cisco 6871 |
USB |
USB |
USB |
— |
|
IP-телефон Cisco для конференц-зв’язку 7832/8832 |
— |
— |
— |
— |
|
Модель телефону |
КЕМ |
|---|---|
|
IP-телефон Cisco 8811/8841/8845 |
— |
|
IP-телефон Cisco 8851/8861/8865 |
BEKEM CP-8800-A-KEM CP-8800-V-KEM |
|
IP-телефон Cisco 7811/7821/7841/7861 |
— |
|
IP-телефон Cisco 6821/6841/6861/6871 |
— |
|
IP-телефон Cisco 6851 |
CP-68KEM-3PCC |
|
IP-телефон Cisco для конференц-зв’язку 7832/8832 |
— |
Щоб усунути проблеми, з якими стикається модуль розширення ключа (модуль розширення ключа) на телефонах, зареєстрованих на Webex Calling, перегляньте вирішення проблем із модулями розширення ключів у Webex Calling для отримання детальної інформації.


