- Strona główna
- /
- Artykuł

Dziękujemy za opinię.

Konfigurowanie urządzeń w usłudze Webex Calling i zarządzanie nimi
 W tym artykule
 Opinia?
W centrum Control Hub można przypisywać urządzenia dla użytkowników i obszarów roboczych oraz zarządzać nimi. Wybierz opcję dodania za pomocą adresu MAC lub generując kod aktywacyjny, który należy wprowadzić na samym urządzeniu.
Podczas dodawania urządzenia wyświetlany jest 16-cyfrowy kod aktywacyjny. Kod aktywacyjny wygasa po 30 dniach w przypadku telefonów MPP i po 7 dniach w przypadku urządzeń Room.
Dodaj telefon do użytkownika
Za pomocą Control Hub możesz przypisać telefon użytkownikowi do użytku osobistego. Telefony wymienione tutaj obsługują usługę Webex Calling. Chociaż wszystkie te telefony można dodać za pomocą adresu MAC, tylko poniższy podzbiór można zarejestrować za pomocą kodu aktywacyjnego:
-
Telefony cisco IP z serii 6800 telefony wieloplatformowe (telefony audio — 6821, 6841, 6851, 6861, 6871)
-
Telefony cisco IP z serii 7800 telefony wieloplatformowe (telefony audio — 7811, 7821, 7841, 7861)
-
Telefony cisco IP z serii 8800 (telefony audio — 8811, 8841, 8851, 8861)
-
Telefony cisco IP z serii 8800 telefony wieloplatformowe (telefony wideo — 8845, 8865)
-
Telefon konferencyjny Cisco IP 7832 i 8832
-
Cisco Video Phone 8875
-
Telefon biurkowy Cisco z serii 9800
W Control Hub można przypisywać wyłącznie urządzenia bazowe DECT (nie słuchawki DECT). Po przypisaniu jednostki bazowej użytkownikowi należy ręcznie sparować słuchawkę DECT z tą jednostką bazową. Aby uzyskać więcej informacji, zobacz Podłączanie słuchawki do stacjibazowej.
| 1 |
Zaloguj się do centrum sterowania. |
| 2 |
Przejdź do . Możesz również dodać urządzenie do użytkownika z sekcji Użytkownicy, przechodząc do > wybierz użytkownika > .
|
| 3 |
Wybierz Użytek osobisty, aby przypisać urządzenie użytkownikowi, a następnie kliknij Dalej. |
| 4 |
Wprowadź nazwę użytkownika lub prawdziwe imię i nazwisko właściciela telefonu, wybierz użytkownika z wyników, a następnie kliknij Dalej. |
| 5 |
Wybierz rodzaj urządzenia, jakie chcesz skonfigurować dla użytkownika:
|
Dodawanie telefonu do nowego obszaru roboczego
Kiedy ludzie są w pracy, zbierają się w miejscach takich jak stołówki, hole i sale konferencyjne. Możesz skonfigurować współdzielone urządzenia Webex w tych obszarach roboczych, dodać usługi, a następnie obserwować, jak przebiega współpraca.
Urządzenie przestrzeni roboczej nie jest przypisane do konkretnego użytkownika, ale do fizycznej lokalizacji, co pozwala na współużytkowanie.
Urządzenia wymienione obsługują usługę Webex Calling. Większość z tych urządzeń można zarejestrować za pomocą adresu MAC, a tylko poniższy ich zbiór można zarejestrować za pomocą kodu aktywacyjnego:
-
Telefony wieloplatformowe Cisco IP Phone z serii 6800 (telefony audio — 6821, 6841, 6851)
-
Telefony cisco IP z serii 7800 telefony wieloplatformowe (telefony audio — 7811, 7821, 7841, 7861)
-
Telefony cisco IP z serii 8800 (telefony audio — 8811, 8841, 8851, 8861)
-
Telefony cisco IP z serii 8800 telefony wieloplatformowe (telefony wideo — 8845, 8865)
-
Telefon konferencyjny Cisco IP 7832 i 8832
-
Telefon biurkowy Cisco z serii 9800
Przed rozpoczęciem
- Do obszaru roboczego z profesjonalną licencją Workspace możesz dodać maksymalnie pięć telefonów stacjonarnych Cisco, telefonów Cisco MPP, urządzeń bezprzewodowych, urządzeń ATA, systemu Phone OS lub urządzeń innych firm.
- Do profesjonalnego obszaru roboczego można dodać wiele urządzeń tylko z poziomu nowej strony obszaru roboczego. Włącz opcję Wypróbuj nowe obszary robocze w prawym górnym rogu strony obszaru roboczego, aby korzystać z nowej strony obszaru roboczego.
- Do obszaru roboczego z licencją obszaru wspólnego można dodać tylko jedno urządzenie.
| 1 |
Zaloguj się do centrum sterowania. |
| 2 |
Przejdź do . Możesz również dodać urządzenie do nowego obszaru roboczego, przechodząc do .
|
| 3 |
Wybierz Współużytkowanie, a następnie kliknij Dalej. |
| 4 |
Wybierz Nowy obszar roboczy, a następnie kliknij Dalej. |
| 5 |
Wprowadź nazwę przestrzeni roboczej (na przykład nazwę fizycznego pomieszczenia), wybierz typ pomieszczenia, dodaj pojemność pomieszczenia i wybierz lokalizację przestrzeni roboczej. Kliknij przycisk Dalej. Nazwa obszaru roboczego nie może być dłuższa niż 128 znaków i nie może zawierać %, #, <, >, /, \, i " znaków. |
| 6 |
Wybierz rodzaj urządzenia, które chcesz skonfigurować dla obszaru roboczego:
|
| 7 |
Kliknij usługę Wywołanie i wybierz typ subskrypcji i licencji, które chcesz przypisać do obszaru roboczego.
Aby dowiedzieć się więcej o funkcjach dostępnych w ramach licencji, zobacz Funkcje dostępne według typu licencji dla Webex Calling. |
| 8 |
Przypisz lokalizację i numer telefonu (określony przez wybraną lokalizację), a następnie kliknij przycisk Zapisz. Istnieje również możliwość przypisania rozszerzenia. Lokalizacja jest aktualizowana podczas nocnej resynchronizacji. Jeśli chcesz dodać więcej urządzeń do profesjonalnego miejsca pracy, możesz to zrobić na jeden z następujących sposobów:
Aby zmodyfikować lub zarządzać urządzeniami przypisanymi do obszaru roboczego, zobacz sekcję Zarządzanie urządzeniem w obszarze roboczym. |
 w kolumnie
 Ponowne przypisanie istniejącego telefonu innemu użytkownikowi lub urządzeniu
Aby ponownie użyć telefonu przypisanego do jednego użytkownika/obszaru roboczego Webex Calling do innego użytkownika/obszaru roboczego Webex Calling, wykonaj następujące kroki:
| 1 |
Zaloguj się do centrum sterowania. |
| 2 |
Idź do User/Workspace gdzie urządzenie jest obecnie przypisane. Możesz ponownie przypisać urządzenie w następujących scenariuszach:
|
| 3 |
W telefonie przejdź do menu ustawień i wykonaj te czynności, aby ponownie przypisać telefon. |
| 4 |
Postępuj zgodnie z instrukcjami w sekcji Dodaj i przypisz telefon do użytkownika lub Dodaj telefon do nowego obszaru roboczego , aby przypisać lub dodać telefon do użytkownika/obszaru roboczego. |
| 5 |
Po dodaniu urządzenia w Control Hub wykonaj następujące czynności na telefonie: |
Dodaj użytkownikowi tablicę, biurko lub urządzenie pokojowe
Przypisanie komuś urządzenia tablicy, biurka lub pokoju jako urządzenia osobistego umożliwia mu odbieranie połączeń i spotkań Webex bezpośrednio na swoim urządzeniu. Aby uzyskać więcej szczegółów, zobacz Przypisywanie użytkownikowi osobistego urządzenia tablicy, biurka lub pokoju.
Dodaj tablicę, biurko lub urządzenie pokojowe do nowego miejsca pracy
Kiedy ludzie są w pracy, spotykają się w wielu miejscach pracy, takich jak sale lunchowe, lobby i sale konferencyjne. Możesz skonfigurować udostępnione urządzenia Cisco Webex w tych obszarach roboczych, dodać usługi, a następnie obserwować współpracę.
Podstawową zasadą działania urządzeń Workspaces jest to, że nie są one przypisane do konkretnego użytkownika, lecz do fizycznej lokalizacji, co pozwala na współużytkowanie.
| 1 |
Zaloguj się do centrum sterowania. |
| 2 |
Przejdź do . Możesz również dodać urządzenie do nowego obszaru roboczego z sekcji Obszary robocze, przechodząc do .
|
| 3 |
Wybierz Udostępnianie i kliknij Dalej. |
| 4 |
Wybierz Nowy obszar roboczy i kliknij Dalej. |
| 5 |
Wprowadź nazwę przestrzeni roboczej (na przykład nazwę fizycznego pomieszczenia), wybierz typ pomieszczenia, dodaj pojemność pomieszczenia i wybierz lokalizację przestrzeni roboczej. Następnie kliknij przycisk Dalej. |
| 6 |
Wybierz urządzenie Cisco Room and Desk. |
| 7 |
Wybierz jedną z następujących usług i kliknij Dalej.
|
| 8 |
Jeśli wybrałeś usługę Cisco Webex Calling, wybierz subskrypcję i typ licencji, które chcesz przypisać do obszaru roboczego.
Aby dowiedzieć się więcej o funkcjach dostępnych w ramach licencji, zobacz Funkcje dostępne według typu licencji dla Webex Calling. |
| 9 |
Przypisz lokalizację, numer telefonu (określony przez wybraną lokalizację), rozszerzenie , a następnie kliknij przycisk Zapisz. |
| 10 |
Aktywuj urządzenie za pomocą podanego kodu. Kod aktywacyjny można skopiować, wysłać pocztą e-mail lub wydrukować. |
Zbiorcze dodawanie i przypisywanie urządzeń
Aby przypisać użytkownikom i obszarom roboczym kilka urządzeń, możesz wypełnić plik CSV wymaganymi informacjami i aktywować te urządzenia, wykonując zaledwie kilka prostych kroków.
- Za pomocą licencji Professional możesz dodać do obszaru roboczego maksymalnie 5 telefonów Cisco Desk Phone, telefonów Cisco MPP, urządzeń ATA lub urządzeń innych firm.
- Do obszaru roboczego z licencją obszaru wspólnego możesz dodać tylko jedno urządzenie.
Wymienione tutaj urządzenia obsługują webex calling. Możesz zarejestrować wszystkie urządzenia za pomocą adresu MAC. Jednak następującą grupę urządzeń zarejestrujesz za pomocą kodu aktywacyjnego:
-
Telefony wieloplatformowe Cisco IP Phone z serii 6800 (telefony audio — 6821, 6841, 6851)
-
Telefony cisco IP z serii 7800 telefony wieloplatformowe (telefony audio — 7811, 7821, 7841, 7861)
-
Telefony cisco IP z serii 8800 (telefony audio — 8811, 8841, 8851, 8861)
-
Telefony cisco IP z serii 8800 telefony wieloplatformowe (telefony wideo — 8845, 8865)
-
Telefon konferencyjny Cisco IP 7832 i 8832
-
Cisco Video Phone 8875
-
Telefon biurkowy Cisco z serii 9800
| 1 |
Zaloguj się do centrum sterowania. | |||||||||||||||||||||||||||||||||||||
| 2 |
Przejdź do . | |||||||||||||||||||||||||||||||||||||
| 3 |
Wybierz jedną z poniższych opcji i kliknij Pobierz.
Aby przygotować plik CSV, możesz skorzystać z poniższej tabeli.
Następujące pola są obowiązkowe podczas przypisywania urządzenia użytkownikom i obszarom roboczym usługi Webex Calling:
Pola numeru telefonu i numeru wewnętrznego nosiły wcześniej nazwy Numer katalogowy i Linia bezpośrednia; te nazwy kolumn będą nadal obsługiwane przez krótki czas. Zalecamy ograniczenie liczby urządzeń do 1000 na plik CSV. Jeśli chcesz dodać więcej niż 1000 urządzeń, użyj drugiego pliku CSV. | |||||||||||||||||||||||||||||||||||||
| 4 |
Wypełnij arkusz kalkulacyjny. | |||||||||||||||||||||||||||||||||||||
| 5 |
Prześlij plik CSV, przeciągając go i upuszczając lub klikając Wybierz plik. | |||||||||||||||||||||||||||||||||||||
| 6 |
Jeśli adres MAC jest pusty, otrzymasz możliwość wyboru miejsca, na które ma zostać wysłany kod aktywacyjny.
Aby aktywować urządzenie, Ty lub użytkownik musicie wprowadzić kod aktywacyjny. | |||||||||||||||||||||||||||||||||||||
| 7 |
Kliknij przycisk Przekaż. Wyświetla zaktualizowany status, gdy urządzenia stają się aktywne.
Urządzenia multiplatformowe muszą mieć zainstalowane oprogramowanie sprzętowe w wersji 11.3.1 SR2 lub nowszej, aby użytkownicy mogli wprowadzić kod aktywacyjny na swoim urządzeniu. Aby uzyskać informacje na temat uaktualniania oprogramowania sprzętowego telefonu, zapoznaj się z tym artykułem. |
Eksportuj listę urządzeń
Jeśli chcesz wyświetlić listę urządzeń przypisanych do użytkowników i obszarów roboczych, możesz wyeksportować plik CSV.
Zaloguj się do Control Hub i przejdź do Urządzenia.
Wybierz kilka urządzeń z listy urządzeń i wybierz opcję Eksportuj. Możesz wybrać pola, które chcesz uwzględnić w pliku CSV i wyeksportować jego zawartość do folderu lokalnego.
Pola wyświetlane w pliku CSV zależą od sposobu połączenia urządzenia z platformą. W związku z tym niektóre pola nie są dostępne w pliku wyjściowym.
Zarządzanie urządzeniem dla użytkownika
Możesz dodać, usunąć, ponownie uruchomić komputer, sprawdzić aktywację lub utworzyć nowy kod aktywacyjny dla urządzeń przypisanych do użytkowników w organizacji. Może to być pomocne w wyświetlaniu urządzeń i zarządzaniu nimi na ekranie użytkowników, w razie potrzeby.
| 1 |
Zaloguj się do centrum sterowania. |
| 2 |
Przejdź do . |
| 3 |
Wybierz użytkownika i kliknij Urządzenia. |
| 4 |
Aby dodać urządzenie do tego użytkownika, kliknij przycisk Dodaj urządzenie. Jeżeli użytkownikowi przypisano już urządzenie i chcesz dodać kolejne urządzenie, kliknij . Aby uzyskać więcej informacji na temat dodawania urządzenia do użytkownika, zobacz sekcję Dodawanie telefonów do użytkownika. |
| 5 |
Aby zmodyfikować istniejące urządzenie, wybierz jego nazwę. Zostaniesz przeniesiony na stronę Urządzenia. Tutaj możesz wyświetlić i edytować ustawienia urządzenia, usunąć urządzenie, ponownie uruchomić urządzenie lub utworzyć nowy kod aktywacyjny dla urządzenia, jeśli dotyczy. Aby uzyskać więcej informacji o konfigurowaniu ustawień telefonu, zobacz Konfigurowanie i aktualizowanie ustawieńtelefonu. |
| 6 |
Jeśli urządzenie dodane do użytkownika to Webex Aware, opcja Webex Aware jest wyświetlana pod urządzeniami, jak pokazano na diagramie. Webex Aware wskazuje, że urządzenie zostało włączone do platformy Webex i ma dostęp do funkcji Webex obsługiwanych przez telefon.
|
| 7 |
Kliknij Czynności , aby zarządzać urządzeniem. Funkcja Akcje umożliwia wprowadzenie zmian w konfiguracji, ponowne uruchomienie urządzenia, zgłoszenie problemu i zebranie dzienników urządzenia lub usunięcie urządzenia. Karta Akcje zawiera następujące opcje dla urządzenia obsługującego Webex Aware:
|
Zarządzanie urządzeniem dla obszaru roboczego
Możesz dodawać i zarządzać urządzeniami bezpośrednio z profilu obszaru roboczego. Urządzenia obszaru roboczego mogą zawierać urządzenia usługi ATA, takie jak faksy. Możesz także skonfigurować urządzenie obszaru roboczego jako hosta hotelowego. Więcej informacji na temat hotelowania znajdziesz w Hotelowanie w Control Hub.
| 1 |
Zaloguj się do centrum sterowania. |
| 2 |
Przejdź do . |
| 3 |
Wybierz obszar roboczy, który chcesz zmodyfikować. |
| 4 |
Aby dodać urządzenie, kliknij Dodaj urządzenie w kafelku Urządzenia. Aby uzyskać więcej informacji na temat dodawania urządzeń do obszaru roboczego, zobacz sekcję Dodawanie telefonu do nowego obszaru roboczego. |
| 5 |
Aby zmodyfikować istniejące urządzenie, wybierz jego nazwę. Zostaniesz przeniesiony na stronę Urządzenia. Tutaj możesz przeglądać i edytować ustawienia urządzenia, usuwać urządzenie, ponownie uruchamiać urządzenie i umożliwiać korzystanie z urządzenia jako hosta hotelowego. Aby uzyskać więcej informacji o konfigurowaniu ustawień telefonu, zobacz Konfigurowanie i aktualizowanie ustawieńtelefonu. |
| 6 |
Jeśli urządzenie dodane do obszaru roboczego to Webex Aware, opcja Webex Aware jest wyświetlana pod urządzeniami, jak pokazano na diagramie. Webex Aware wskazuje, że urządzenie zostało włączone do platformy Webex i ma dostęp do funkcji Webex obsługiwanych przez telefon.
|
| 7 |
Kliknij Czynności , aby zarządzać urządzeniem. Akcje pomagają zastosować zmiany konfiguracji lub zaktualizować oprogramowanie układowe dla urządzeń MPP. Karta Akcje zawiera następujące opcje dla urządzenia obsługującego Webex Aware:
|
Konfiguruj linie — dodawaj i zmieniaj kolejność linii
Funkcja Konfiguruj linie, umożliwiająca przypisywanie do telefonów linii podstawowych, współdzielonych i wirtualnych, umożliwia wielokrotne wyświetlanie linii współdzielonej na tym samym urządzeniu. Proces konfiguracji portów dla urządzeń ATA nie uległ zmianie.
Oto aktualizacje funkcji Konfiguruj linie dla urządzeń MPP i PhoneOS:
-
Linie podstawowe
-
Przypisz właściciela urządzenia i upewnij się, że znajduje się on w pierwszym wierszu listy na urządzeniu.
-
Aby dodać dodatkowe wystąpienia, zwiększ liczbę wystąpień w tym wierszu.
-
-
Linie współdzielone / Linie wirtualne
-
Przypisz współdzielone linie od dowolnego użytkownika lub obszaru roboczego z włączoną funkcją połączeń w organizacji za pomocą dostępnych wyglądów współdzielonych połączeń (SCA).
-
Zwiększ liczbę występów w rzędzie linii współdzielonych, aby dodać dodatkowe występy.
Limity SCA dostępne dla użytkownika lub obszaru roboczego mogą ograniczać liczbę przypisywanych wyglądów.
-
Przypisz indeks linii do każdej linii współdzielonej. Możesz zmienić kolejność współdzielonych linii poprzez przeciąganie i upuszczanie.
Nie można oddzielać poszczególnych wystąpień linii.
-
Użyj opcji użytkownika umożliwiający ustalenie położenia indeksów linii współdzielonych na urządzeniu.
-
-
Wyglądy
-
Konfiguruj wiele wyglądów tej samej linii podstawowej, współdzielonej lub wirtualnej jako osobne zestawy linii ważonych.
-
Linie ważone mają sufiks -1, -2 itd. (tylko telefony Cisco).
-
Połączenia są sygnalizowane pierwszym dostępnym sygnałem linii ważonej.
-
-
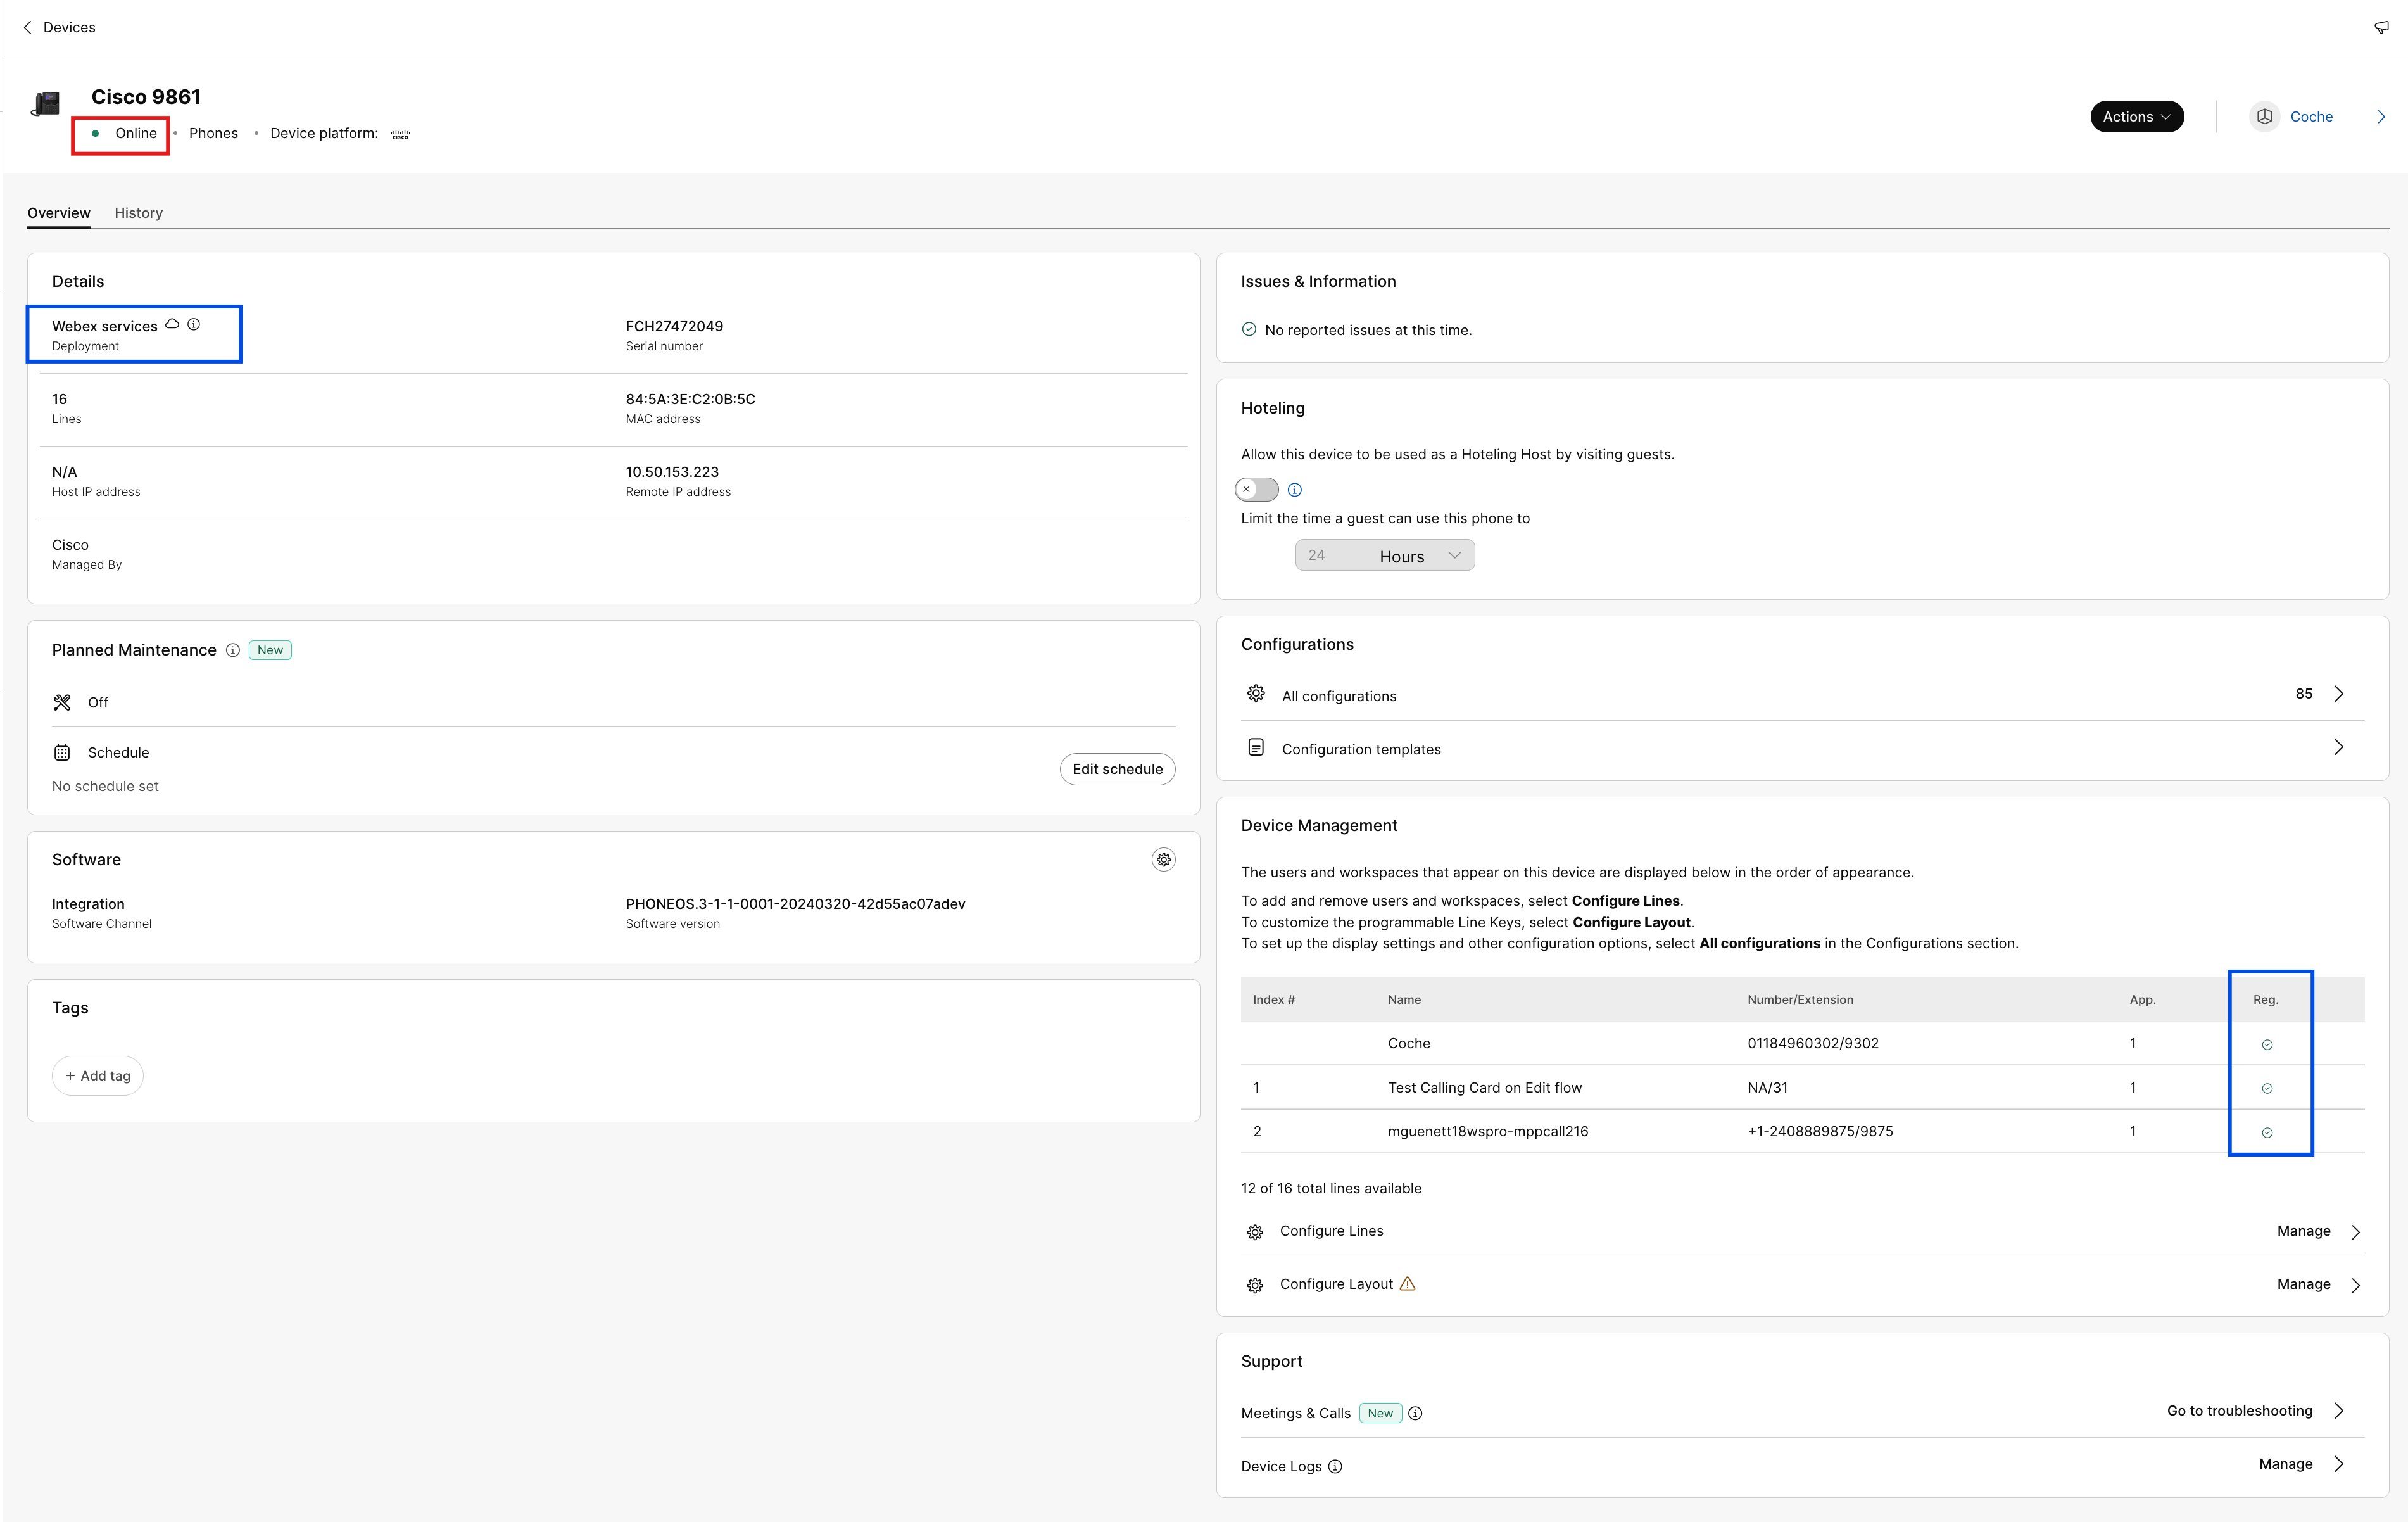
Nowe informacje podsumowujące (na dole strony)
-
Unikalne linie rejestracyjne SIP – pokazuje liczbę unikalnych kont rejestracyjnych SIP, które telefon może obsługiwać. Maksymalna liczba obsługiwanych kont wynosi obecnie 16.
-
Łączna liczba wystąpień linii – pokazuje całkowitą liczbę przypisywalnych wystąpień linii obsługiwanych przez urządzenie. Jeżeli model telefonu obsługuje KEM-y, maksymalna liczba wystąpień uwzględnia rozszerzoną pojemność.
-
-
Masowe przypisywanie linii i publiczne interfejsy API
- Metody Bulk CSV i Public API służące do przypisywania linii obejmują funkcjonalność „Wygląd”.
Aby uzyskać więcej informacji na temat współdzielonej linii w różnych lokalizacjach, zobacz Konfiguracja współdzielonych linii i linii wirtualnych w różnych lokalizacjach.
Po dodaniu do telefonu szybkiego wybierania poprzez długie naciśnięcie klawisza żądanej linii, szybkie wybieranie nie będzie widoczne w Control Hub. Szybkie wybieranie można zastąpić, konfigurując linię współdzieloną pod tym klawiszem linii.
| 1 |
Zaloguj się do centrum sterowania. |
| 2 |
Przejdź do Użytkownicy lub Obszary robocze (w zależności od tego, gdzie przypisane jest urządzenie, które chcesz zmodyfikować). |
| 3 |
Wybierz użytkownika lub obszar roboczy. |
| 4 |
Przejdź do Urządzenia i kliknij urządzenie, dla którego chcesz dodać lub zmodyfikować linie współdzielone. Zostaniesz przeniesiony na stronę Urządzenia. |
| 5 |
W obszarze Zarządzanie urządzeniamikliknij opcję Konfiguruj linie. |
| 6 |
Aby dodać wygląd linii wspólnej, kliknij ikonę Można przypisać tę samą linię wspólną lub linię wirtualną do wielu pojedynczych klawiszy linii w telefonie. W kolumnie Wyświetlenia odpowiedniego wiersza kliknij ikonę
Możesz dodać wiersze w kolejności, w jakiej mają się pojawiać. Aby zmienić kolejność wyglądu wiersza, usuń i dodaj do listy w kolejności, w jakiej mają być wyświetlane. Jeżeli użytkownik posiada numery z innych źródeł users/groups skonfigurowanych na ich urządzeniach, możesz dodać etykietę linii dla linii współdzielonej. Etykieta linii pomaga odróżnić poszczególne linie wspólne od siebie. Aby usunąć linię, kliknij ikonę |
| 7 |
Kliknij opcję Zapisz. W przypadku dużych organizacji administrator musi wybrać lokalizację przed skonfigurowaniem dodatkowych linii telefonicznych. Kliknij ikonę W przypadku zwykłej organizacji filtr lokalizacji nie jest dostępny i administrator może wybrać linię. |
 , wyszukaj według nazwy lub numeru telefonu i wybierz linię.
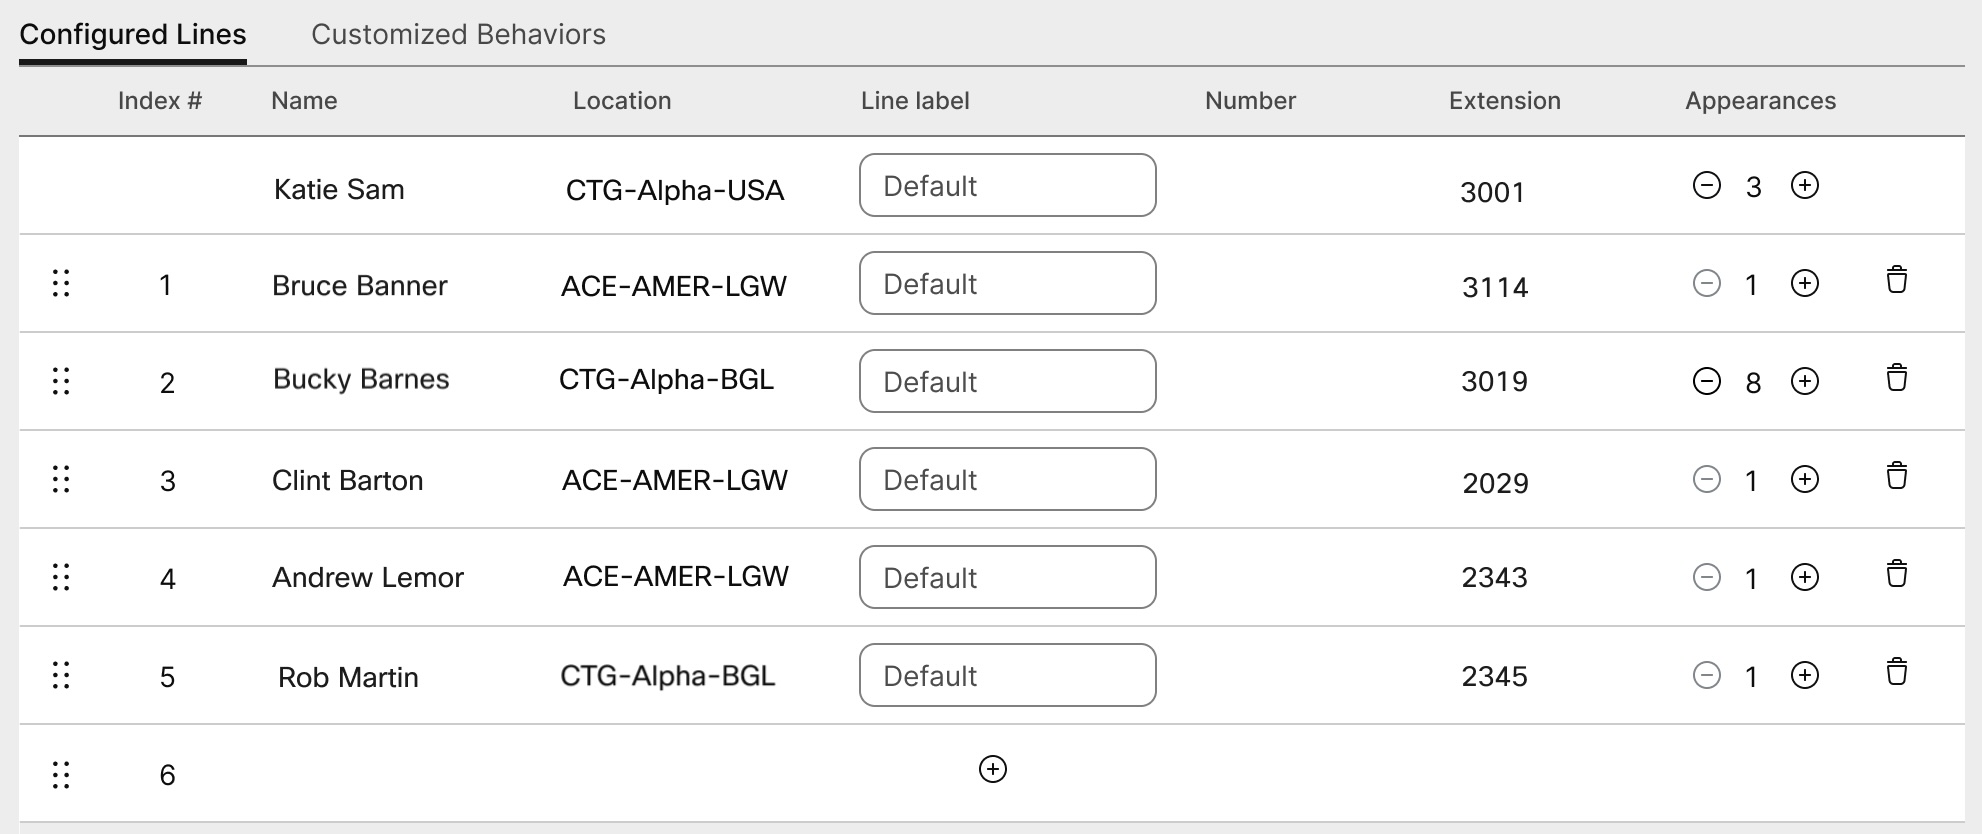
 . Nie można usunąć głównego użytkownika online 1.
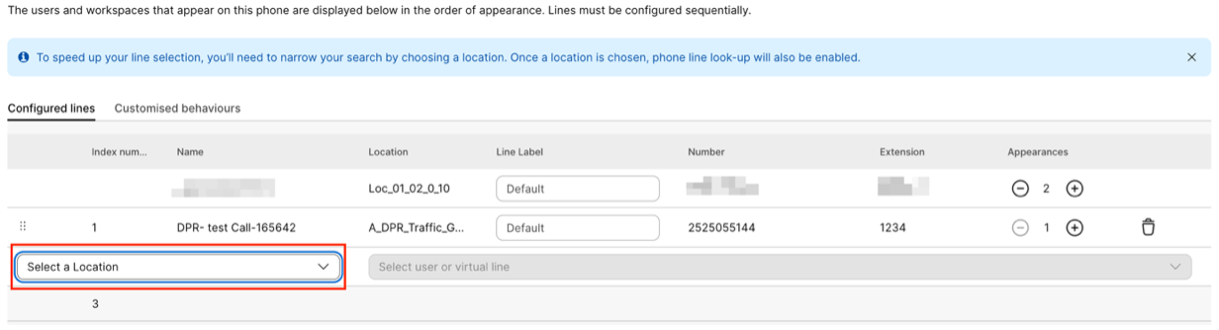
Konfigurowanie urządzenia usługi ATA dla użytkownika
Można skonfigurować porty na urządzeniu ATA (Analog Telephone Adapter) przypisanym użytkownikowi w Control Hub. Obecnie dostępne są dwie konfiguracje urządzeń ATA: dla urządzeń z dwoma portami i urządzeń z 24 portami.
| 1 |
Zaloguj się do centrum sterowania. |
| 2 |
Przejdź do . |
| 3 |
Wybierz użytkownika, którego chcesz zmodyfikować i przewiń do Urządzenia. |
| 4 |
Wybierz urządzenie, do którego chcesz coś dodać lub zmodyfikować. |
| 5 |
W obszarze Użytkownicy na tym urządzeniukliknij pozycję Konfiguruj porty. |
| 6 |
Aby dodać konfigurację portu udostępnionego, kliknij ikonę |
| 7 |
Wprowadź nazwę lub numer telefonu i wybierz jedną z wyświetlonych opcji, a następnie kliknij przycisk Zapisz. W odnośniku pojawiają się tylko obszary robocze bez urządzeń. |
| 8 |
Jeśli urządzenie wymaga kompresji faksu T.38, zaznacz pole wyboru w kolumnie T.38 lub zastąp opcje kompresji na poziomie użytkownika, a następnie kliknij Zapisz. Obszar roboczy może mieć ata. Jest to przydatne w przypadku faksów. |
 .
.Dodawanie numerów do lokalizacji
Numery telefonów możesz dodać do urządzeń biurkowych i pokojowych w organizacji klientów w dowolnym momencie, niezależnie od tego, czy jesteś w trakcie okresu próbnego, czy też zostałeś przekonwertowany na płatną subskrypcję.
Zwiększyliśmy liczbę numerów telefonów, które można dodać w Control Hub, z 250 do 1000.
| 1 |
Zaloguj się do centrum sterowania. |
| 2 |
Przejdź do , a następnie kliknij Dodaj liczby. |
| 3 |
Określ typ lokalizacji i numeru. Jeśli przenosisz numery, wprowadź zarówno bieżący, jak i nowy numer rozliczeniowy. |
| 4 |
Podaj lokalizację, stan, kod kierunkowy, prefiks (opcjonalnie), a następnie kliknij Szukaj. Wyświetlane są dostępne numery. |
| 5 |
Wybierz liczby, które chcesz dodać do lokalizacji. Wybrane liczby zostaną przeniesione do pola Wybrane liczby. |
| 6 |
Kliknij opcję Zapisz. |
Sprawdzanie stanu uporządkowanych numerów PSTN
Możesz wyświetlić listę numerów PSTN zamówionych przez Twoją organizację. Dzięki tym informacjom możesz zobaczyć, które numery są dostępne i niewykorzystane, a także numery zamówione, które wkrótce będą dostępne.
| 1 |
Zaloguj się do centrum sterowania. |
| 2 |
Przejdź do . |
Akcesoria podłączone do telefonu wieloplatformowego (MPP) — zestawy słuchawkowe i kluczowe moduły rozszerzeń (KEM)
Po podłączeniu akcesoriów (Headsets/KEMs) do urządzenia MPP, pojawiają się jako element inwentarza na karcie Urządzenia w Centrum sterowania. Z inwentarza urządzeń Control Hub można dowiedzieć się, jaki jest model akcesorium, jego stan i do kogo należy akcesorium. Po wybraniu akcesorium można uzyskać dodatkowe informacje, takie jak numer seryjny akcesorium i bieżąca wersja oprogramowania. Pole stanu akcesorium jest zgłaszane jako "online", o ile akcesorium jest podłączone do MPP. Zestaw słuchawkowy podłączony do MPP automatycznie uaktualni swoje oprogramowanie do najnowszej wersji dostępnej w Zarządzaniu urządzeniami.
|
Model telefonu |
Zestaw słuchawkowy Cisco z serii 520 |
Zestaw słuchawkowy Cisco z serii 530 |
Zestaw słuchawkowy Cisco z serii 560 |
Zestaw słuchawkowy Cisco z serii 730 |
|---|---|---|---|---|
|
Telefon IP Cisco 8811/8841/8845 |
— |
— |
RJ9 i RJ11 |
— |
|
Telefon IP Cisco 8851/8861/8865 |
USB |
USB |
USB RJ9 i RJ11 |
— |
|
Telefon IP Cisco 7811/7821/7841/7861 |
— |
— |
— |
— |
|
Telefon IP Cisco 6821/6841/6851/6861 |
— |
— |
— |
— |
|
Telefon IP Cisco 6871 |
USB |
USB |
USB |
— |
|
Telefon konferencyjny Cisco IP 7832/8832 |
— |
— |
— |
— |
|
Model telefonu |
KEM |
|---|---|
|
Telefon IP Cisco 8811/8841/8845 |
— |
|
Telefon IP Cisco 8851/8861/8865 |
BEKEM CP-8800-A-KEM CP-8800-V-KEM |
|
Telefon IP Cisco 7811/7821/7841/7861 |
— |
|
Telefon IP Cisco 6821/6841/6861/6871 |
— |
|
Telefon IP Cisco 6851 |
CP-68KEM-3PCC |
|
Telefon konferencyjny Cisco IP 7832/8832 |
— |
Aby rozwiązać problemy z key expansion module (kluczowym modułem rozszerzeń) na telefonach zarejestrowanych w Webex Calling, zobacz Rozwiązywanie problemów z kluczowymi modułami rozszerzeń w Webex Calling , aby uzyskać szczegółowe informacje.


